PrestaShop
Introduction
Using the Prestashop plugin, you will be able to integrate our e-commerce payment gateway without requiring software development or source code. This involves importing a .zip file (plugin) into the WordPress admin panel and configuring it with the credentials provided.
Technical Requirements
PHP Requirements
- Minimum version [7.1.*], Recommended 7.1.15
- Memory Limit: 1024M
- Extensions to be enabled: curl, gd, mcrypt, openssl, PDO/MySQL,
- SimpleXML, xsl, zip, DOM
Apache Requirements
- Apache version (minimum) [2.4.*], Recommended 2.4.46
Prestashop Requirements
- The Fiserv Gateway plugin is compatible with versions 1.7.6.x-1.7.7.x
Installation Guide:
-
Download the Plugin here.
-
Select the Module Manager option from the Prestashop Modules menu

-
Select “Upload a module”

-
Find the previously downloaded Prestashop plugin file.

-
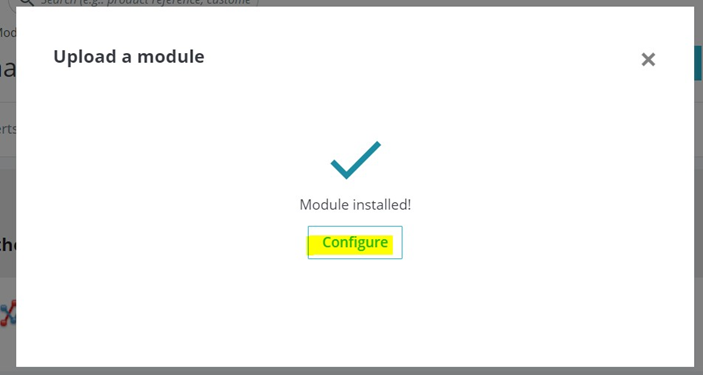
Once the plugin is loaded, the following screen will be displayed:
-
The module will appear in the Module Manager option

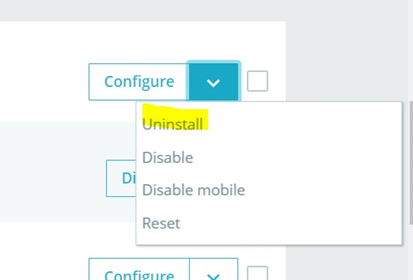
If necessary, you can uninstall the Fiserv plugin through the following steps:
-
Select Uninstall within the configuration options
-
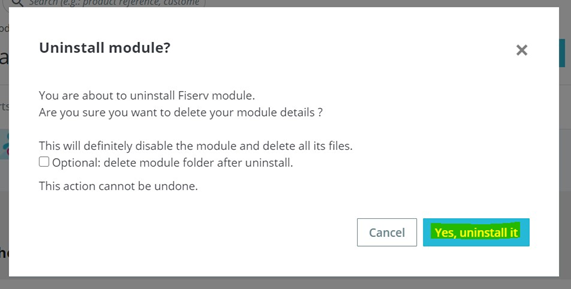
Confirm uninstallation by clicking on “Yes, unistall it”
Configuration
To configure the plugin it is necessary to have Affiliation, Store ID and SharedSecret provided by Fiserv. Clicking on the Configure button will display the following options:

Complete the information according to the following parameters:
Country/País: Select the country where your merchant operates.
Reseller/Alianza: Select the corresponding reseller (information provided by Fiserv).
Display Logo/Mostrar Logo: If you want to display the dealer logo on the checkout page, select the "Show Logo" checkbox. By enabling the reseller logo, it will be displayed on the payment page as shown below.
Display Card Logo/Mostrar: Card logo. Displays the franchises accepted by Fiserv (VISA, MasterCard, American Express)
Description: Text that the cardholder sees when viewing the payment option; for example, “Card payment”.
Environment/Entorno: Allows you to select whether transactions will travel to a Test or Production environment. Consider that Store ID and SharedSecret are different in each environment.
Store Name/Nombre de la Tienda: Also known as Store ID, it is an identifier for your merchant on our platform.
Shared Secret: Key assigned to your merchant (password) within our gateway. Please note that Store ID and SharedSecret are different in each environment.

URL Configuration
The plugin contains prebuilt URLs to process the transaction completely. If you require a custom interface, you must develop these URLs on your own If you want to use the default URLs leave the default option.
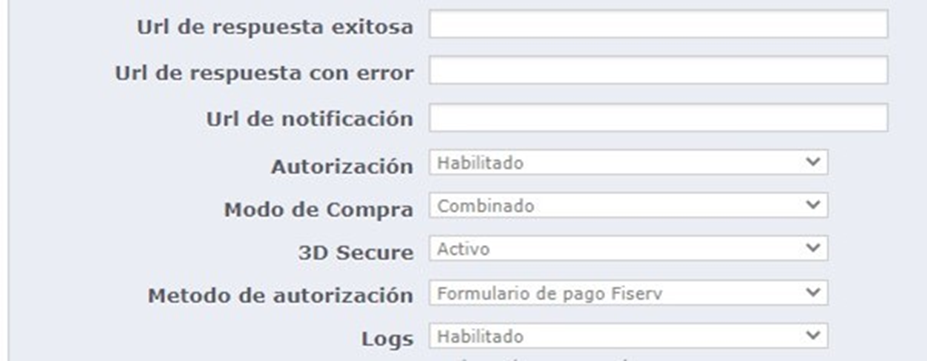
Successful Response URL: URL to which the cardholder will be redirected in case of successful transaction.
Failed Response URL: URL to which the cardholder will be redirected in case of failed transaction.
The Successful Response and Failed Response URLs must be defined with a response page of their own.

Notification URL: URL that will receive and process notification of transactions.
Authorization: If the “Capture Fee Immediately” checkbox is selected, it will generate Sales transactions. These transactions involve charging the cardholder's available balance at the time of purchase.
On the contrary, if this checkbox is not selected, all entered transactions will be Pre-authorizations.
Warning
Please review the Definition of Transaction Types section to understand the Sale, Pre-authorization, and Complete Authorization transaction types.
Checkout Type: Select Combined page (consolidates payment method options and payment method into a single page).
3D Secure: Enabling "Activated" means enabling the 3DS protocol in Full Payment Authentication mode. To ensure the proper functioning of the payment ecosystem, Mastercard requires the implementation of 3D Secure as a mandatory requirement, promoting consumer authentication with the card issuer before requesting authorization. Under this mode, the issuer assumes responsibility for a chargeback due to unauthorized purchase, offering payment guarantee.
Consider the following...
The mere use of the service implies acceptance of the terms of use. The Service may have additional costs. Please consult with your FISERV account executive to avoid fines from the card brands.
Debug Log/Registro de Errores: Enable as it will contain logs referring to rejected transactions/operating errors.
Authorization Method: The drop-down menu will show 2 options, please select “Hosted Payment”.
Fiserv Payment Form: (“Hosted Payment”). Redirect to our secure site to enter sensitive cardholder information.

Own Form / Merchant Interface: It allows you to stay on your site and process the transaction without redirecting to our secure site.
Concealed Authorization
The merchant is responsible in the event of using Hidden Authorization (payment form) to comply with the Payment Card Industry Data Security Standard (PCI-DSS). Only if your merchant is PCI-DSS compliant can you enable this option; otherwise, it may be subject to fines from card brands.
Plan Setup (Interest-Free Months)
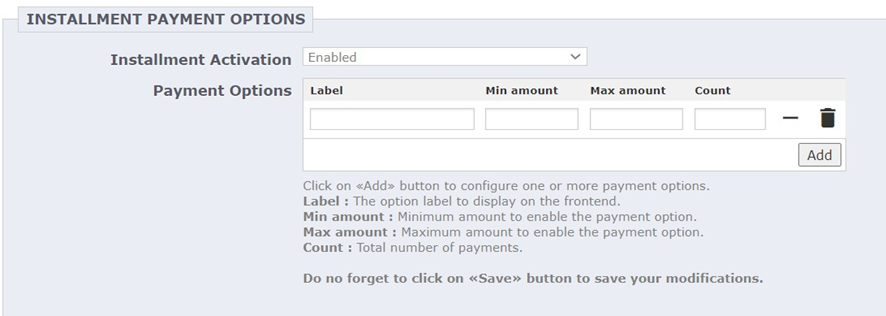
If the merchant was affiliated with the Interest-Free Months scheme, the plans to be displayed on the payment page must be defined. These plans are defined by specifying a label, a minimum amount, a maximum amount, and the number of installments. Below is an example of standard configuration for a merchant.
It is important to set the “Period” parameter always with an empty value and never check the “Interest” checkbox.
Label: The description of the label will be displayed in the interface e.g.: Plan NOW 3
Floor Amount: Minimum amount to enable payment option e.g.: 1000
Maximum amount: Maximum amount to enable the payment option e.g.: 100000
Calculation: Total number of Payments, i.e.: 13
Delay: Delay (in days) between payments (always place 0)
Installment with Interest: Always place NO.
Local Payment Methods
It is possible to choose various local payment methods from the Payment Method dropdown menu.
Importante
In Argentina (ARG) and Uruguay (ROU), this option must be set to NO since the plugin does not have local payment methods available.
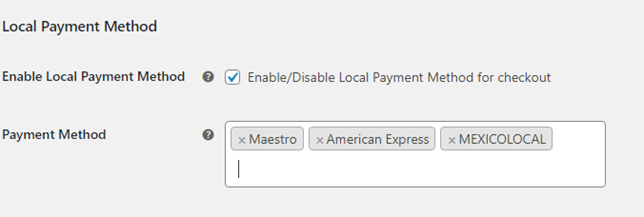
When enabling the local payment method, the payment screen will provide the option for the user to choose the local payment method during the payment process.

The Fiserv Payment Gateway option should be available on the payment page. Make sure your website complies with PCI.

Updated 4 months ago