
General Information
General Information
Soft Descriptor
The soft descriptor is an additional text that will be presented alongside the name of the establishment in the credit card invoice.
This text can be defined in Carat Portal merchant configuration or in a payment/pre-authorization request.
| Format and Size |
|---|
| < AN 25 |
In Carat Portal, the soft descriptor format accepts up to 30 alphanumeric characters, but it can be truncated according to acquirer specified size.
The soft descriptor is an optional data.
Attention: We suggest that merchant always confirm the size, format and presentation conditions of soft descriptor with acquirer
SiTef Rountings
Each SiTef that accepts soft descriptor has a specific format. The soft descriptor oversize received by Carat Portal will be removed.
| Routing | Format and Size |
|---|---|
| Cielo | < AN 13 |
| Stone | < AN 25 |
| Getnet | < AN 22 |
| Banrisul | < AN 22 |
| Cabal | < AN 22 |
| Rede | < AN 22 |
| BIN | < AN 25 |
| SiPAG | < AN 25 |
Non SiTef Rountings
Cielo e-Commerce
Only for Visa and Mastercard cards. The size limit is 13 alphanumeric characters.
e-Rede
The maximum size is 13 alphanumeric characters.
Need to activate "invoice identification" at the e-Rede registration.
e.Rede REST
The maximum size is 13 alphanumeric characters, to be registered in Carat Portal backoffice or to be sent in transaction request.
The invoice will show 8 static characters that represent the merchant name, plus an asterik *, plus the dynamic part of 13 characters mentioned above.
Exemple: mercName*DynamicPart01
Need to activate "invoice identification" at the e.Rede REST registration.
Stone WS
If the transaction use Visa, the limit is 25 characters.
If the transaction use Mastercard, the limit is 22 characters.
If the transaction use installment with Visa, so the first 8 characters for installment information, resting 17 characters.
GetNet WS
If the merchant does not send or register the soft descriptor in Carat Portal, Getnet will use the fantasy name of the Commercial Establishment registration.
This field is composed as following:
- Facilitator ID, with 3, 7 or 12 characters
- Separation character
*(asterisk) - Submerchant ID
The maximum size is 20 characters.
PayPal
For PayPal, the presented format will be as shown above:
<PP *> or <PAYPAL *><Merchant descriptor as set in the PayPal Payment Receiving Preferences><1 space><soft descriptor>
- Character length and limitations:
- Alphanumeric characters
- dash
- - asterisk
* - period
. - space
- The maximum length of the soft descriptor is 22 characters.
For example:
- The PayPal prefix toggle is set to
PAYPAL *in PayPal’s administration tools. - The merchant descriptor set in the Payment Receiving Preferences is set to
EBAY. - The soft descriptor is passed in Carat Portal as
JanesFlowerGifts LLC. - The resulting descriptor string on the credit card invoice is
PAYPAL *EBAY JanesFlow
SafraPay
For SafraPay, the soft descriptor field allows a maximum length of 22 characters, where larger strings sent in this field will be truncated at this limit.
- The following characters are allowed:
- alphanumeric in uppercase and unaccented;
- % $ , . / & ( ) + = = < > - *
- Valid field example:
LOS*POLLOS*HERMANOS*2 - Invalid field examples:
los*pollos*hermanos(lowercase characters)MOE'S_BAR(use of special characters'and_)
Soft descriptor field can be sent in the following transactions:
- Credit with late confirmation
- Credit with automatic confirmation
- Transaction refund
- Transaction undo
GlobalPaymentsWS
For Global Payments, the soft descriptor field allows a maximum length of 13 characters. This text will be printed alongside the merchant's identification, following the lengths of each brand:
- Visa: 25 characters
- Mastercard: 22 characters
[Merchant Name] + [Asterisk] + [Soft Descriptor] = [22 or 25] characters
In case the sum of these fields exceed the character limit, the soft descriptor text will be truncated from right to left. White spaces are counted as 1 character.
Only simple characters are allowed.
Signature Authentication
In order to guarantee convenience and security to its customers, Carat Portal offers, in addition to the authenticity POST to the merchant's registered URL ([learn more](recarga-rest-begin.md#parameters-sent-by-Carat Portal-on-https-post)), the option of signing messages, in which content and sender are guaranteed integrity and authenticity, respectively. Thus, the store receives the information of the created transaction directly in response to its REST call and no longer through the authenticity POST.
What you'll need
- Active registration on Carat Portal's homologation environment (obtained with our support team);
- The creation of a public key and the management of its respective private key;
- Public key registration on Carat Portal (done through our support team).
Creating private and public keys
Examples of how to create the private and public keys:
- On Linux (using the terminal):
# creating private key
ssh-keygen -t rsa -b 4096 -m PEM -f jwtRS256.key
 creating a public key using the created private key
openssl rsa -in jwtRS256.key -pubout -outform PEM -out jwtRS256.key.pub
- On Windows:
Use ssh-keygen at the command prompt
# creating private key
ssh-keygen -t rsa -b 4096 -m PEM -f jwtRS256.key
Use a version of openssl for windows, run as administrator and run the following command:
# creating a public key using the created private key
openssl rsa -in jwtRS256.key -pubout -outform PEM -out jwtRS256.key.pub
Important:
The
jwtRS256.key.pubfile is the only one you'll send to our support team. Always keep safe your private key and your password - if you've assigned one.
Signature algorithm
The algorithm supported by the application is RS256 along with the JWT (RFC 7519) standard.
When using this standard, a signature consists of three parts: header, data (payload) and signature verification. Base64 encoding is applied to each of these parts.
First part (header)
The header must contain the following fixed content:
{
  "alg": "RS256",
  "typ": "JWT"
}
Base64 header:
eyJhbGciOiJIUzI1NiIsInR5cCI6IkpXVCJ9
Second part (payload)
The payload segment varies according to the operation to be signed. e.g.:
{
  "merchant_id": "XXXXX",
  "merchant_key": "XXXXXXXXXXXXXXX",
  "order_id": "182367r12831t29b",
  "merchant_usn": "92837429837",
  "timestamp": "1605034925174"
}
Base64 payload:
eyJtZXJjaGFudF9pZCI6IlhYWFhYIiwibWVyY2hhbnRfa2V5IjoiWFhYWFhYWFhYWFhYWFhYIiwib3JkZXJfaWQiOiIxODIzNjdyMTI4MzF0MjliIiwibWVyY2hhbnRfdXNuIjoiOTI4Mzc0Mjk4MzciLCJ0aW1lc3RhbXAiOiIxNjA1MDM0OTI1MTc0In0
Payload composition
Depending on the service called, the payload fields will be different. Below are described the required fields for each service.
Merchant creation and listing services
| Parameter | Description | Format | Mandatory |
|---|---|---|---|
merchant_id | Merchant code on Carat Portal. | = 15 AN | YES |
merchant_key | Merchant authentication key on Carat Portal. | < 80 AN | YES |
timestamp | Represents the moment the signature is generated in milliseconds. The timestamp field has a validity limit of 10 minutes. | < 13 N | YES |
{
  "merchant_id": "XXXXX",
  "merchant_key": "XXXXXXXXXXXXXXX",
  "timestamp": "1605034925174"
}
Merchant editing and query services
| Parameter | Description | Format | Mandatory |
|---|---|---|---|
merchant_id | Merchant code on Carat Portal. The production and certification codes will be different. | = 15 AN | YES |
merchant_key | Merchant authentication key on Carat Portal. The production and certification keys will be different. | < 80 AN | YES |
timestamp | Represents the moment the signature is generated in milliseconds. The timestamp field has a validity limit of 10 minutes. | < 13 N | YES |
registered_merchant_id | Merchant code created or to be created on Carat Portal. The production and certification codes will be different. | = 15 AN | YES |
{
  "merchant_id": "XXXXX",
  "merchant_key": "XXXXXXXXXXXXXXX",
  "registered_merchant_id": "YYYYYYY",
  "timestamp": "1605034925174"
}
Transaction creation services
| Parameter | Description | Format | Mandatory |
|---|---|---|---|
merchant_id | Merchant code on Carat Portal. The production and certification codes will be different. | = 15 AN | YES |
merchant_key | Merchant authentication key on Carat Portal. The production and certification keys will be different. | < 80 AN | YES |
order_id | Order code defined by the merchant. | < 40 AN | Conditional |
merchant_usn | Unique sequential number for each order, created by the merchant. | < 12 N | Conditional |
timestamp | Represents the moment the signature is generated in milliseconds. The timestamp field has a validity limit of 10 minutes. | < 13 N | YES |
Important:
The
order_idandmerchant_usnfields are not mandatory for some transaction creation services and, therefore, they must follow the same rule, being informed with the same values contained in the request body.
Example:
{
  "merchant_id": "XXXXX",
  "merchant_key": "XXXXXXXXXXXXXXX",
  "order_id": "182367r12831t29b",
  "merchant_usn": "92837429837",
  "timestamp": "1605034925174"
}
Other services
| Parameter | Description | Format | Mandatory |
|---|---|---|---|
nit | Transaction identifier on Carat Portal. | = 64 AN | YES |
merchant_id | Merchant code on Carat Portal. The production and certification codes will be different. | = 15 AN | YES |
merchant_key | Merchant authentication key on Carat Portal. The production and certification keys will be different. | < 80 AN | YES |
timestamp | Represents the moment the signature is generated in milliseconds. The timestamp field has a validity limit of 10 minutes. | < 13 N | YES |
Example:
{
  "nit": "asdfghjk12345678asdfghjk12345678asdfghjk12345678asdfghjk12345678",
  "merchant_id": "XXXXX",
  "merchant_key": "XXXXXXXXXXXXXXX",
  "timestamp": "1605034925174"
}
Third part (verification)
The third and final part is the result of the encryption of the two previous parts separately coded in Base64 and concatenated by a period (".").
Two previous parts coded separately in Base64 and concatenated by a period ("."), where the first segment of the text - before the period - corresponds to the header and the second corresponds to the payload:
eyJhbGciOiJSUzI1NiIsInR5cCI6IkpXVCJ9.eyJtZXJjaGFudF9pZCI6IlhYWFhYIiwibWVyY2hhbnRfa2V5IjoiWFhYWFhYWFhYWFhYWFhYIiwib3JkZXJfaWQiOiIxODIzNjdyMTI4MzF0MjliIiwibWVyY2hhbnRfdXNuIjoiOTI4Mzc0Mjk4MzciLCJ0aW1lc3RhbXAiOiIxNjA1MDM0OTI1MTc0In0
Finally, this content must be RSA encrypted using the merchant's private key. Example:
LLQ2kaC3dG0tsu78JyEIbvd8c1G05lo-1qLDBb0lBXsS2lrJ98-rcusEhuodhHDBE701a_RZwCfOH9ebPZXYdEtuLldqp_Q47y_AYOBYuz3eexuVC0sH3MvmljjHEiMYEIKtFyhsSFrBuQBFvBOT4tJCA779j_cP-JnW4MeDazDehsydEa6phsmkGg_0YfN2xdRzaaTrQqldYibUeI7_YEwLTYrZg0Ys7r45quT7veAzNFLEL4I3iJmMJUcBaCfIQl6NKvX7meoSBeFBaj_MRw8WwXnNTjCFXjU6w_iUiYPg0VVAAKGaEYKP7sHUcw1hn-BawMDMorLcvT9YwP4OxQ
Final signature
The final signature is the concatenation of the 3 parts separated by ("."):
eyJhbGciOiJIUzI1NiIsInR5cCI6IkpXVCJ9.eyJtZXJjaGFudF9pZCI6IkxPSkFURVNURSIsIm1lcmNoYW50X2tleSI6IkYxOURFMDAxNzdDMzAxREYyNEE4NjVGMTFBQTlCMjU2N0Y2MDQ4OTFGMEY0NEREQUVGRDY5RTMzOTlFMEI3RTEiLCJvcmRlcl9pZCI6IjE4MjM2N3IxMjgzMXQyOWIiLCJtZXJjaGFudF91c24iOiI5MjgzNzQyOTgzNyIsInRpbWVzdGFtcCI6IjE2MDUwMzQ5MjUxNzQifQ.tCRZhbix7x2X_Iz7FBgQOBa18hutPqm3t3mJAnW3_2o
These three parts of the signature, represented by the previous example, must be sent in the Authorization header with value Bearer <signature>. Thus, Carat Portal will be able to validate the signature using the merchant's public key.
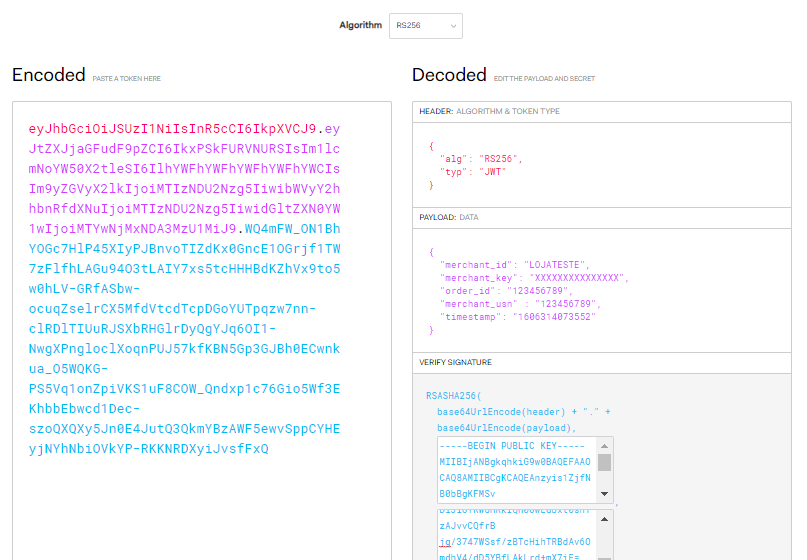
Using JWT site for testing
You can use the JWT website to create a valid signature for testing. For that, it is necessary to select the RS256 algorithm and pass the respective payload and a public and private key.
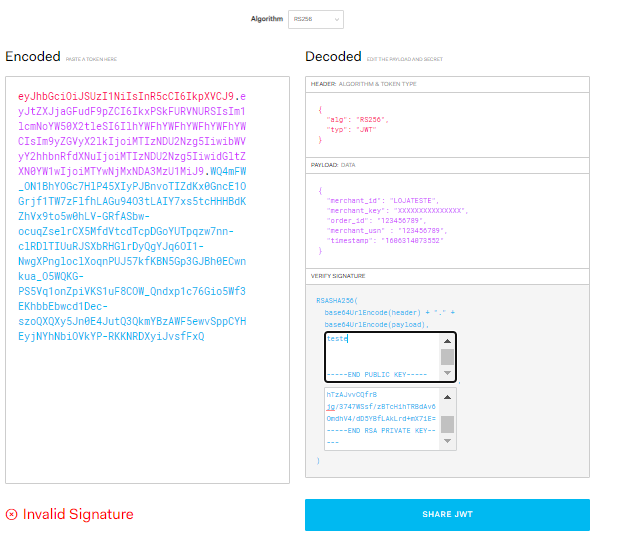
If the public key is not valid, the message "Invalid Signature" will be displayed.
Digital Certificates
Introduction
The purpose of this document is to guide the customer who will integrate their product with Carat Portal
on the use of Digital Certificates.
The purpose of this is to present in a simplified way small guidelines on the use of these
to ensure the communication security between Carat Portal and the customer's product.
In case it is necessary to go deeper into the subjects presented, we suggest
consult other literature and sources available on-line.
Digital Certificate
The Digital Certificate or Public Key Certificate ('certificate' hereinafter) is a digital document that has the purpose of certifying the identity of a person, or entity in digital communication. A form of secure digital communication widely used on-line is HTTPS, which is an abbreviation for HTTP over SSL / TLS.
The certificate is usually requested by the person or entity and issued by a CA (Certification Authority, or Certification Authority, in English) such as Verisign, CertSign, etc. A valid certificate is one that, among other requirements, is within its expiration date and signed by a trusted CA.
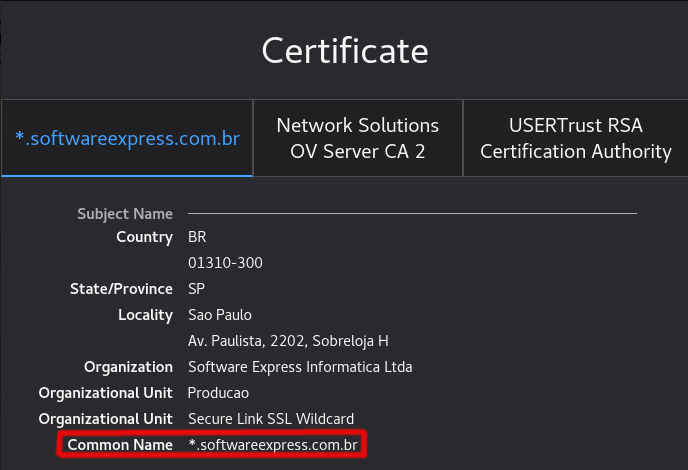
As an example, when we use a browser (Firefox, Chrome, etc.) to access a website that offers security in communication using HTTPS, in general the certificate used by the website server is presented, usually symbolized by a padlock that is located near the URL. By clicking on this lock icon, it is possible to detail the characteristics of this certificate.
The main characteristic of a certificate is the name to which it is issued, that is, what is the name identified in the certificate. In the image below we can see the information, where the certificate is issued by CA “Network Solutions DV Server” and issued to the name esitef.softwareexpress.com.br
Self-signed Certificates
For testing environments, there are cases where obtaining a valid certificate is not feasible, therefore a self-signed signed certificate is sometimes used.
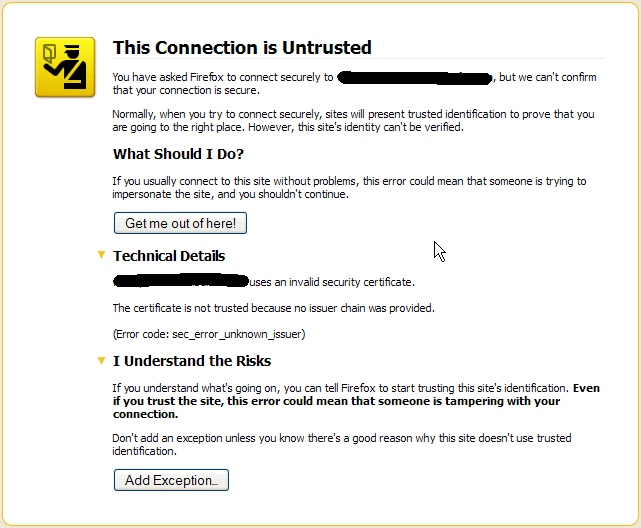
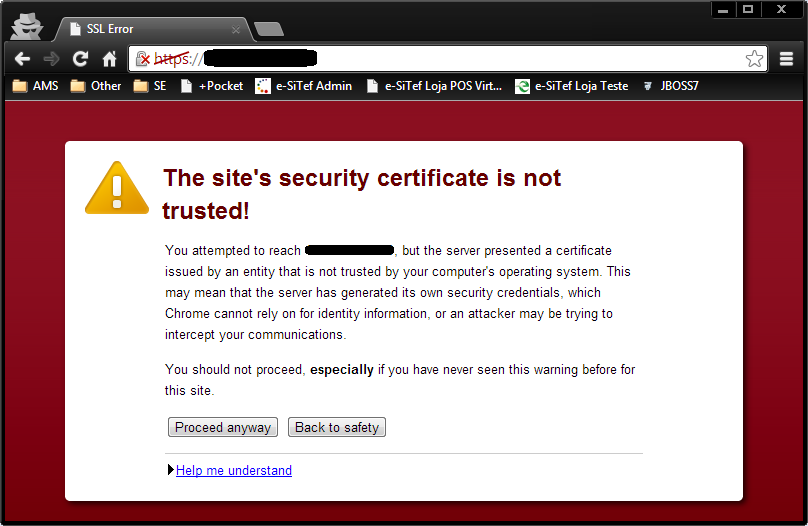
A self-signed certificate is generated and signed by the person/entity itself and is not accepted as reliable for secure communication. As an example, when accessing a website via a browser via HTTPS, where the server uses a self-signed certificate, a warning similar to the images below is displayed in the browser:
Firefox
Chrome
Internet Explorer
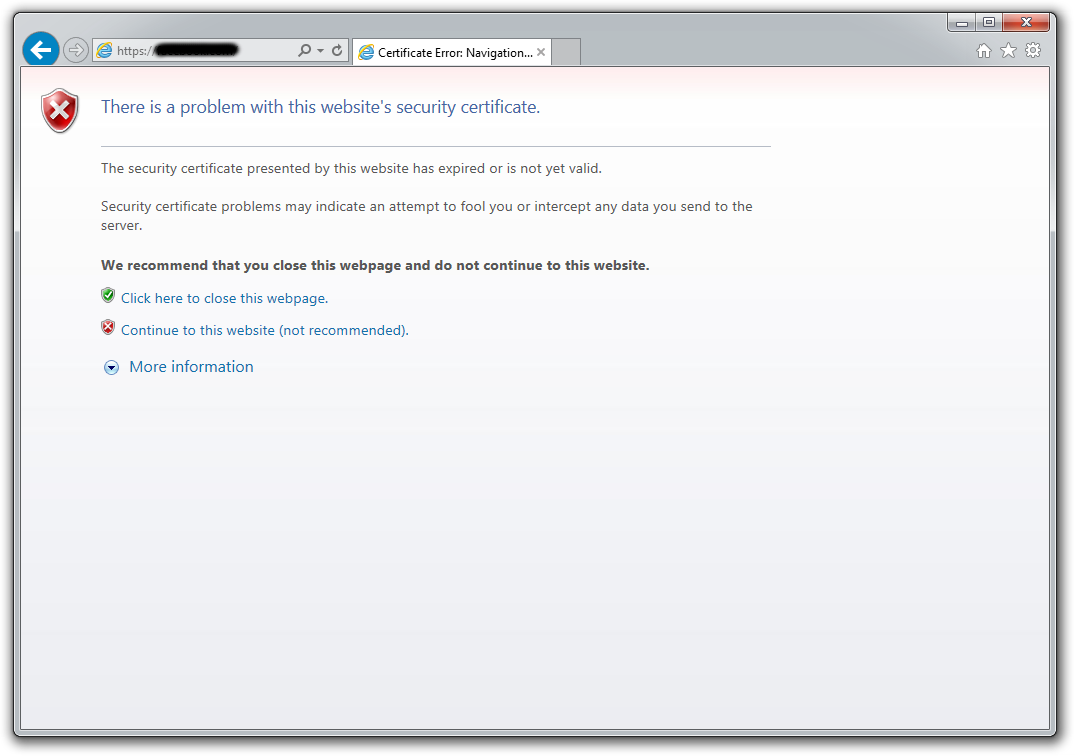
When browsing through these sites that use self-signed certificates, we have the option of trusting the site and accessing them, even knowing that the certificate presented on them is not trusted, taking the risk of accessing and sending information to a site that does not have the certificate trusted or even with a certificate that doesn't have the identity of who he claims to be. This can also be applied to communication between servers.
Client Servers Carat Portal Communication
Carat Portal often communicates with customer servers via HTTPS POST’s, to validate the authenticity of the request, such as in recharge transactions and payment reversals. For this communication, it is necessary that the client's server presents valid certificates to guarantee the security of the transmitted information. In Carat Portal production environment, in general all customers already have a ready infrastructure, with servers and their respective valid certificates signed by well-established CA's.
However, in the testing stage, many systems are still using temporary certificates, and often self-signed ones. In this case, we use an approach similar to that mentioned previously, making exceptions for Carat Portal to trust a server that presents a self-signed certificate. This is accomplished by importing it into a trusted certificates list. Thus we can facilitate the approval process for customer systems.
As the technology used in Carat Portal follows the RFC-2818 HTTPS communication specification, this approach has some restrictions:
- The certificate must be valid, that is, at least it must have its expiration date appropriate for the use period;
- The identification of the client's server must be compatible with the name shown on the certificate. Therefore, the following situations will result in communication failure:
- A certificate issued to
www.dominio.comwill not be compatible for a server identified asdominio.comortests.dominio.comas different identifications are considered; - A server with a single IP but with multiple domains and respectively multiple certificates can be identified in different and unexpected ways;
- The specification does not allow certificates issued for the IP address of a server unless Subject Alternative Names from IP’s or domains are added to the certificate.
- A certificate issued to
Therefore, certificates that are in other conditions than the specified will not be accepted in HTTPS communication even if they are imported into the trusted certificates list in Carat Portal. This requirement in the Carat Portal approval environment ends up preparing the customer in order to guarantee the use of a certificate correctly issued by a CA for the system in the production environment.
Self-signed Certificate Creation
There are several ways to generate self-signed certificates. Here we will present one of them, using the openssl tool, which can be found in Apache web server packages. All references and commands presented below are based on Apache HTTP 2.2 and openssl 0.9.8 versions in Windows environment. If it is the customer's preference, a similar procedure can be performed in a Linux environment, with the appropriate tools and adaptations.
As enviroment setup, we suggest the following:
- create a separate folder named
openssl(or whichever suits better); - copy the following three files available at
%APACHE_HOME%/bin:libeay32.dll,ssleay.dllezlib1.dll; - paste those three files at
Windows\System32; - copy the file
openssl.exeavailable at%APACHE_HOME%/binand paste it at the recently createdopenssldirectory; - copy the file
openssl.cnfavailable at%APACHE_HOME%/confand paste it at the recently createdopenssldirectory;
Openssl Setup: openssl.cnf
openssl.cnfThe openssl.cnf file contains the settings for generating certificates. Initially, create a copy of this with another name, something like openssl_edit.cnf or a name that suits better.
We suggest editing the following fields in the openssl_editado.cnf file to facilitate its future use:
-
uncomment (remove the
#char) at the beginning of the following line:`req_extensions` = v3_req # The extensions to add to a certificate request -
below, add or change default values for the following fields:
countryName_default= BR (or another country)stateOrProvinceName_default= <state/prvince name>localityName_default= <city name>0.organizationName_default= <company name>organizationalUnitName_default= <sector name, team>commonName_default= <common name to be registered>emailAddress_default= <e-mail>
-
after the following passage:
[ v3_req ]basicConstraints = CA:FALSE -
add
subjectAltName=@alt_names[alt_names] -
then, just below add alternative names to the
commonName, in the form of DNS or IP as in the examples below, according to the server's identification needs:DNS.1 = www.dominio.com DNS.2 = *.dominio.com ... IP.1 = 192.168.4.34 IP.2 = 200.122.10.66 ...
This concludes the customization of the openssl setup file.
Openssl Commands for Certificate Creation
Let's assume we're trying to create a certificate named dominio.
-
create a 2048-bit RSA private key by running the following command at the openssl directory:
openssl genrsa -out dominio.pem 2048 -
execute the following command to request certificate creation:
openssl req -config openssl_editado.cnf -extensions v3_req -new -out dominio.cer -keyout dominio.pem -
Then run the command below to create the private key that is not password protected (the associated password with the private key will be removed). That way, the key will be readable only by the Apache server and the administrator:
openssl rsa –in dominio.pem –out dominio.key
After this command execution, the private key password will be asked.
It is highly recommended the removal of .rnd file, as it contains sensitive information regarding the creation of the key. Removing it avoids cryptographic attacks against the private key.
-
Finally, execute the command below to create the signed certificate that will last for one year:
openssl x509 -in dominio.cer -out dominio.cer -req -signkey dominio.key -days 365 -extensions v3_req extfile openssl_editado.cnf
The dominio.cer and dominio.key files will be used on the server.
Install of Self-signed Certificate Generated by Apache
Here we will present an example of installing the certificate on the Apache 2.2 HTTP server.
-
in the Apache folder, access
conffolder and openhttpd-ssl.confconfiguration file and edit the following itens:ServerName <name/domain or server IP>Ex:
www.dominio.com.bror IP200.###.###.###SSLCertificateFile <path+certificate name> Ex: `%APACHE_HOME%/conf/dominio.cer`SSLCertificateKeyFile <path+certificate key file name>Ex:
%APACHE_HOME%/conf/dominio.key -
Restart Apache.
Generated Certificate Verify
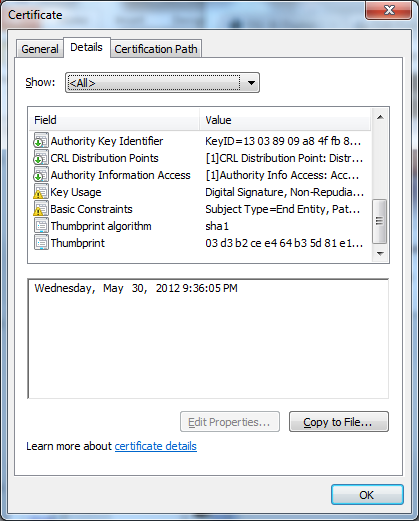
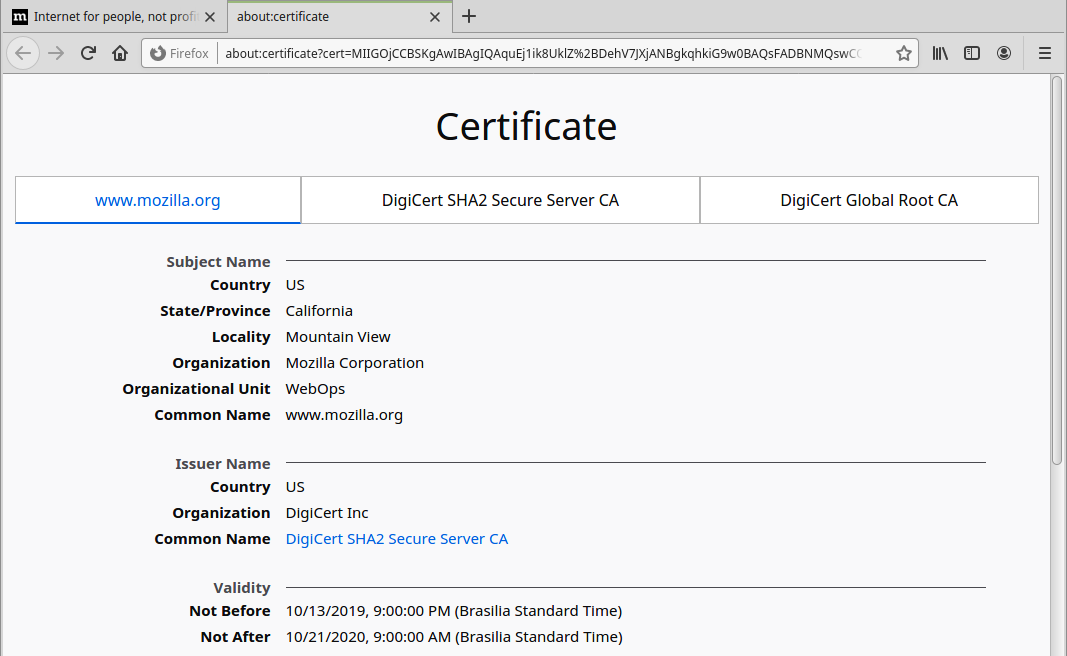
In order to verify that the certificate was generated and installed correctly, open a browser of your choice and enter the URL which Apache responds to, and click the lock icon to open the certificate. The figures below illustrate the certificate visualization in different environments:
Certificate Details at Windows Enviroment
Certificate Details at Firefox
Updated 2 months ago