PSP Fiserv
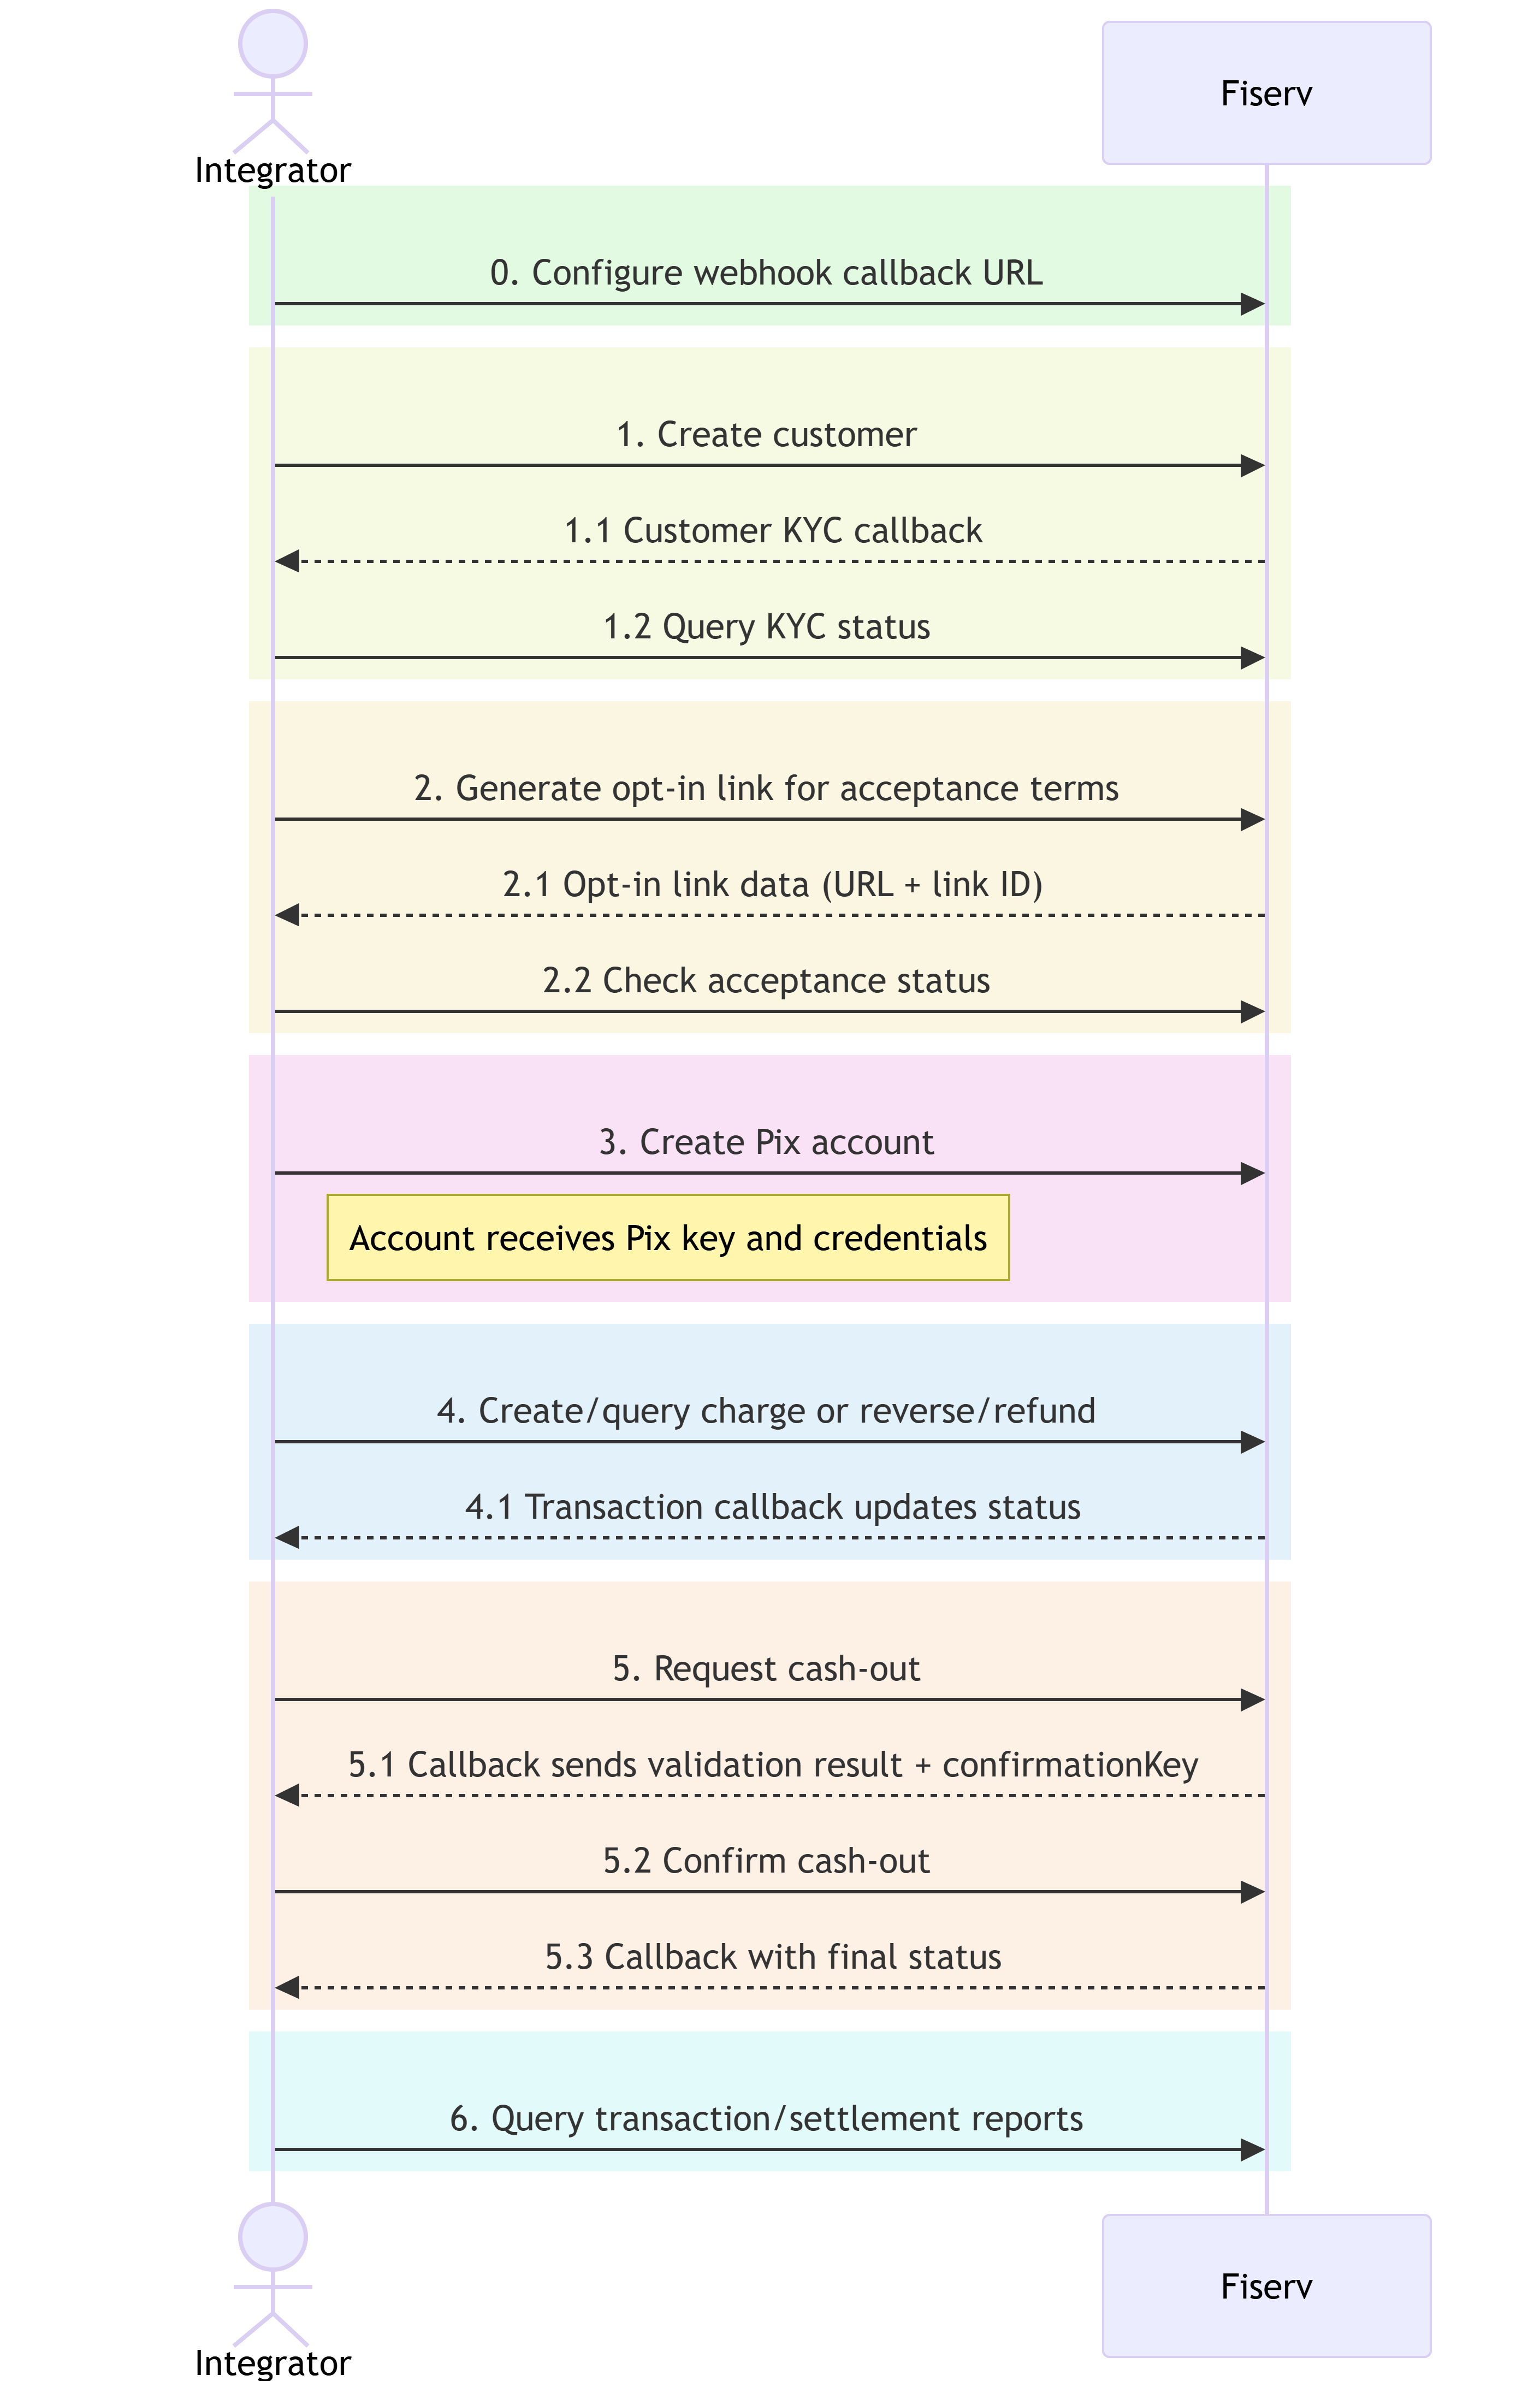
This guide walks through every action you must take — in the exact order — to complete a Direct PSP Fiserv integration.
This guide covers the PSP Fiserv Direct path only. If you chose Pix Hub, refer to that path's Pix Hub Integration Guide.
Prerequisites
Before you start, confirm you have received the following integrator-level credentials from the Fiserv team:
| Credential | Description |
|---|---|
client_id | Your integrator client ID |
client_secret | Your integrator client secret |
apikey | Your API key, required on every request |
secret | HMAC signing key |
These are YOUR integrator credentials. They authenticate YOU with Fiserv and are reused across all Pix accounts you create. Different account-specific credentials will be generated in Step 3.
Keep these in a secrets vault. You will also need to send the CNPJ(s) to be approved to the Fiserv team before testing KYC in the certification environment.
API Base URLs
| Environment | Base URL |
|---|---|
| Production | https://connect.latam.fiservapis.com |
| Certification | https://connect-cert.latam.fiservapis.com |
Every request requires security headers (
apikey,x-timestamp,x-request-id,x-hmac-signature) in addition to theAuthorizationbearer token. See Authentication for the full specification and a ready-to-use Postman script.
Step 1 — Authenticate
Exchange your credentials for a Bearer token:
POST /gateway/token
Tokens expire after the time indicated in the response (expires_in, in seconds). Re-authenticate before each new session or whenever the token is about to expire.
See Authentication for full details.
Step 2 — Register Your Webhooks
Pix Hub requires two separate webhooks, both needing Fiserv team approval before they receive notifications. Register both before making any other call.
2.1 — Transaction Webhook
Handles KYC conclusions and all transactional events (charges, refunds, reversals):
This can only be configured via the support portal.
2.2 — Boarding Webhook
Handles async store provisioning results from the Pix Hub:
PUT /onboard/api/v4/webhook
{
  "url": "https://example.your-application-url.here/service-to-receive-callback",
  "authType": "OAUTH2",
  "authSettings": {
    "authUrl": "https://example.com/auth",
    "clientId": "*****",
    "clientSecret": "*****",
    "grantType": "client_credentials"
  }
}
Request Fields
| Name | Mandatory | Type | Description |
|---|---|---|---|
| url | yes | String | URL to receive notifications |
| authType | yes | String | Authentication type. Allowed: OAuth2, HMAC2, NONE |
| authSettings | no | Object | Authentication Settings |
| authSettings.authUrl | no | String | Authentication URL. Mandatory if authType is OAUTH2 |
| authSettings.clientId | no | String | Client id. Mandatory if authType is OAUTH2 |
| authSettings.clientSecret | no | String | Client Secret. Mandatory if authType is OAUTH2 |
| authSettings.grantType | no | String | Grant type. Mandatory if authType is OAUTH2 |
| authSettings.apiKey | no | String | Api Key. Mandatory if authType is HMAC |
| authSettings.apiSecret | no | String | Api Secret. Mandatory if authType is HMAC |
Important: Both URLs must be submitted to your Fiserv contact for whitelisting. Changes to existing URLs also require prior alignment with the team.
Events delivered to each webhook:
| Event | Webhook | Type |
|---|---|---|
| KYC Conclusion | Transaction | Callback (pushed) |
| Transaction Status | Transaction | Callback (pushed) |
| Boarding Protocol | Boarding | Callback (pushed) |
| Terms Acceptance | (none) | Poll only — never pushed |
Always implement a fallback query strategy for pushed events in case webhook delivery fails.
See Webhook Callbacks for boarding callback schemas
Step 3 — Create Customer and Await KYC Approval
KYC validation is asynchronous. You must wait for approval before proceeding to account creation.
3.1 — Create Customer
Submit the customer's company registration data:
POST /gateway/v1/client
Save the clientId returned in the response — it is required in Step 4.
3.2 — Await KYC Callback
After registration, Fiserv runs KYC asynchronously. Your webhook will receive a notification when processing is complete.
3.3 — Confirm KYC Status
Query the customer to confirm the result before proceeding:
GET /gateway/v1/client/{clientId}
| kycStatus | Next action |
|---|---|
| APPROVED | Proceed to Step 4 |
| PENDING / PROCESSING | Wait and poll again |
| REFUSED | Do not proceed; review with Fiserv |
| ERROR | Retry or contact support |
| NOT_FOUND | Wait and poll again. If the status persists, retry or contact support |
See Customer for request/response schemas and KYC status details.
Step 4 — Acceptance Terms (Opt-in)
Terms acceptance is required before account creation and ensures the customer acknowledges and agrees with the Pix service terms.
4.1 — Generate Opt-in Link
Create the opt-in link that the customer must access to accept terms:
POST /gateway/v3/clients/opt-in
Request the opt-in link providing the customer's contact information and Pix fees. The response returns:
url: The link the customer must access to accept termsid: The unique link identifier for tracking
4.2 — Check Acceptance Status
Verify if the customer has completed the terms acceptance:
GET /gateway/v3/clients/link/{link_id}
| status | Meaning | Next action |
|---|---|---|
CREATED | Link generated but not accessed yet | Send link to customer, then poll |
INITIATED | Customer accessed the link | Wait for form submission |
FINISHED | Customer completed acceptance and submitted the form | Proceed to Step 5 |
Poll this endpoint periodically until the status reaches FINISHED before creating the Pix account.
See Onboarding for full request/response schemas.
Step 5 — Create Pix Account
Create a Pix account for the approved customer with completed terms acceptance:
POST /gateway/v1/client/{clientId}/apm/pix/account
The response returns three account-specific credentials (different from your integrator credentials)
These credentials are returned only once and are unique to this account. Store them in a secure vault and rotate them periodically. If you create multiple Pix accounts, each will have its own set of these three credentials. You reuse your integrator credentials (from Prerequisites) across all accounts.
See Account for settlement configuration, fee setup, and account query endpoints.
Step 6 — Process Transactions
5.1 — Create a Charge
Generate a Pix charge for the account:
POST /gateway/v1/apm/pix/charge
Save the txid from the response to track the transaction.
5.2 — Await Transaction Callback
Your webhook receives a notification for each status change (Pending → Confirmed or Canceled). If the callback does not arrive within your expected window, query the status directly:
GET /gateway/v1/apm/pix/charge/{txid}
5.3 — Reverse or Refund (optional)
To cancel a pending charge:
PATCH /gateway/v1/apm/pix/charge/cancel/{txid}
To refund a confirmed charge:
PUT /gateway/v1/apm/pix/{endToEndId}/reverse/{txid}
A webhook callback is sent after either operation.
See Transaction for full schemas and static QR code creation.
Step 7 — Cash-out
Cash-out is a two-stage operation, both involving asynchronous webhook callbacks.
6.1 — Request Cash-out
Initiate a withdrawal from the account:
POST /gateway/v2/apm/pix/cashout
6.2 — Await Validation Callback (Stage 1)
Fiserv validates the request asynchronously and sends a callback to your webhook containing a confirmationKey.
Save
confirmationKey— it is required to confirm the cash-out in the next step. If the callback does not arrive, query the status directly withGET /gateway/v2/apm/pix/cashout/{txid}.
6.3 — Confirm Cash-out
Submit the confirmation using the key received in step 6.2:
POST /gateway/v2/apm/pix/cashout/confirm
6.4 — Await Final Callback (Stage 2)
A second webhook notification is sent with the final result (confirmed, failed, or expired). If the final status is not confirmed, check failReason for the cause.
See Cashout for status enumerations and fail-reason codes.
Step 8 — Reconcile via Reports
Query transaction and settlement data for reconciliation:
GET /gateway/v1/apm/pix/report/transactions
GET /gateway/v1/apm/pix/report/settlement
Reports only include transactions processed through PSP Fiserv.
See Report for filtering options and response schemas.
Step 9 — Create Static QR Code (optional)
Generate a reusable static Pix QR Code that can be paid multiple times with no expiration:
POST /gateway/v2/apm/pix/static-qrcode
Unlike immediate charges, a static QR Code persists indefinitely and accepts multiple payments. Retrieve details or cancel with:
GET /gateway/v2/apm/pix/static-qrcode/{txid}
PATCH /gateway/v2/apm/pix/static-qrcode/cancel/{txid}
List all payments associated with a static QR Code:
GET /gateway/v2/apm/pix/static-qrcode/payments/{txid}
See Transaction for static QR code schemas and payment listing.
Step 10 — Create Charge with Due Date (optional)
Generate a Pix charge with a due date that supports financial adjustments (interest, penalties, discounts, reductions):
POST /gateway/v2/apm/pix/charge/due-date
Retrieve charge details or list all due-date charges:
GET /gateway/v2/apm/pix/charge/due-date/{txid}
GET /gateway/v2/apm/pix/charge/due-date/list
This charge type supports:
- Interest: Applied after due date (fixed amount or percentage)
- Penalties: Fines for late payment
- Discounts: Reductions before or up to specified dates
- Reductions/Deductions: Additional adjustments
The QR Code remains active for the validity period after the due date, allowing continued payment with applicable financial adjustments.
See Transaction for due-date charge schemas, interest/penalty/discount modalities, and response examples.
Quick Reference
| # | Action | Endpoint | Async? |
|---|---|---|---|
| 1 | Authenticate | POST /gateway/token | No |
| 2.1 | Register transaction webhook | Support portal configuration | No |
| 2.2 | Register boarding webhook | PUT /gateway/onboard/api/v4/webhook | No |
| 3 | Create customer | POST /gateway/v1/client | No |
| 3.1 | Await KYC callback | (webhook) | Yes |
| 3.2 | Confirm KYC approval | GET /gateway/v1/client/{clientId} | No |
| 4 | Generate opt-in link for acceptance | POST /gateway/v3/clients/opt-in | No |
| 4.1 | Check acceptance status | GET /gateway/v3/clients/link/{link_id} | No |
| 5 | Create Pix account | POST /gateway/v1/client/{clientId}/apm/pix/account | No |
| 6 | Create charge | POST /gateway/v1/apm/pix/charge | No |
| 6.1 | Await transaction callback | (webhook) | Yes |
| 6.2 | Reverse or refund (optional) | DELETE or PUT on charge endpoints | No |
| 7 | Request cash-out | POST /gateway/v2/apm/pix/cashout | No |
| 7.1 | Await validation callback + save key | (webhook) | Yes |
| 7.2 | Confirm cash-out | POST /gateway/v2/apm/pix/cashout/confirm | No |
| 7.3 | Await final callback | (webhook) | Yes |
| 8 | Query reports | GET /gateway/v1/apm/pix/report/transactions | No |
| 9 | Create static QR code (optional) | POST /gateway/v2/apm/pix/static-qrcode | No |
| 10 | Create charge with due date (optional) | POST /gateway/v2/apm/pix/charge/due-date | No |
Updated 7 days ago