
Merchant Web Page
Merchant Web Page
Overview
The Carat Portal's Store Portal is a management tool for registered stores for a user.
Through it, it is possible to have control over store parameters, as well as obtain information through reports. It is also possible to be allowed to cancel transactions, depending on the profile configured for the store's user.
All calls made will be answered synchronously, except for the status notification that will be carried out by Payment Online asynchronously.
And to learn more about these nomenclatures (Bin, Software Express, Carat, e-Sitef) Learn more
Configuration for Digital Wallets
This page will present the possible configurations for digital wallets supported by Carat Portal (E.g.: Google Pay, Masterpass, Visa Checkout).
The examples below use Google Pay, however the settings can be applied to any other wallet.
When configuring a digital wallet on Carat Portal, it is necessary to select the routing/acquirer that will be responsible for processing the transactions of the chosen wallet, as in the example below:
For more information on Authorizing/Routing configuration, access the page Authorizer Configuration on the Merchant's Portal.

In this configuration, any transaction performed by Google Pay, regardless of the card's flag, will be routed/captured by the acquirer Cielo.
If necessary, it is possible to configure the routing/acquirer that will process the transaction according to the flag of the selected card within the digital wallet:
For more information on Authorizing/Routing configuration, access the page Authorizer Configuration on the Merchant's Portal.

In this configuration, transactions performed by Google Pay with flag Mastercard will be processed by the acquirer Rede (formerly Redecard).
The remaining flags (Visa, Maestro, etc.) will be processed by the default acquirer configured for Google Pay, which in this example will be Cielo.
This configuration can be applied as many flags as needed.
Recurrence Schedules
Carat Portal allows the scheduling of recurring payments (mainly used for subscription to services such as magazines, gyms, etc.), that is, automatic monthly payments.
In the Store's Portal it is possible to register schedulings, view a report of registered schedulings, as well as change their data.
The Schedules Report allows the visualization of all appointments registered in its stores in a certain period of time. Several filters are applicable in the listing of schedulings, in addition to the functionality of editing schedulings also available to the store.
To access this report, place your mouse cursor over the link Reports from the main menu, and a sub-menu will be displayed;. Then click on Schedules Report as shown below:
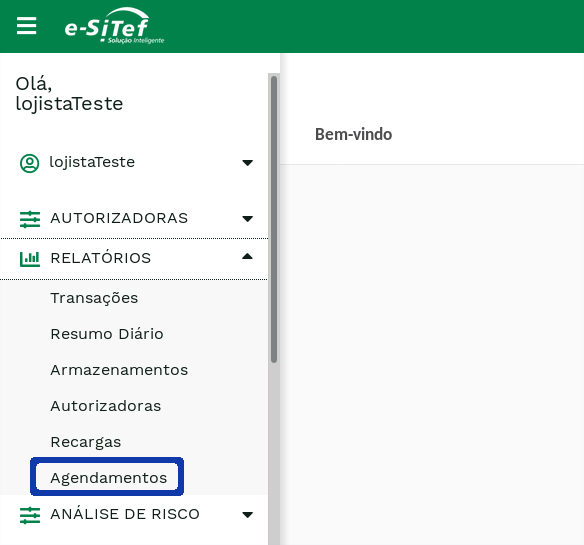
So a screen similar to the one below will be displayed:
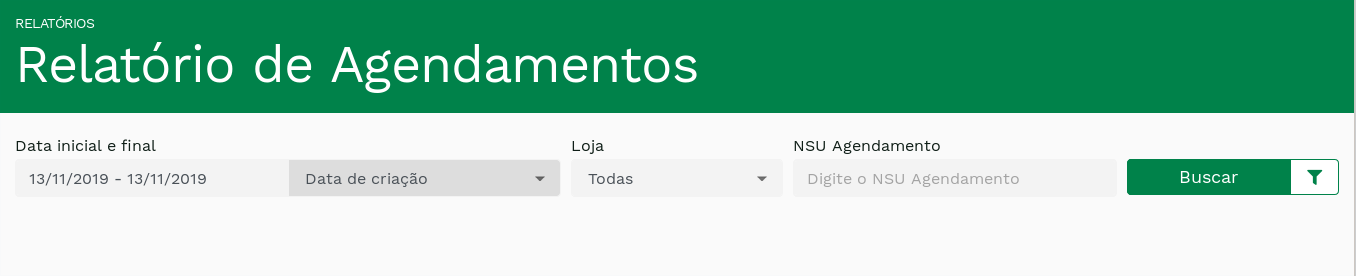
On this screen, the merchant has the option of defining the filters he wants to apply before generating the list of schedulings for the specified period of time. The following table describes the possible filters for this report:
Table 1: Schedulings Report Filters.
| Filter | Description |
|---|---|
| Stard Date <span style={{ color: 'red' }}>* | Reference start date for scheduling for listing of schedulings. |
| End Date<span style={{ color: 'red' }}>* | Reference end date for scheduling for listing of schedulings. |
| Type of Date | Defines which date the Start Date and End Date filters refer to. They can act on the creation date of the scheduling transaction or the date of its next execution. |
| NSU Store | Store sequential number. |
| Order Code | Identification of the order placed by the store. |
| NSU Scheduling | Unique number corresponding to the schedule. |
| Store | registered for the store. |
| Status | Scheduling Status. For more information, see Table 2. |
The table below describes the possible status of the schedulings:
Table 2: Schedulings Status
| Name | Description |
|---|---|
| Active | Recurring payments for this scheduling will be processed on the specified next run date. |
| Error | An error occurred while trying to activate the scheduling. |
| Finished | All recurring payments for this schedule have been performed. |
| Inactive | Scheduling has been disabled by the store, ie recurring payments will not be processed. |
| Undone | The scheduling, which was pending, was canceled by the store. |
| Expired | A scheduling with New__status has exceeded its activation deadline. This SID can no longer be used. |
| Invalid | An invalid parameter was sent by the store in an attempt to create the schedule. |
| New | Scheduling transaction was recently created but no activation attempt was made. |
| Pending | The scheduling has a pending confirmation status from the store so that it can be, in fact, activated. |
Finally, after defining the desired filters, just click on Search. You will receive a list of all the schedulings that meet the specified criteria. The screen is similar to the one in the following figure:
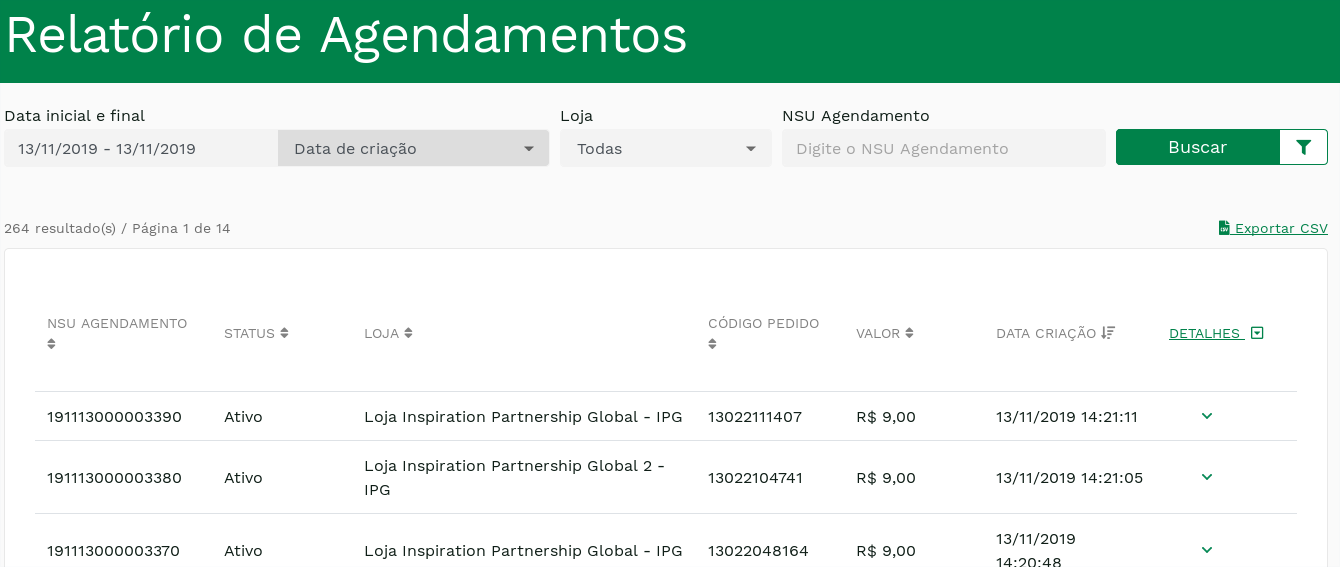
NIn this list, there are several useful features for the store. For example, it is possible to sort the schedulings in numerical or alphabetical order of some of the main parameters. To do this, just click on any of the parameter titles – NSU SCHEDULING, STATUS, STORE, ORDER CODE, VALUE, CREATED DATE
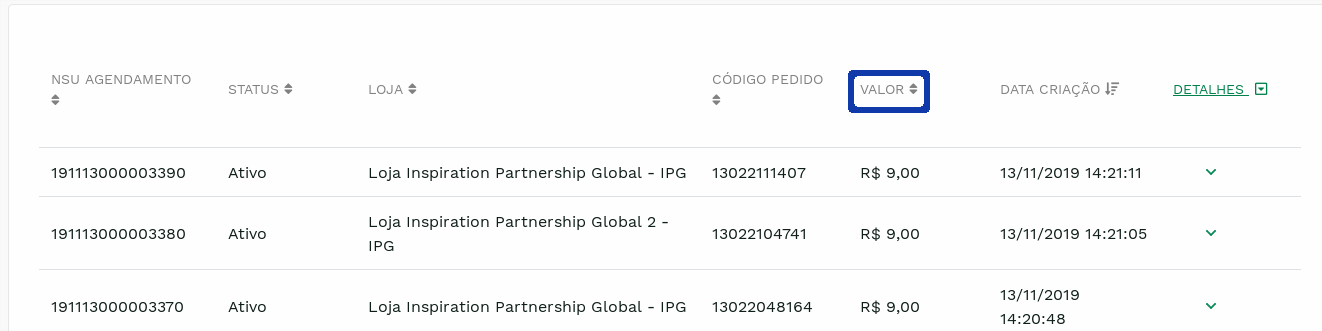
Clicking once sorts the schedule in ascending order. Clicking again sorts them in descending order. The default for listing is to arrange the schedulings in order from most recent to least recent.
It is also possible to see more details about the scheduling. To do this, just click on v, at the end of the line corresponding to the scheduling:

This wil retult in more details about scheduling to be displayed:
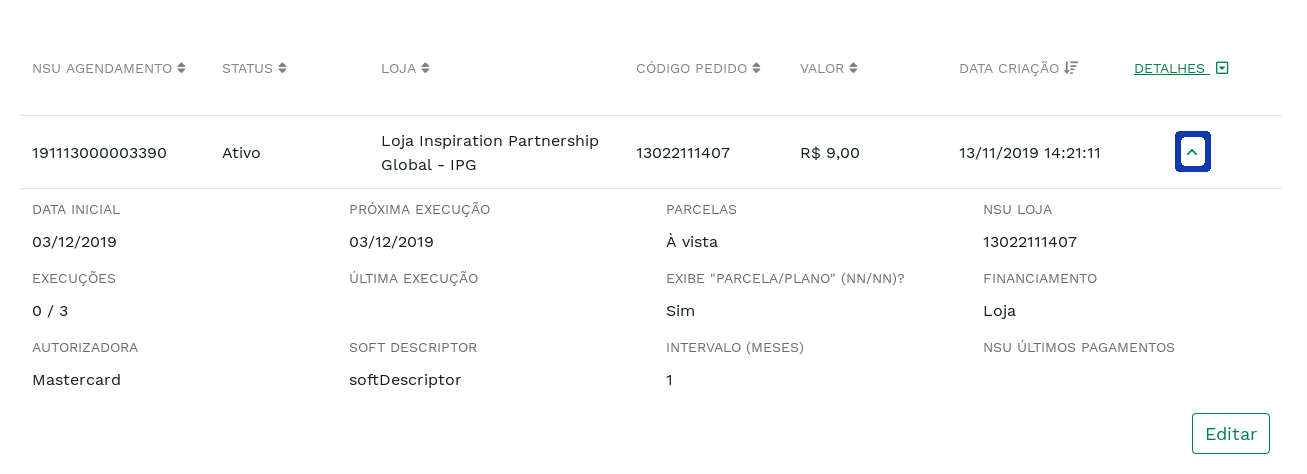
It is possible to hide these details by clicking ^ at the end of the line corresponding to the scheduling (on the same place where v was clicked).
It is also possible to view the details of all the schedulings in the list. To do this, just click on the DETAILS parameter title. Clicking once displays details of all schedulings in the list. Clicking again hides all details.
The table below describes the listed fields:
Table 3: Description of the fields listed in the Scheduling Report
| Name | Description |
|---|---|
| NSU Scheduling | Scheduling Transaction Identifier. |
| Status | Status da transação de agendamento. For further information, see table 2. |
| Store | Name of the store that created the scheduling. |
| Order Code | Store-Defined Order Code. |
| Value | Monetary value to be used in recurring payments. |
| Creation Date | Date the scheduling transaction was created |
| Stard Date | First date the scheduling was done. |
| Last Run | Date of the last time this scheduling was run.. |
| Next Run | Date of the next time this scheduling will run. |
| Runs | This field contains two pieces of information: the number of times this schedule has been run (before the slash) and the total number of runs that the scheduling must have to be considered completed. |
| Interval (months) | Schedule run frequency. |
| Store's NSU | Store sequential number. |
| Authorizer | Authorizer to be used in recurring payments. |
| Iinstallments | Number of installments to be used for recurring payments.. |
| Financing | Financing to be used in recurring payments (store or Credit Card Company). |
| Soft Descriptor | Additional text that will be displayed with the name of the establishment on the buyer's credit card statement. Know more |
| Displays “installment/plan†(nn/nn)? | Defines whether the soft descriptor text will be proceeded from the Runs field. |
| Last Payments' NSU | Identifiers of the last six recurring payments. |
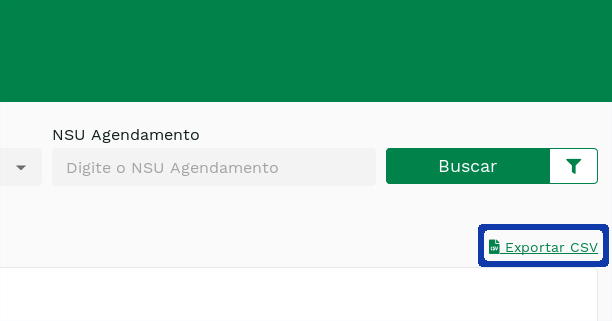
It is also possible to export the listed data to a CSV file by clicking the link EXPORT CSV FILE
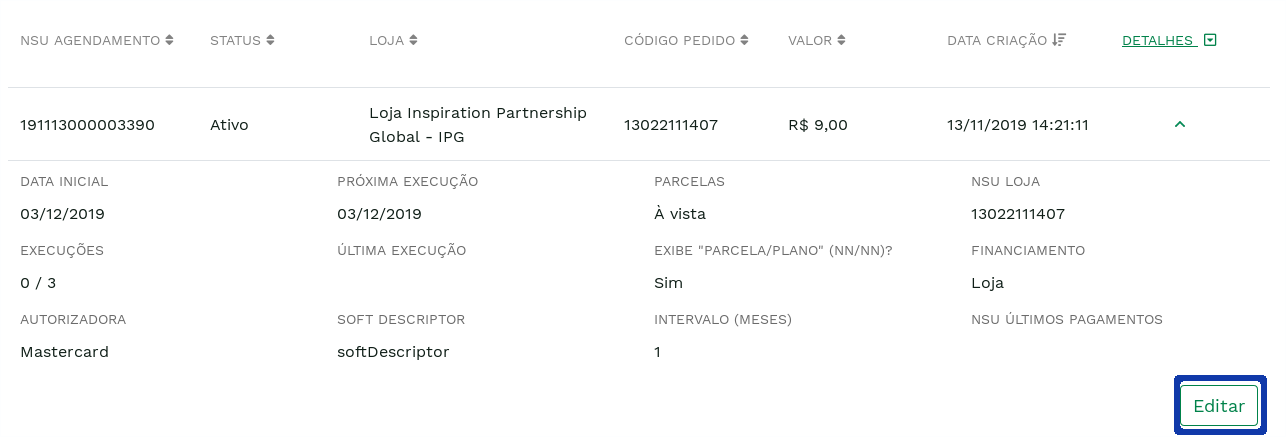
The merchant can change some scheduling data with status Active or Inactive as the value, card or status. To do this, in the schedulings report, find the desired one, click on view to view its details and then click on the link in front of the text Edit, as shown in the image below:
By accessing the link described above, the store will be redirected to a page similar to the one shown in the image below:
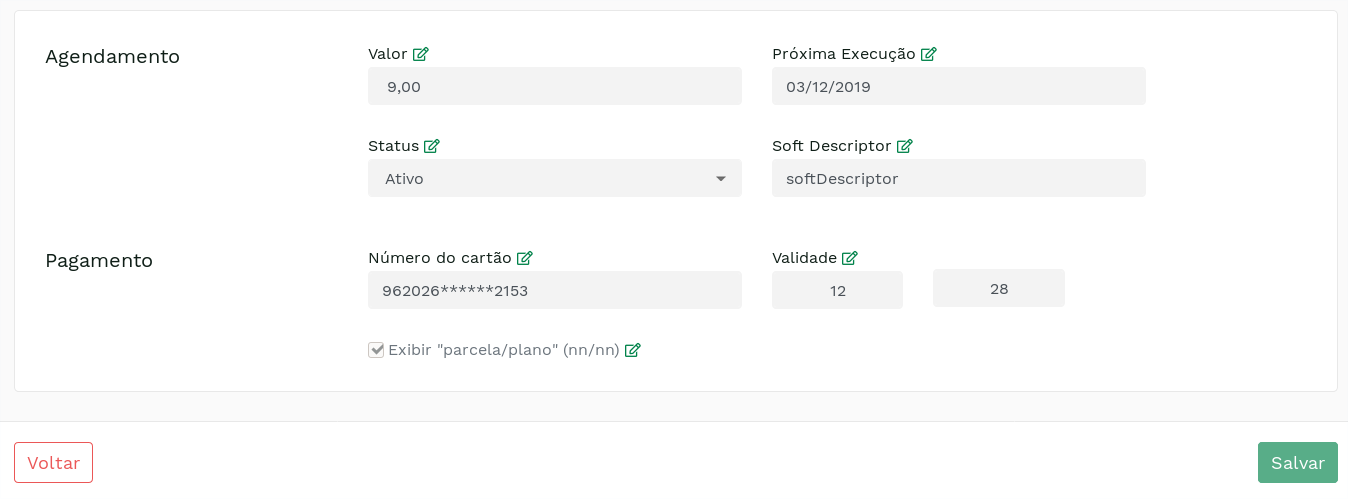
This screen contains all editable fields and their current values. To make changes, click on the pencil of the desired field, as shown in the figure below:
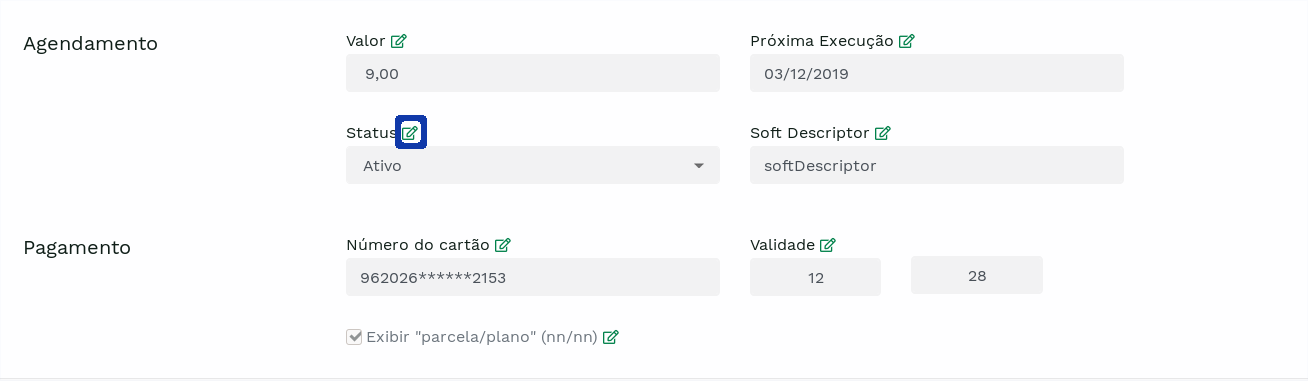
By clicking on, the field will become open for editing, as in the image below:
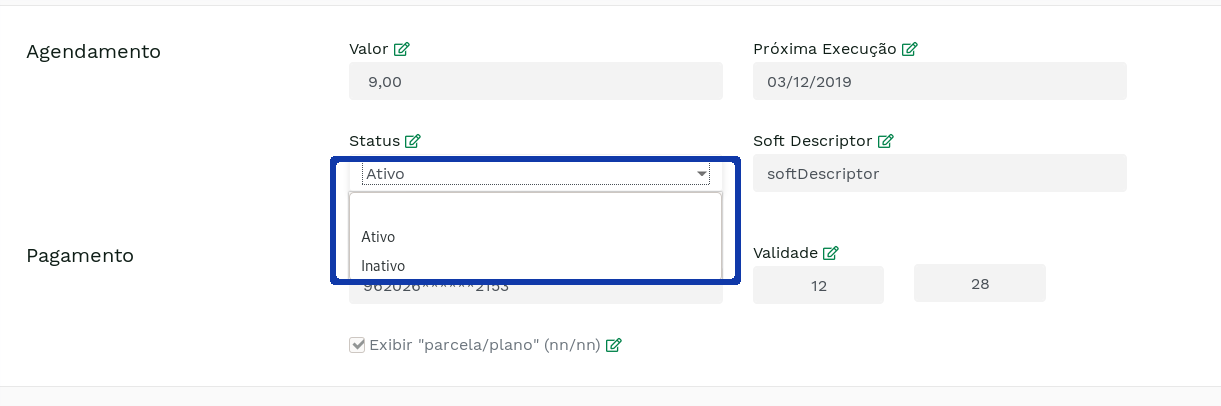
The table below describes the editable fields.:
Table 4: Scheduling Editing Fields
| Field | Description |
|---|---|
| Value | Value of recurring payments. |
| Next Run | Run date of the next recurring payment |
| Status | This field gives the possibility to activate or deactivate the scheduling. For more information, see Table 2. |
| Soft Descriptor | Additional text that will appear with the name of the store on the buyer's credit card statement. Know more |
| <div style={{ whiteSpace: 'nowrap' }}> Exibir “parcela/plano†| For finite time schedulings, add the number of runs/total runs at the end of the Soft Descriptor field (example: Subscription 3/12). |
| Credit card Number | Customer's credit card number. |
| Expiration date | Customer's credit card number expiration date. |
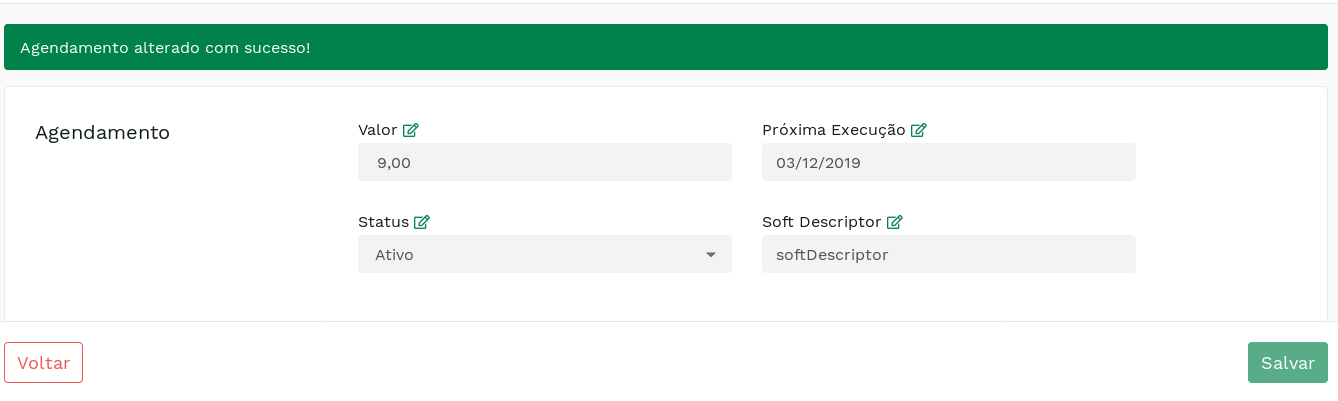
After making all the desired changes, the store must click on the Save button. With that, the store will be redirected back to the scheduling report, which will now have a success message above the filters, as in the figure below:
The schedulings registration is a tool that allows the merchant to schedule recurring payments for their store on Carat Portal.
Attention
To view the Schedulings Registration, the user must have the profile that allows this operation. In case of doubt, please consult the support team.
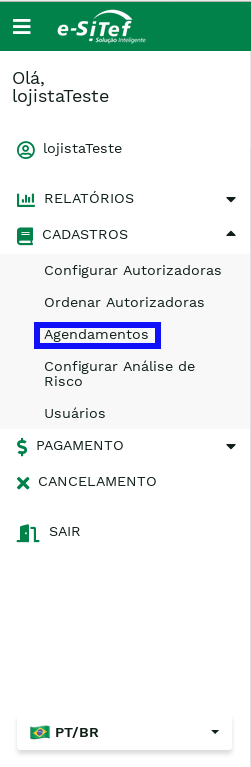
To access this functionality, just click on the link Schedulings Registration, as shown below:
If the store's user has multiple associated stores, he will be redirected to a screen where he must select the desired store, as shown in the figure below.:
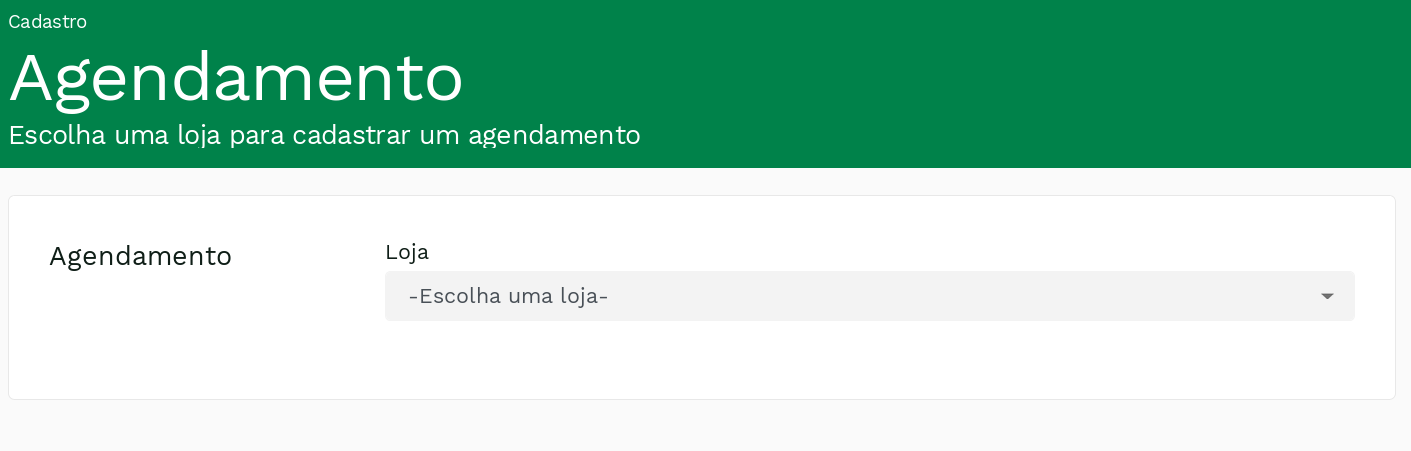
After selecting the store, the store will be forwarded to the schedulings registration page, as shown below:
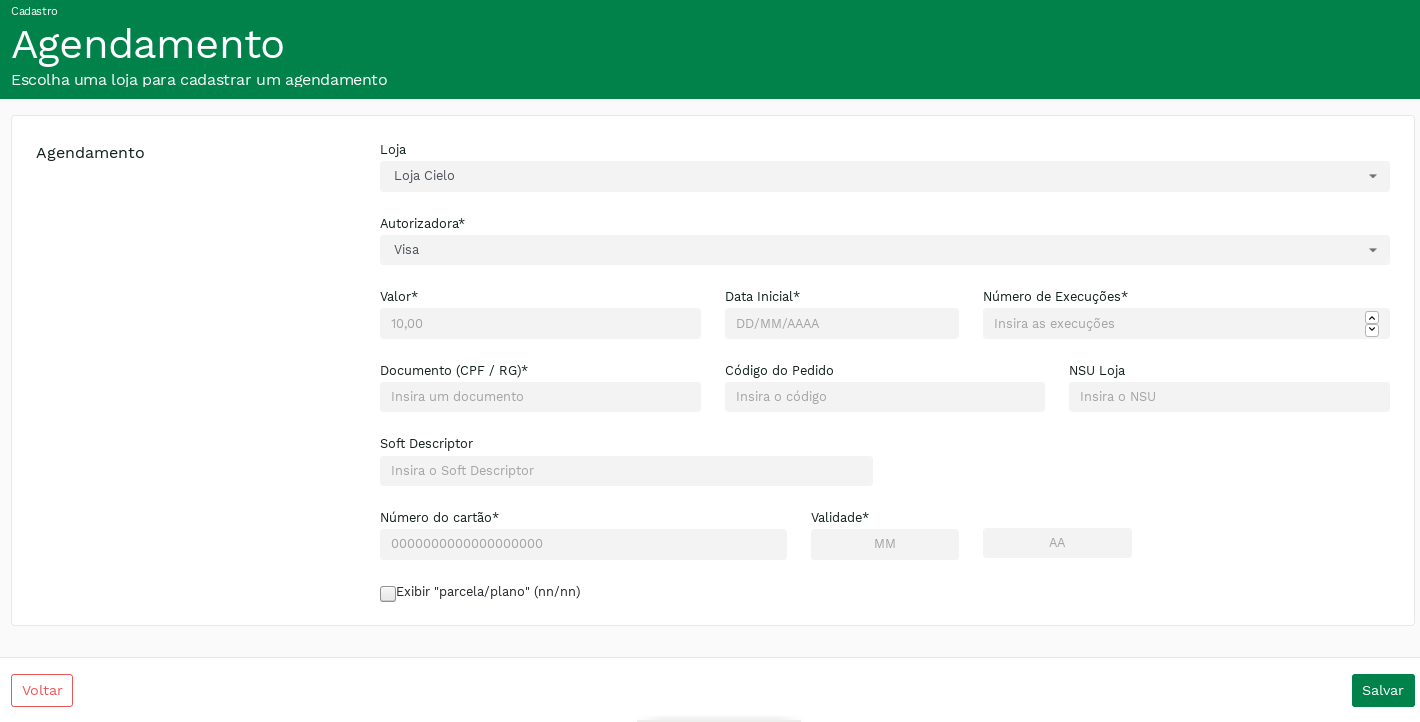
The table below describes the fields on the scheduling registration form:
Table 5: Scheduling registration fields
| Field | Description |
|---|---|
| Authorizers <span style={{ color: 'red' }}>* | Customer's Credit Card Company. |
| Value <span style={{ color: 'red' }}>* | Value to be charged for recurring payments. |
| Start Date <span style={{ color: 'red' }}>* | Run Date of the first scheduled payment. Minimum 2 days from current date. Days 29, 30 and 31 are not accepted in this field. |
| Number of Runs | Number of payments to be run by the scheduling. If this field is not filled in, the scheduling will run indefinitely. |
| Personal Document (CPF / RG) <span style={{ color: 'red' }}>* | Customer Personal Document. |
| Order Code | Store-generated order code. |
| NSU Store | Unique sequential number generated by the store to facilitate scheduling identification. |
| Soft Descriptor | Text that will be shown on the card statement. |
| <div style={{ whiteSpace: 'nowrap' }}> Exibir “parcela/plano†| For finite time schedules, add the number of runs/total runs at the end of the Soft Descriptor field (example: Subscription 3/12). |
| Credit Card Number <span style={{ color: 'red' }}>* | Customer's Credit Card Number |
| Expiration date <span style={{ color: 'red' }}>* | Customer's card expiration date. |
Fields accompanied by <span style={{ color: 'red' }}>* are mandatory.
After filling out the form and clicking on the SEND button, the store will be redirected to a success page, containing its scheduling information, as in the image below:
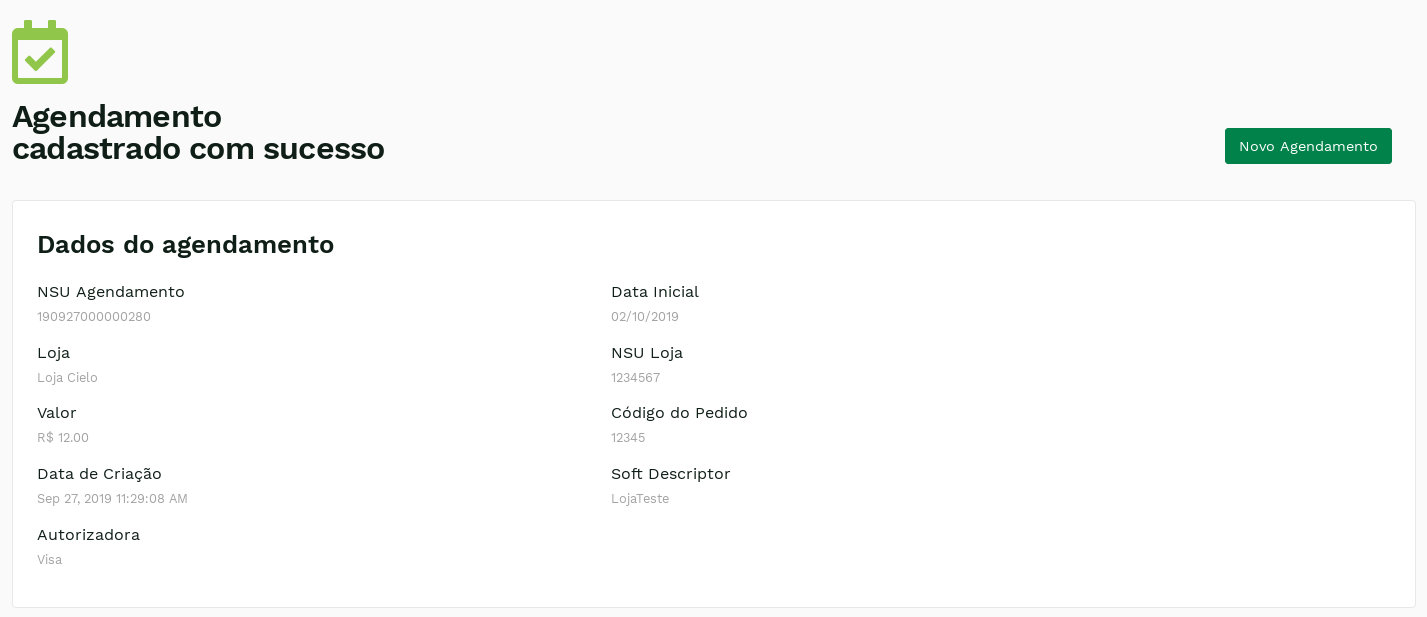
On a daily basis, the Carat Portal will process the payments scheduled for the day in question and will update data on the schedules run, such as the current number of runs. If the schedule has already been run for the number of times desired by the merchant, it will have its status changed to Finished and will be disregarded in future processing, as only schedules with the status of Active will be run.
The current number of runs of a schedule will only be incremented on confirmed or denied payments. In case of denied transactions, the Carat Portal will not reprocess them.
User Administration
If your user has the necessary permissions (provided by the Software Express operation team), you can register, list and change users.
To access the new users registration screen, follow the steps below:
- Click on Registration:
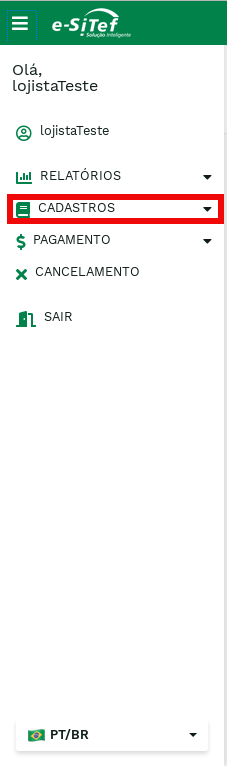
- In the following displayed submenu, click on Users:
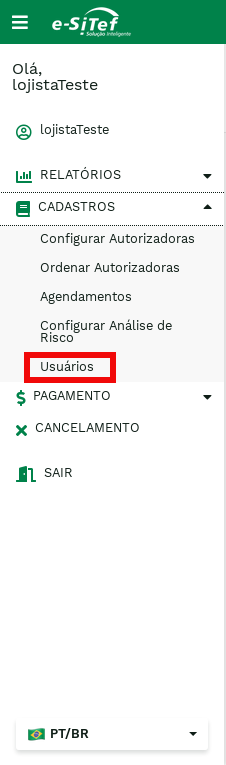
- In the new submenu, click on New User:

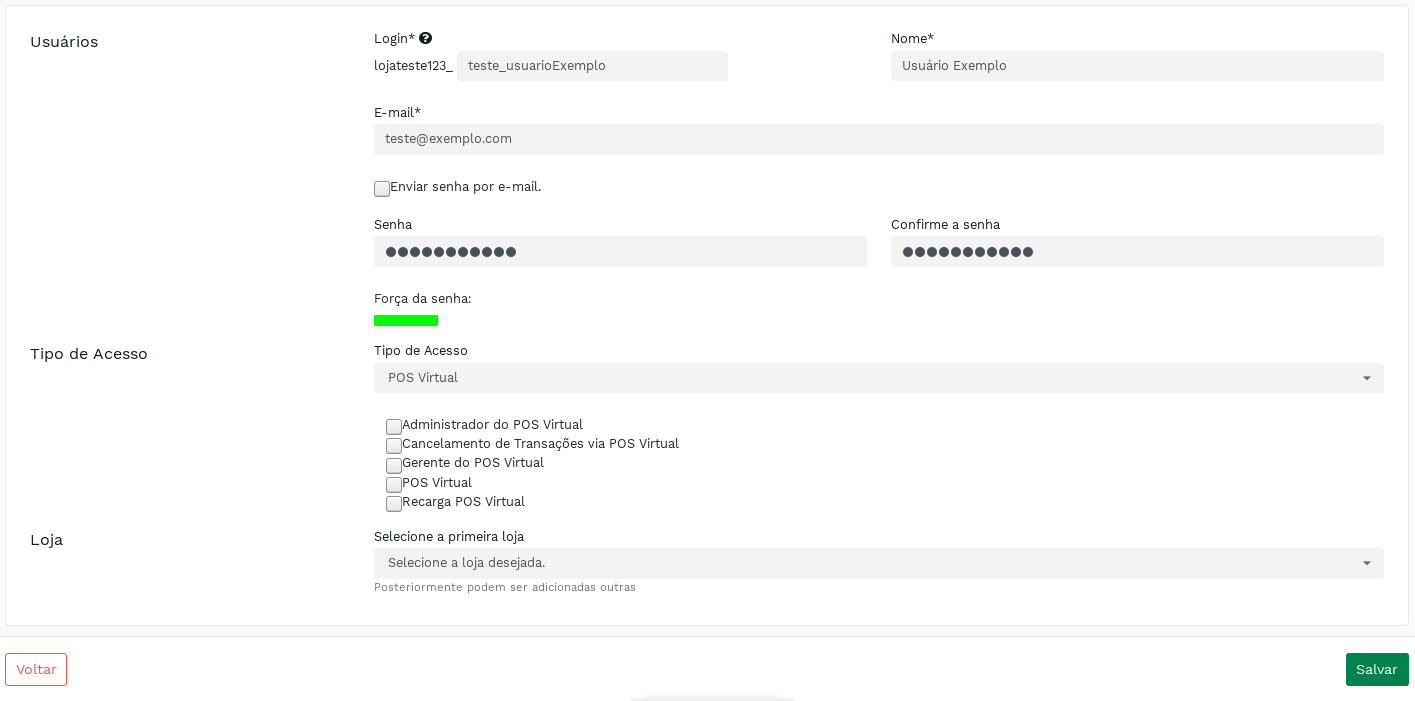
Com isso, a seguinte página será exibida:
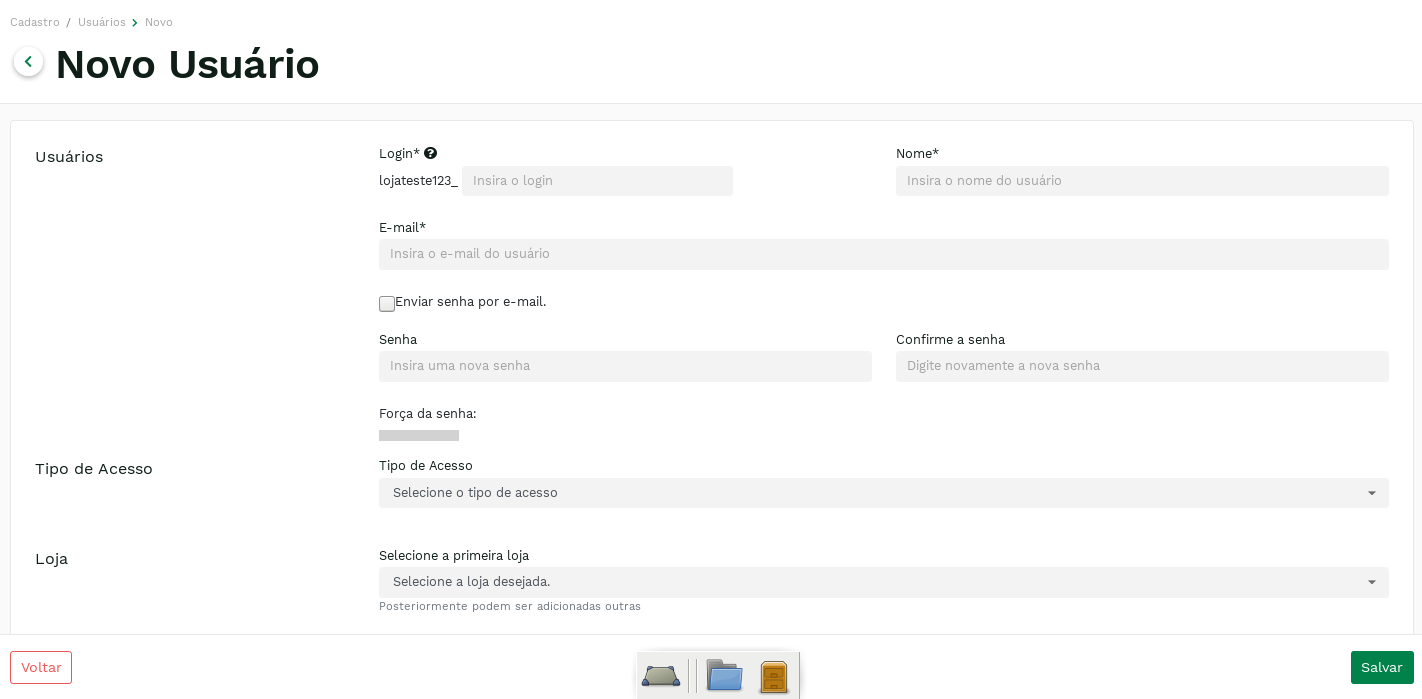
All fields on this form are required. Below is the description of each of them:
- Login: name that will be used to access the Store Web Portal. This login is added with a specific prefix for the store that makes the registration.
- Name: username.
- Email: user's email address.
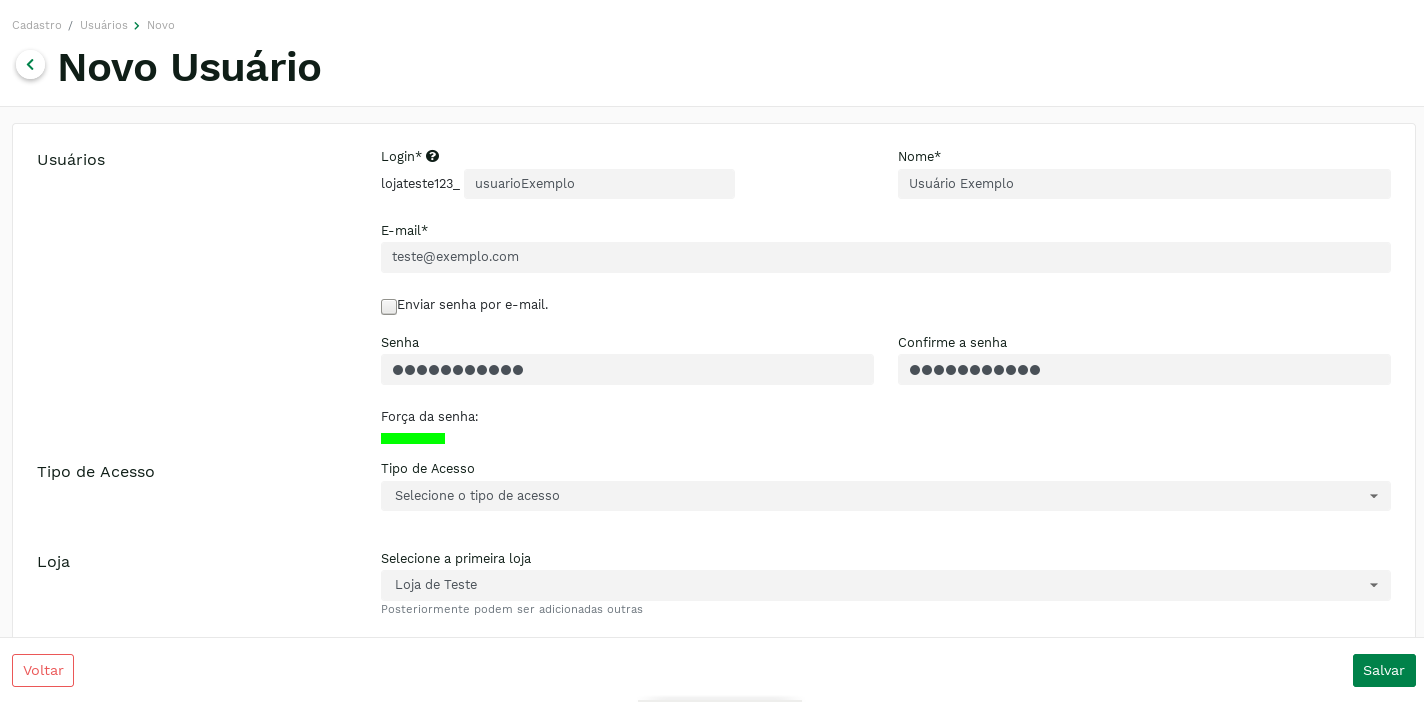
- Password: User password to be used to access the Store Web Portal. When entering the password, the page will display its strength below, that is, how secure the password is.
- Password Confirmation: enter the user's password again. This procedure is important to avoid errors in password registration.
attention:
The login prefix is ​​registered by Software Express. If you want to change it, it is necessary to contact the activation team. The modification of the prefix will not change the users that already exist in the Store Web Portal.
The figure below illustrates the filling in of the fields listed so far, as well as the indication of password strength:
The Access Type field has two options:
- Store Web Portal: access to various reports, registration of appointments, configuration of authorizers, among other features.
- POS Virtual: making payments, recharges and cancellations, accessing transaction reports and basic settings for these operations.
Regardless of which option is checked, the page will display various options that represent each user's access permissions.
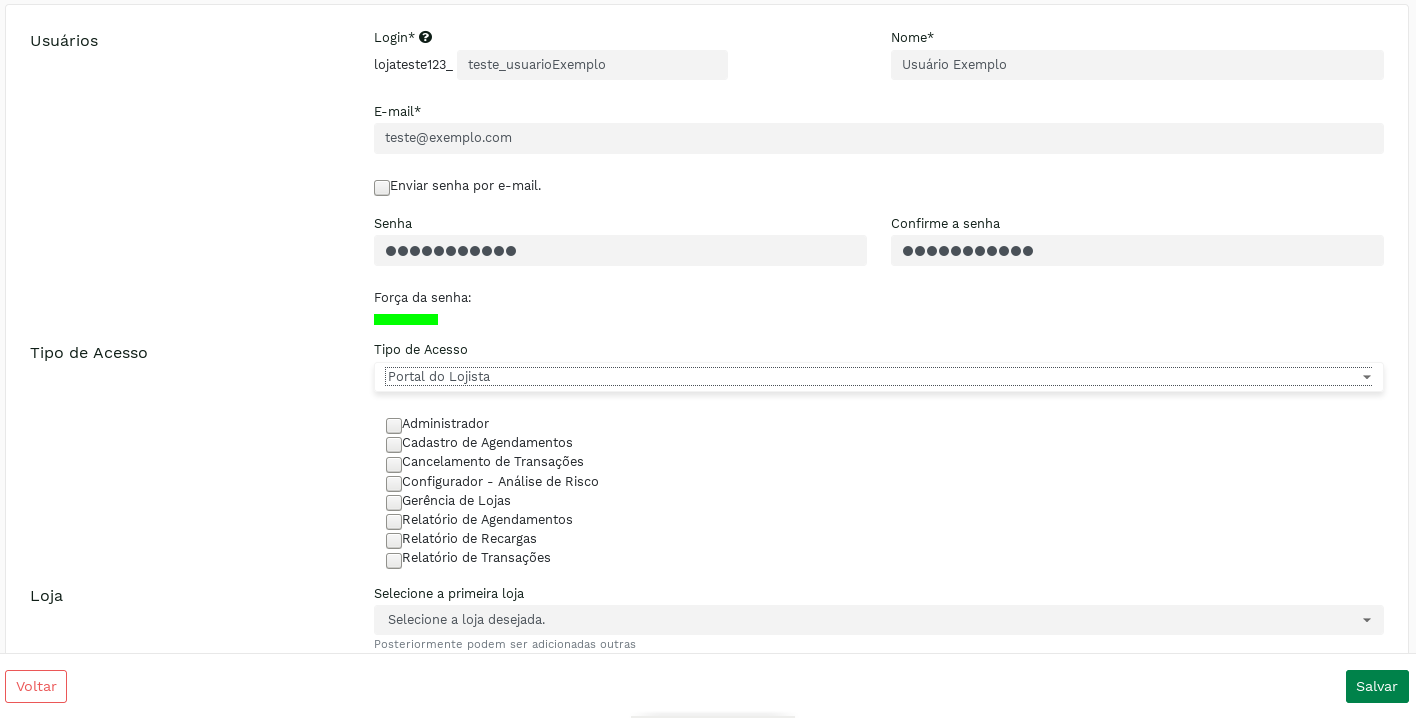
Below is a description of which features can be accessed by checking the options available for the type of access Store's Portal:
- Administrator: user administration (registration, listing and editing).
- Scheduling Registration: registration of recurring schedules.
- Transaction Cancellation: Transaction Cancellation/Reversal.
- Configurator - Risk Analysis: configuration of transactions with risk analysis.
- Store Management: configuration and ordering of store authorizers.
- Scheduling Report: Recurrence scheduling transaction report.
- Recharge Report: Recharge transaction report.
- Transaction Report: transaction report and daily summary graphs.
The profiles Transaction Report and Store Management cannot be simultaneously assigned to the same user.
Below is described which features can be accessed by checking the available options for the POS Virtual access type:
- Virtual POS Administrator: configuration of transactions made in the Store's Web Portal.
- Transaction Cancellation via Virtual POS: Transaction Cancellation/Reversal.
- Virtual POS Manager: Daily Summary Report View.
- Virtual POS: performing payment transactions and viewing the transaction report.
- Virtual POS recharge: performing recharge transactions.
In addition to the fields presented so far, it is also necessary to select a store to be associated with the user in question.
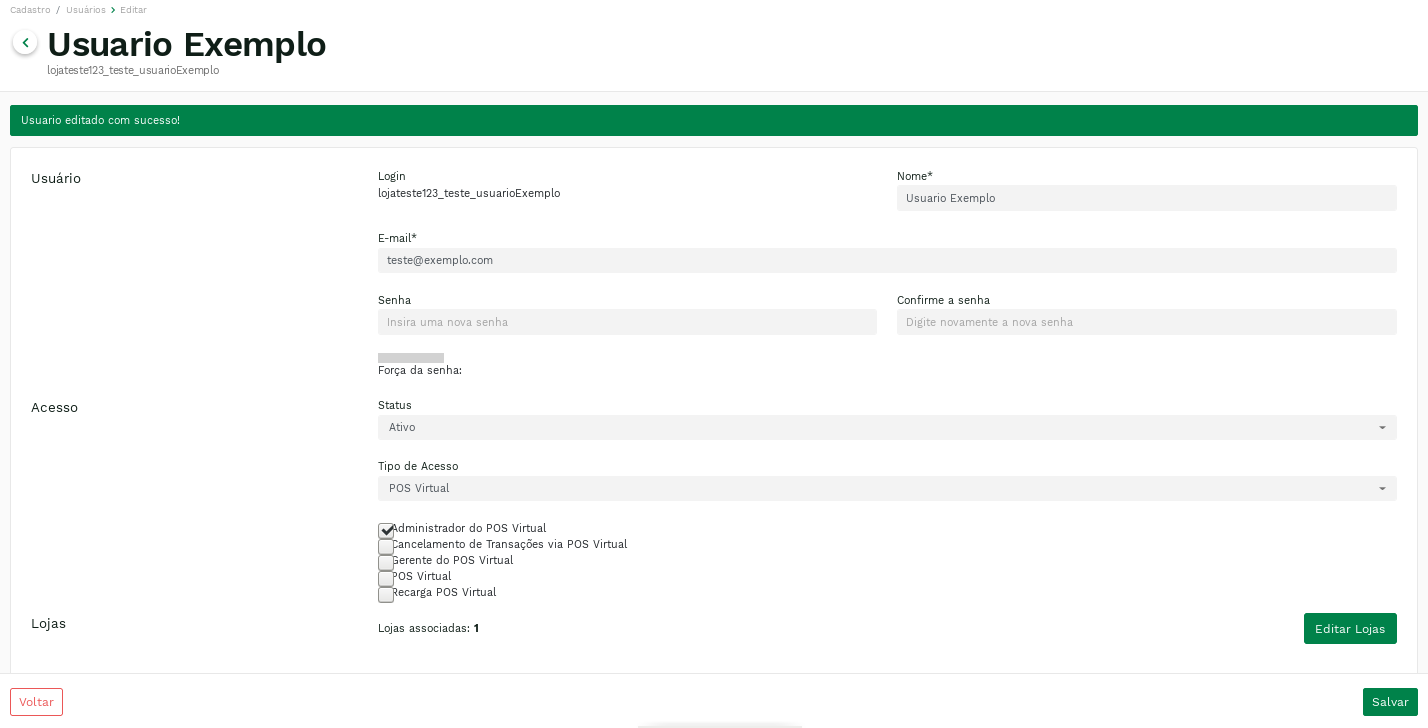
After filling in all the fields and clicking on SEND, you will be taken to the edit page of the user you just registered. In the upper left corner of the screen, a success message will be presented.
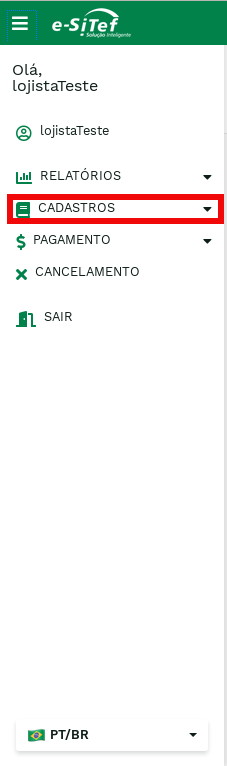
To access the users listing screen, follow the steps below:
- Click on Registration:
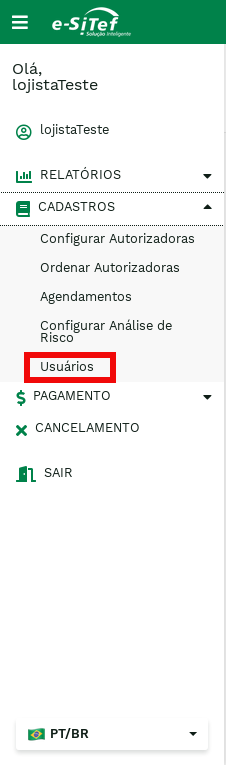
- In the submenu displayed afterwards, click on Users:
With that, the following page will be displayed:
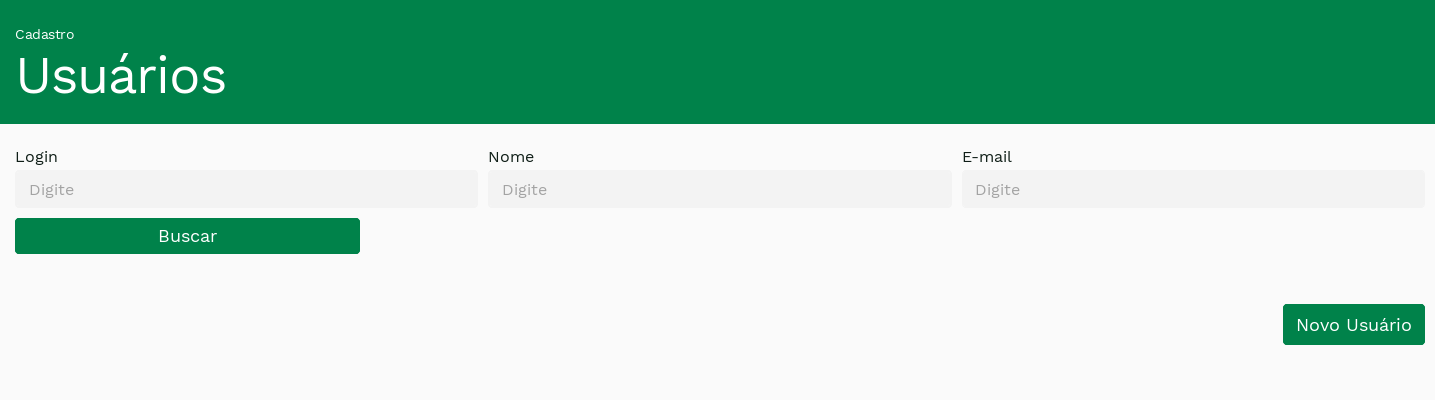
By clicking on Buscar, the list of users itself will be performed:
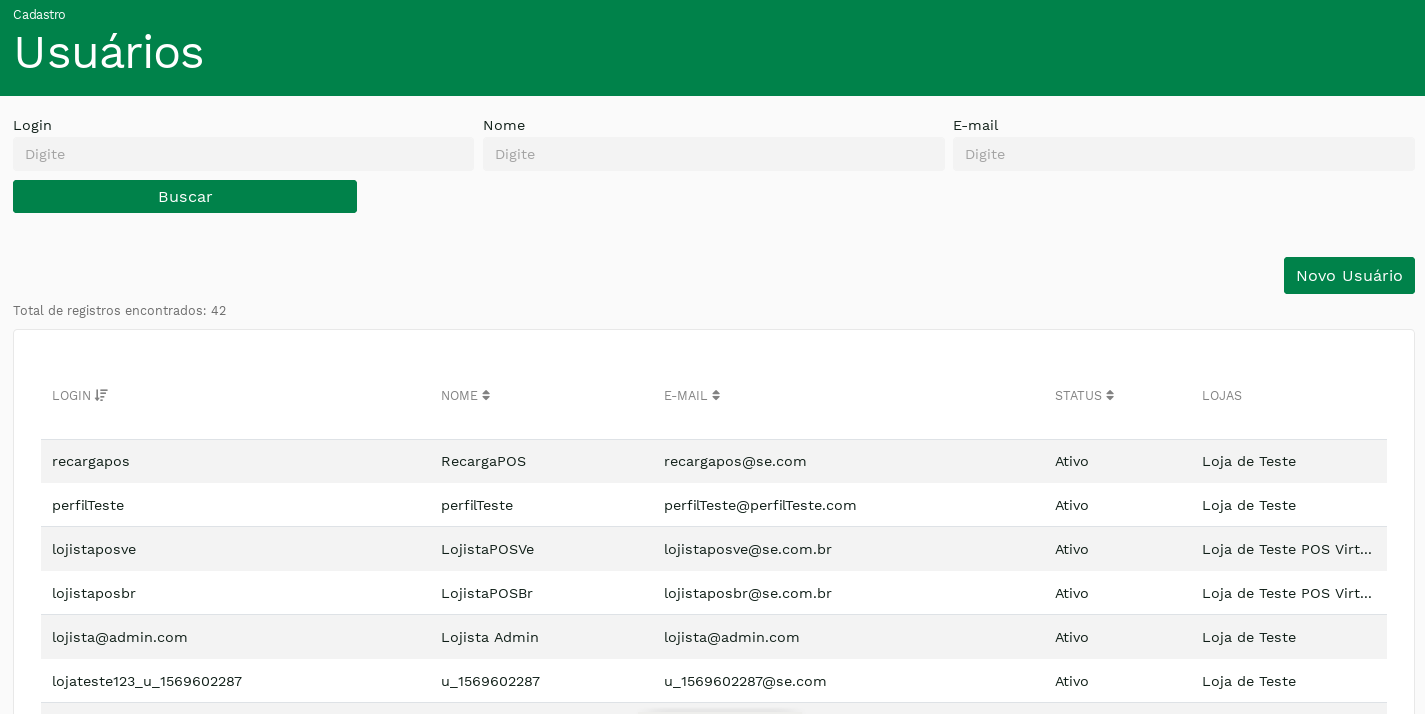
For each listing page a maximum of 20 users are displayed. To navigate among pages, just click on the arrows below the table.
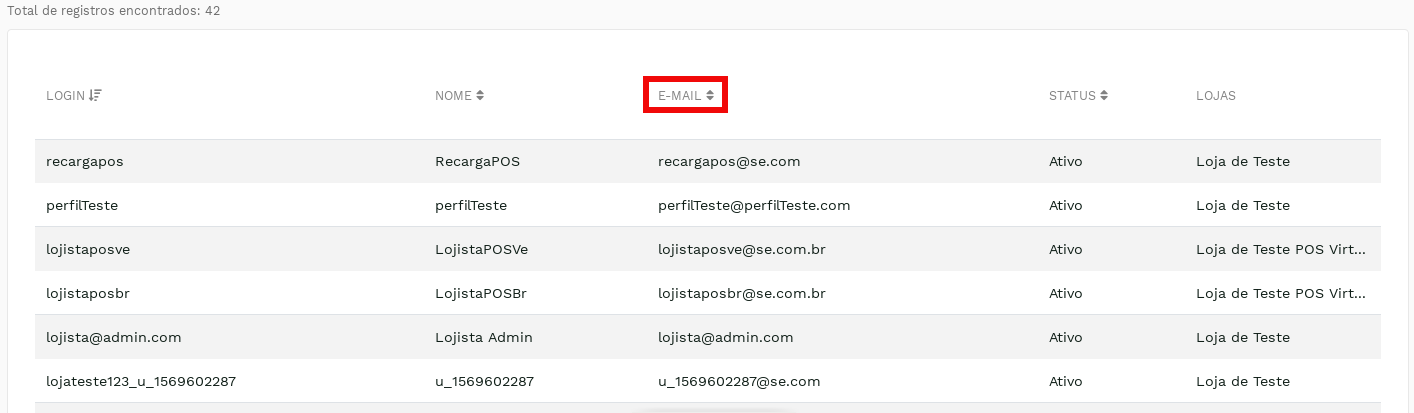
It is possible to sort the results obtained by clicking on the header of the desired field.
Results can be filtered by Login, name and email. To do this, just fill in the desired fields and click on Search.
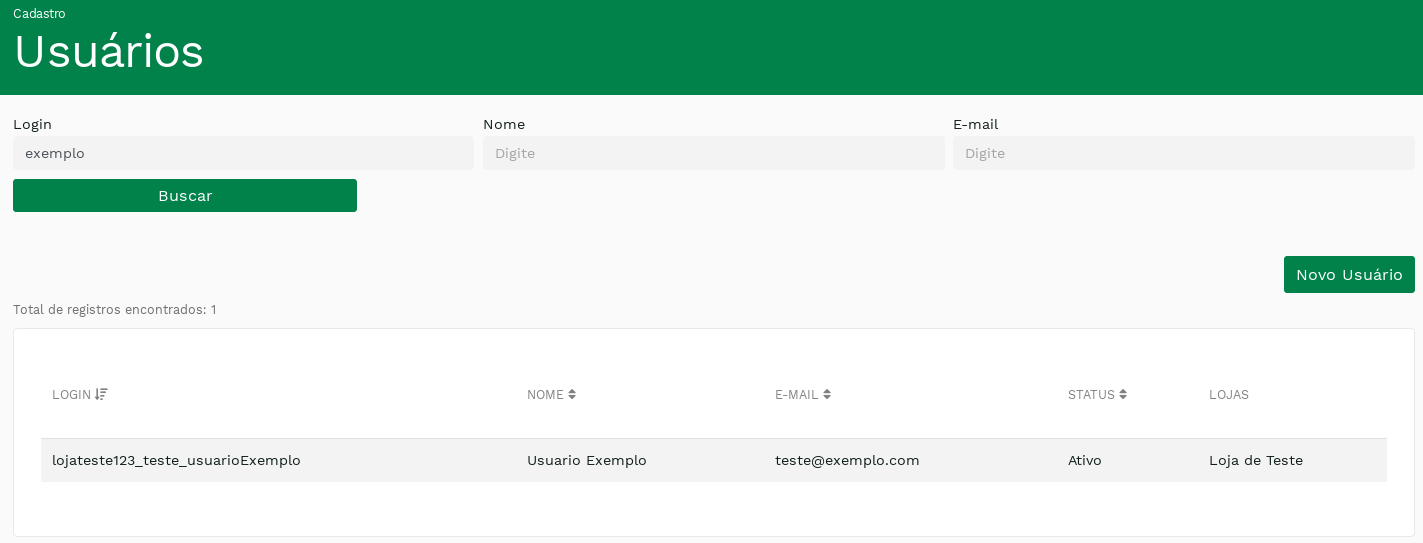
When you click on a user's login, Carat Portal will present the user's edit page.
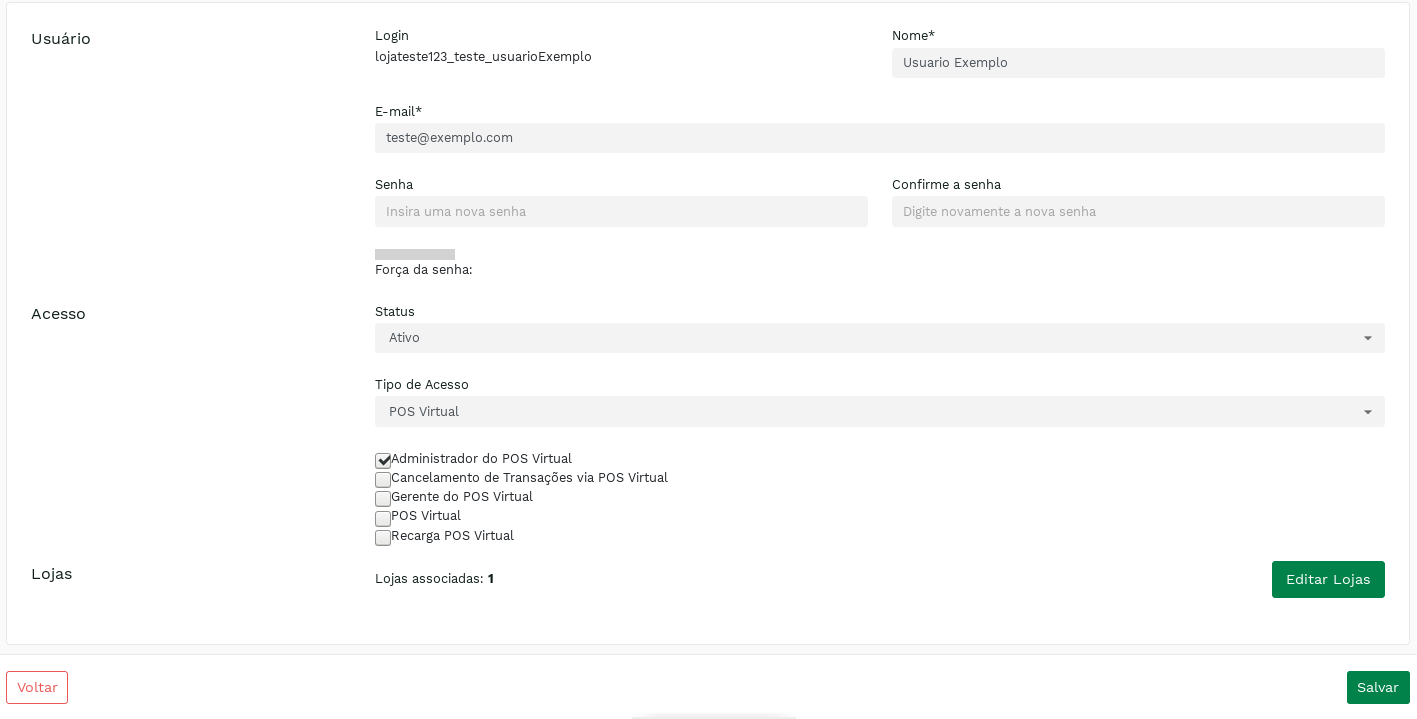
As seen in the previous chapters, you can access the user editing screen in two situations:
- Right after registering the user
- On the user listing screen, clicking on the user's login
The only difference in editing for registration is the possibility to add or remove stores, available by accessing the link Editing Stores.
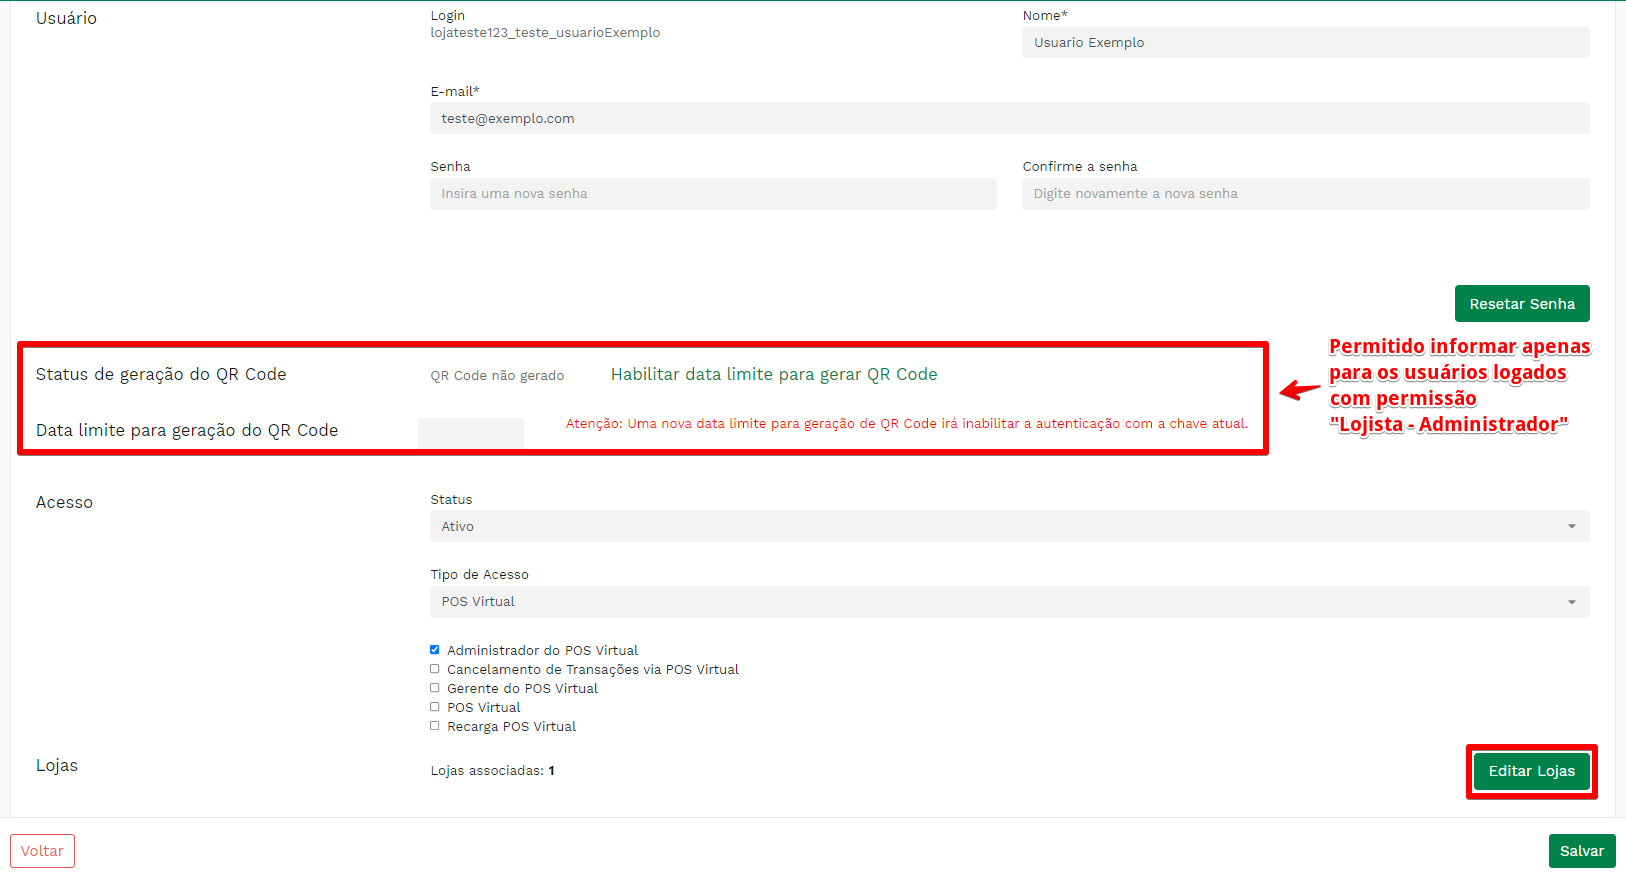
With that, the following page will be displayed:
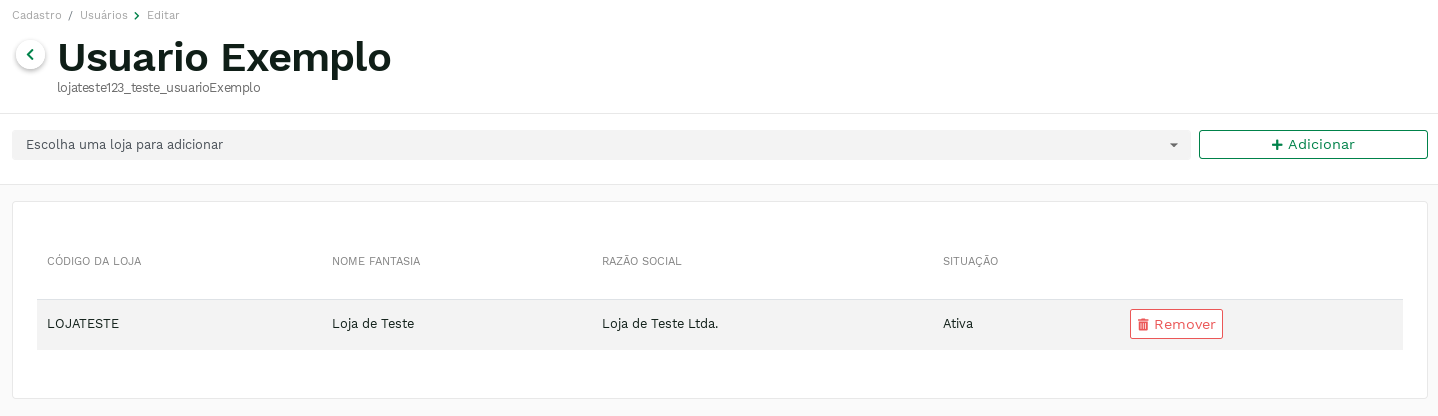
To add a store, just select it in the Available Stores field and click on ADD. With that, a confirmation window will be presented.:
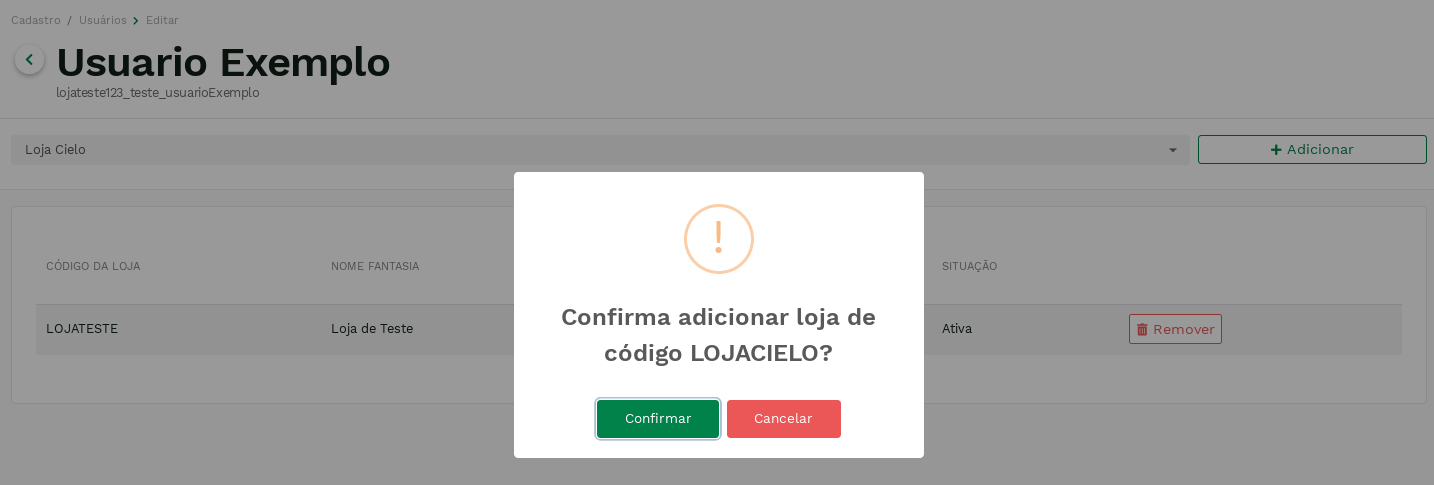
When confirming the addition, the operation will be performed, and the page will display the store listing again, but now containing the new store.
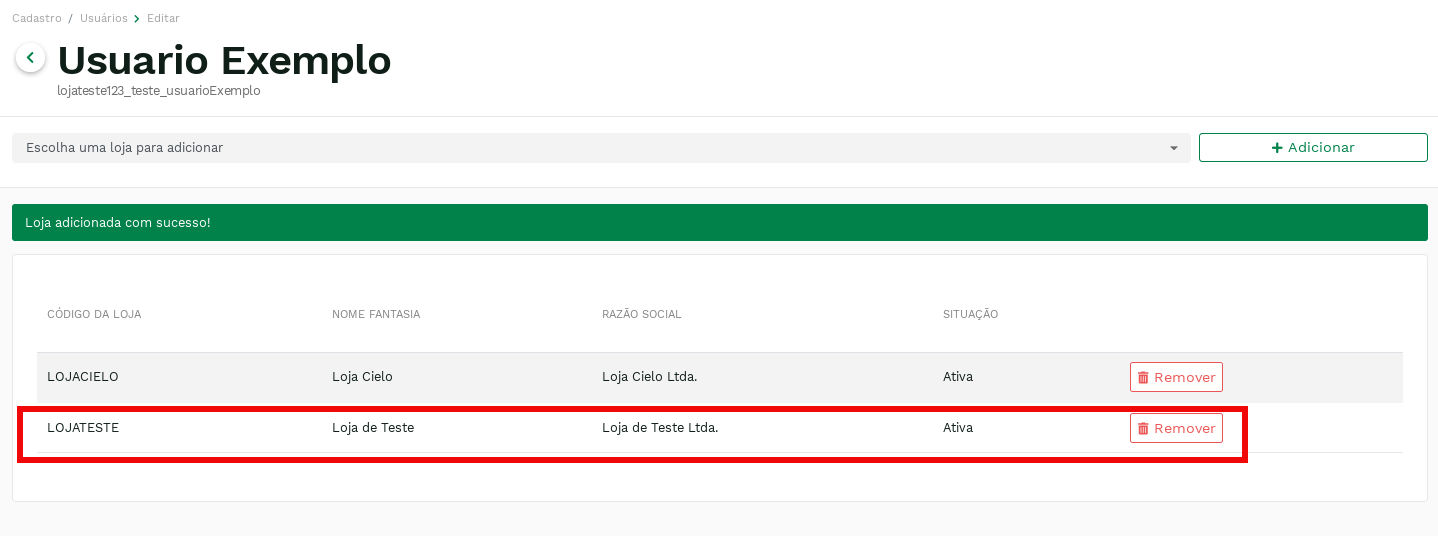
The addition of repeat stores is not allowed.
It is possible to remove a store by clicking on the link Remove in its listing.
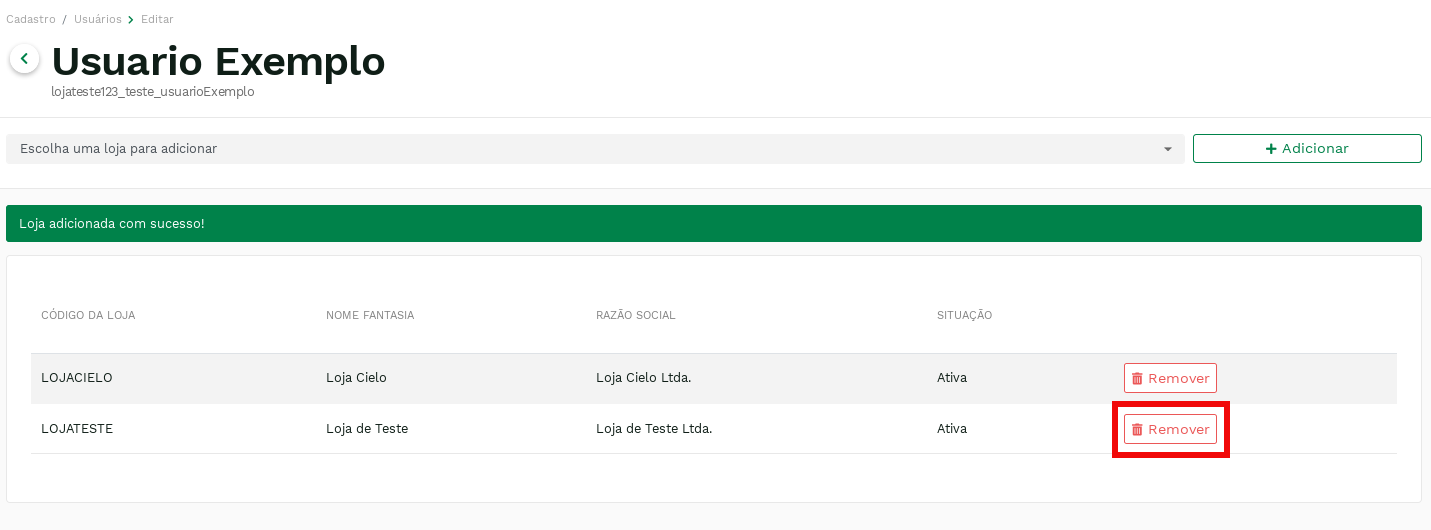
With that, a confirmation window will be presented:
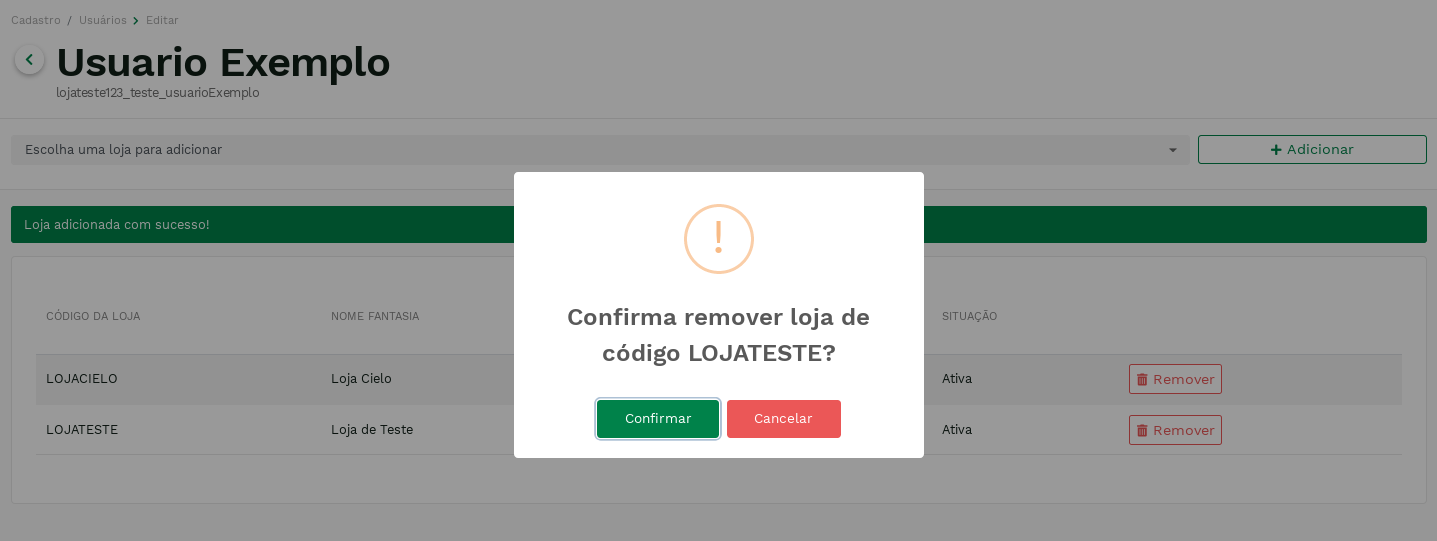
After confirming the removal, the operation will actually be performed, and the store listing will be displayed again, but without the removed store.
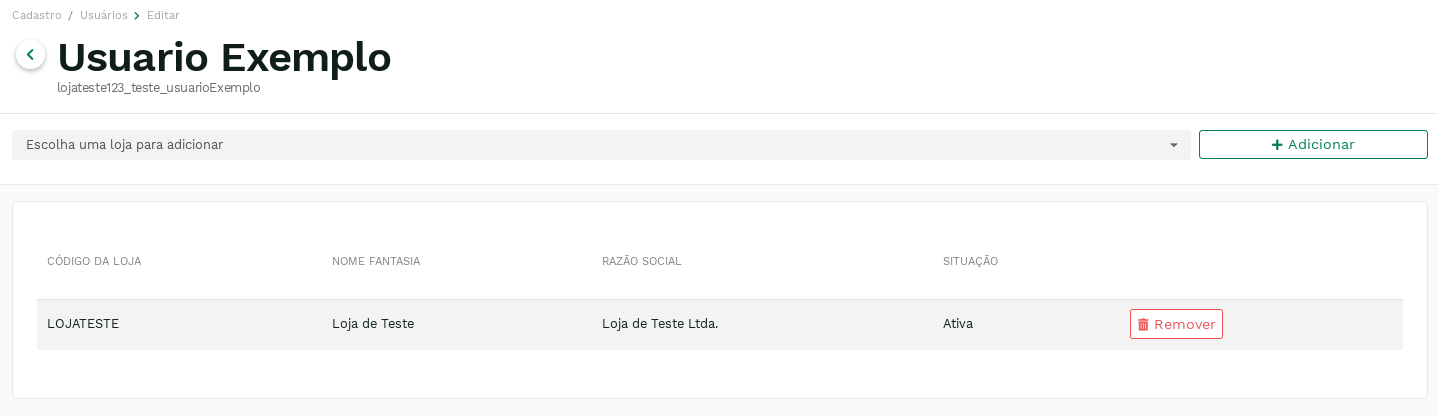
It is only allowed to remove stores from the user if he has at least two stores.
Transaction Cancellation
Transaction Cancellation is a tool that allows the store to cancel already confirmed transactions.
Attention:
To view the Transaction Cancellation, the logged in user must have the profile that allows this operation. In case of doubt, please consult the support team.
The deadline for canceling transactions through the Portal is up to six months, depending on the authorizer's settings.
Attention:
Para o caso de pagamentos Gift é necessária que a opção de cancelamento esteja habilitada no SiTef.
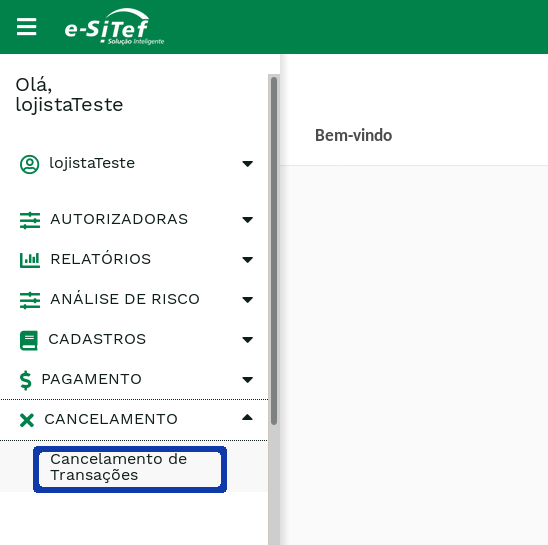
To cancel transactions, place your mouse cursor over the link Cancel of the main menu, and a sub-menu will appear. Then click on Transaction Cancellation:
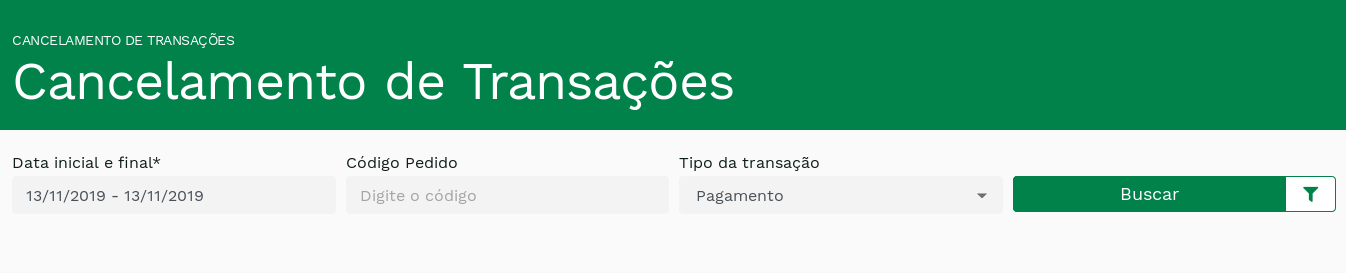
The presented screen will be similar to the one below:
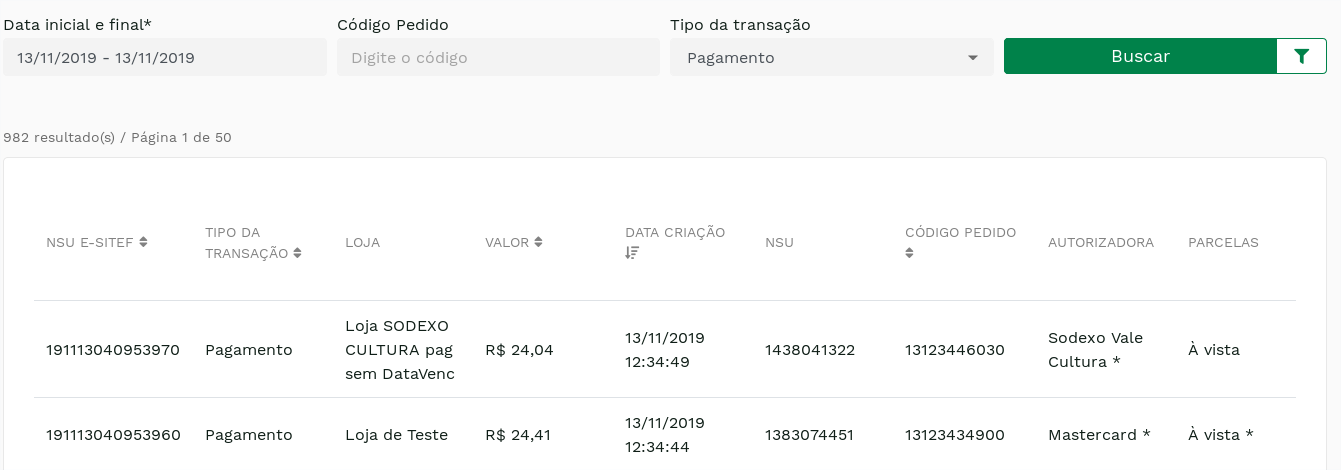
On this screen, it is possible to filter a transaction by its order code, as long as it was carried out between Start and end date.If the Order Code field is left blank, all transactions for the day will be shown after the user clicks on the Search button. The figure below depicts the latter case.
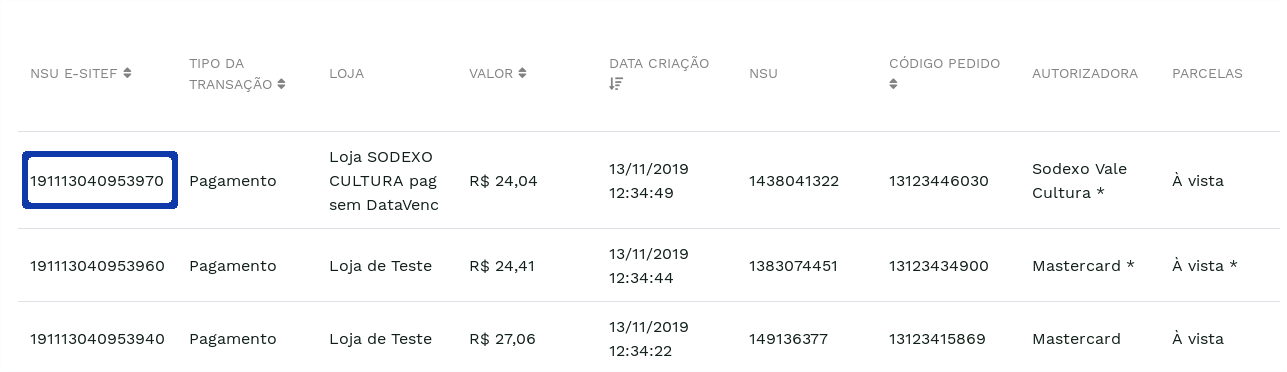
To cancel one of the transactions, just click on one of the respective data: NSU Carat Portal, STORE, VALUE, PAYMENT DATE, NSU or ORDER CODE. An example is shown in the following figure:
After this step, you will be taken to the transaction cancellation screen. It is similar to the one presented in the next item.
For the cancellation of payment transactions carried out via SiTef, the screen shown below is displayed:
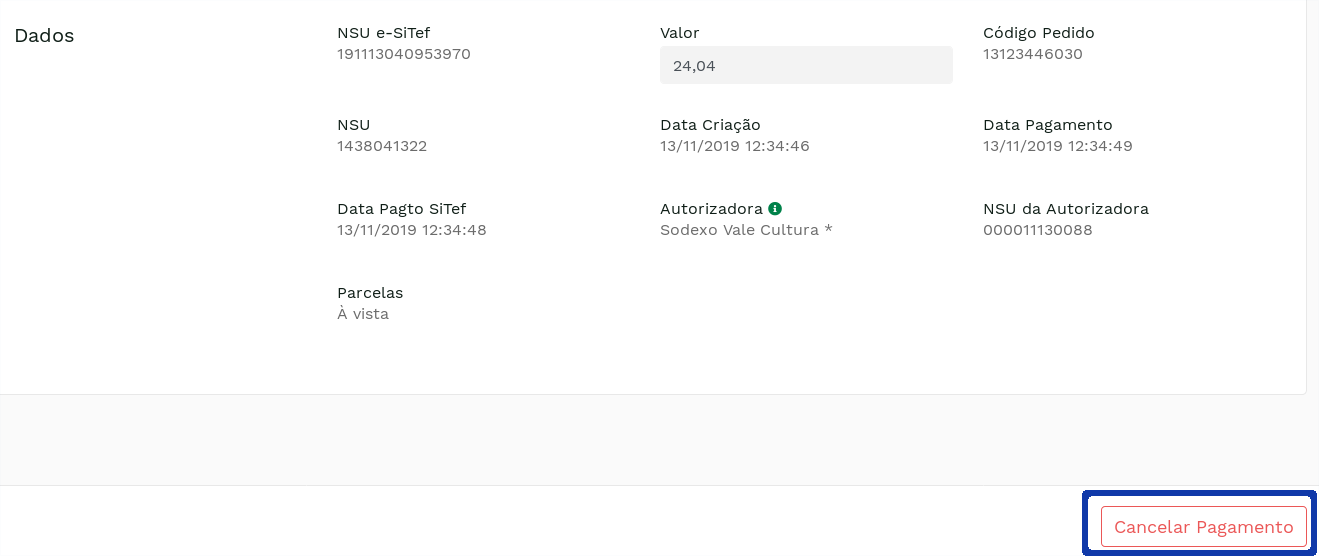
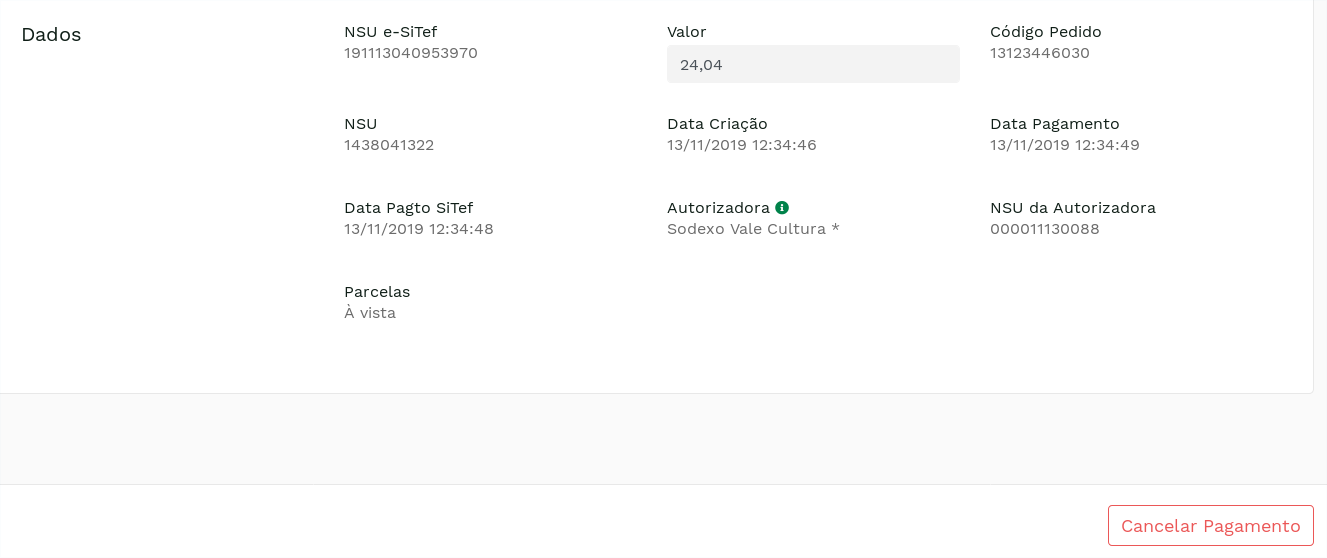
Here, you can check the details of the transaction to be canceled. Clicking the BACK button returns you to the transaction cancellation screen. If this is the desired transaction, to cancel, just click on the button Cancel Payment highlighted in the figure below:
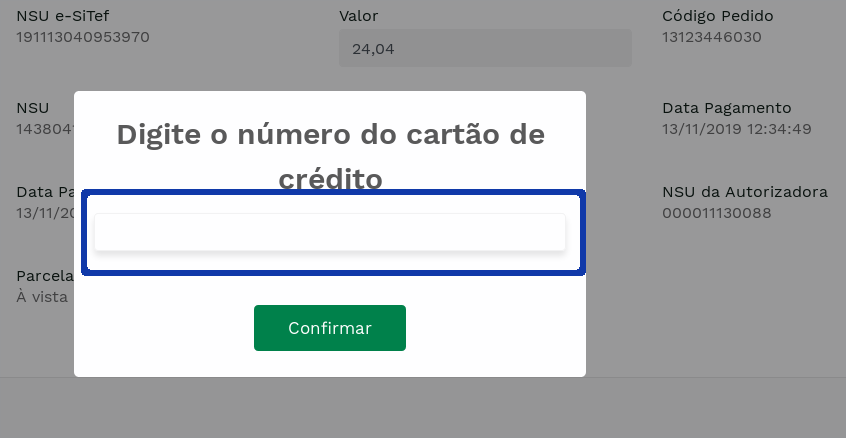
After that, the user needs to fill in the field that appeared with the card number used in the transaction and click on confirm. This step is represented in the figure below:
Cancellation will be processed. After successful cancellation, a screen will be displayed with the original transaction data, the cancellation receipt and a success message. This screen is similar to the one in the following figure:
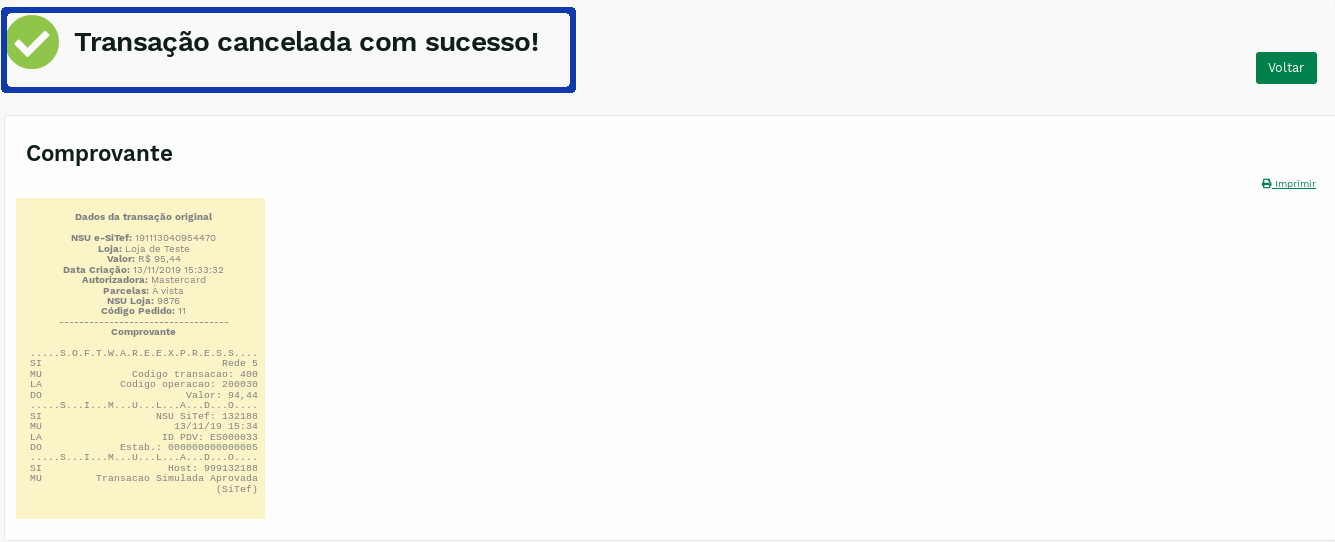
The success message was highlighted above. It is possible to print this data by clicking on the PRINT button, which will open a new page with the receipt formatted for printing. Clicking on the BACK button returns you to the transaction cancellation screen.
After a successful cancellation, a reversal transaction will be created with the same order code as the original transaction. You can check this new transaction in the Transactions Report
.
Attention:
For cancellation of transactions using the PayPal authorizer, the procedure presents particularities as additional fields to be filled out. Please request the specific document: Appendix D - PayPal.
Two-step Authentication
To ensure greater convenience and security to its customers, the Carat Portal offers two-factor authentication, in which, in addition to the platform login, it is necessary to inform a single-use verification code displayed in a previously configured app. For the sake of simplicity, we have assumed Google Authenticator as the app used in our documentation .
- Active registration in the Carat Portal approval environment (obtained from our support team)
- Two-step authentication functionality enabled by the supervisor;
- Installing the app Google Authenticator on a secure mobile device.
A user with a Store - Administrator profile has access to the registration of users and can also enable this functionality for other users.
n order to do this, the administrator/supervisor must go to the User Registration and edit its registration.
On the editing screen, the fields QR Code Generation Status and QR Code Generation Deadline are displayed, in addition to the link to enable 2-step authentication for the selected user.
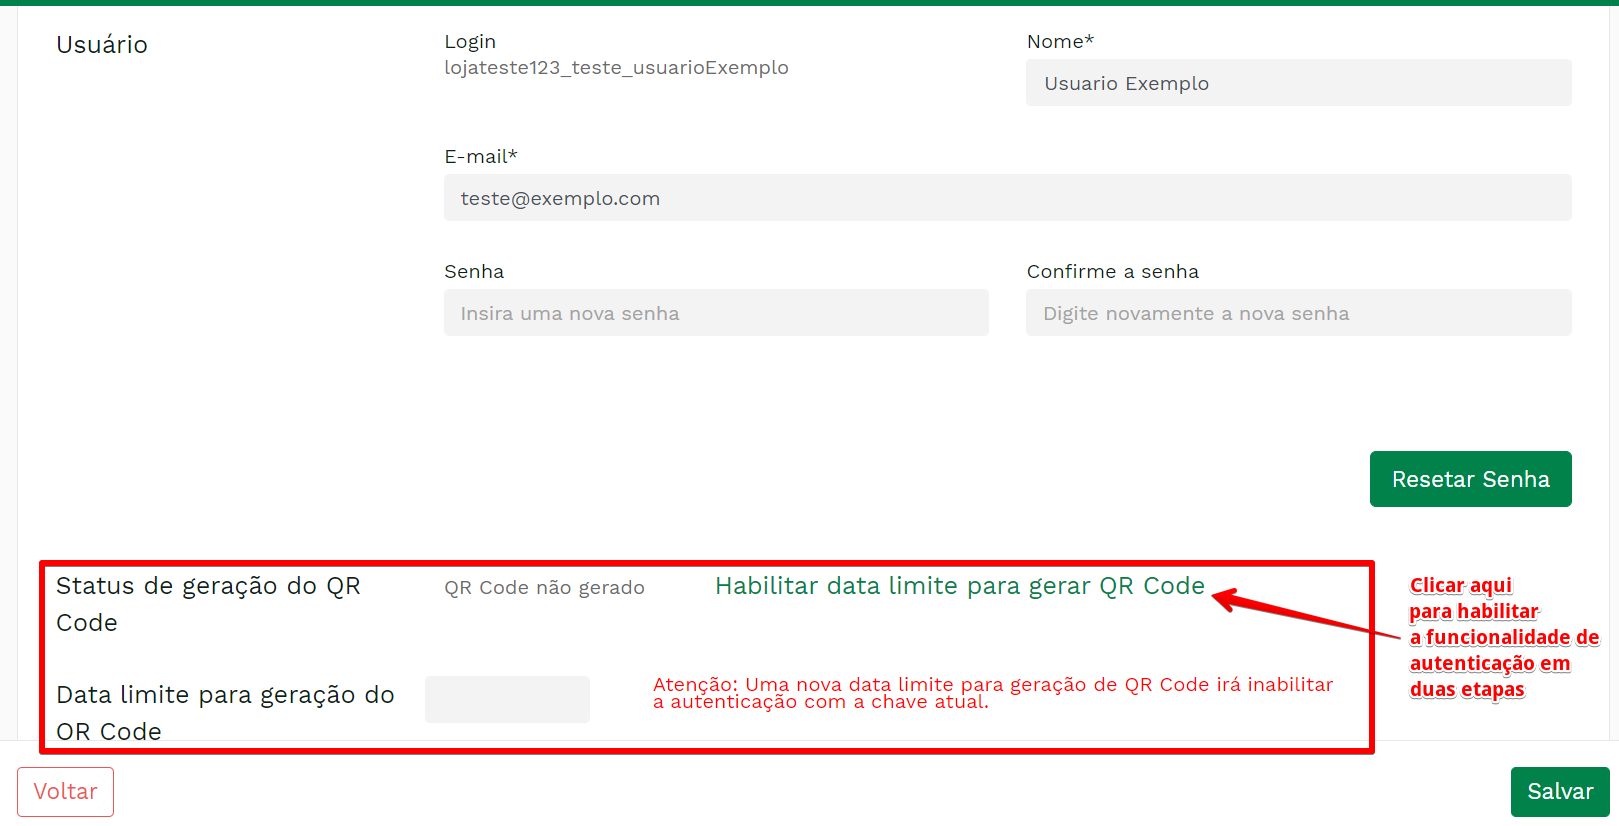
Just click on the link and a default date will be filled in the due date field. Clicking on Save will make this enablement effective.
With the two-step authentication functionality enabled by the support team and logged into the Stoere Portal, access the Two-step authentication option in the user menu, as shown in the image below:
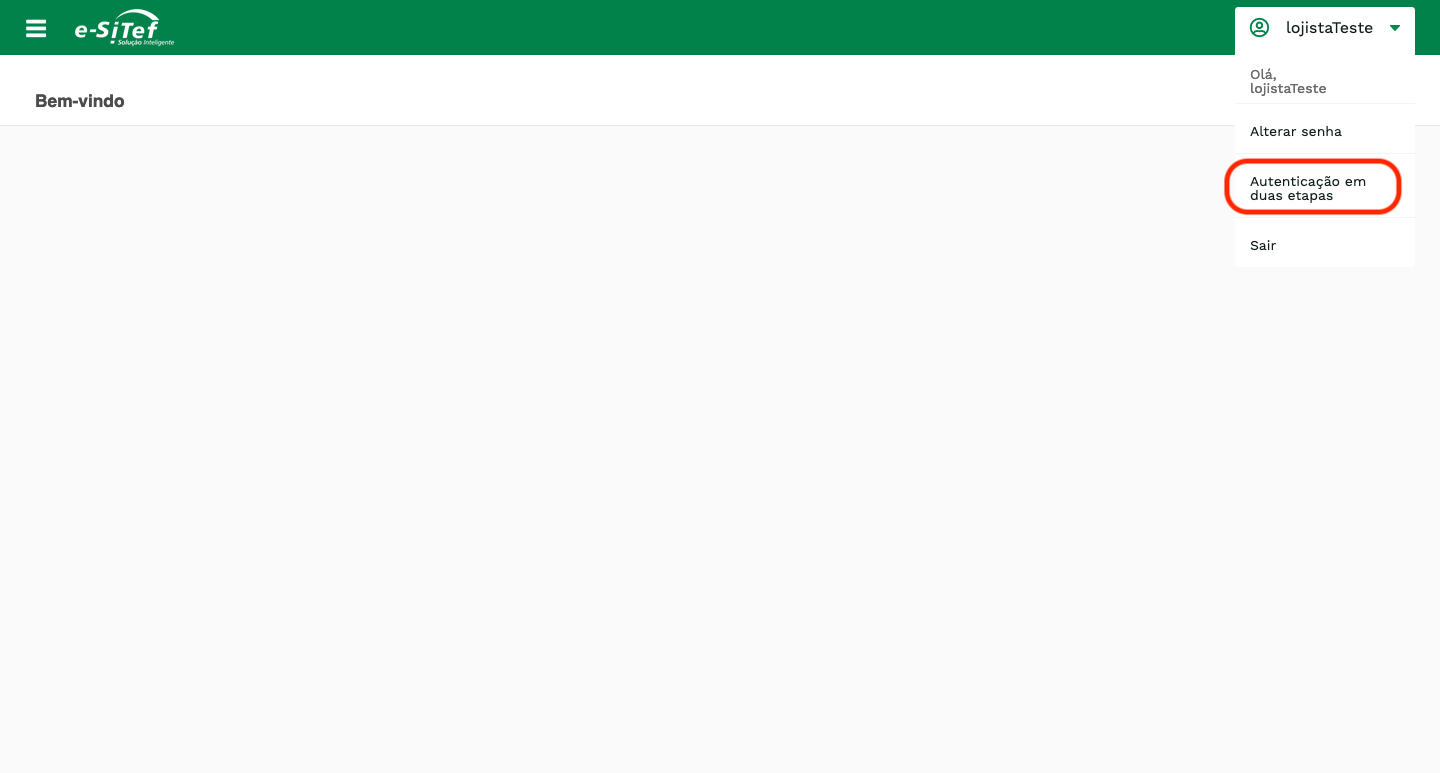
If all prerequisites are correct, a screen that looks like the following may be displayed:
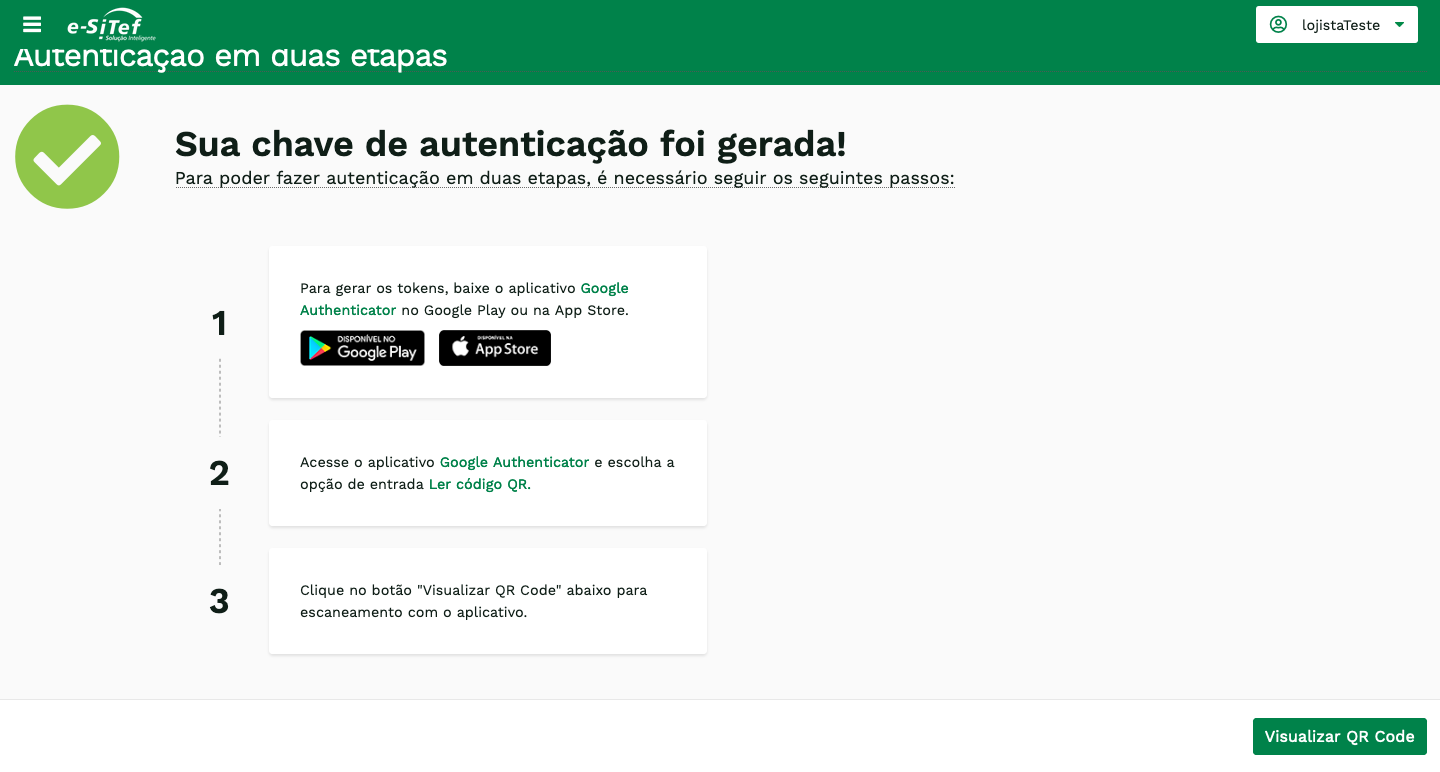
With the app properly configured on the mobile device, when clicking on View QR Code, a screen like the following may be displayed
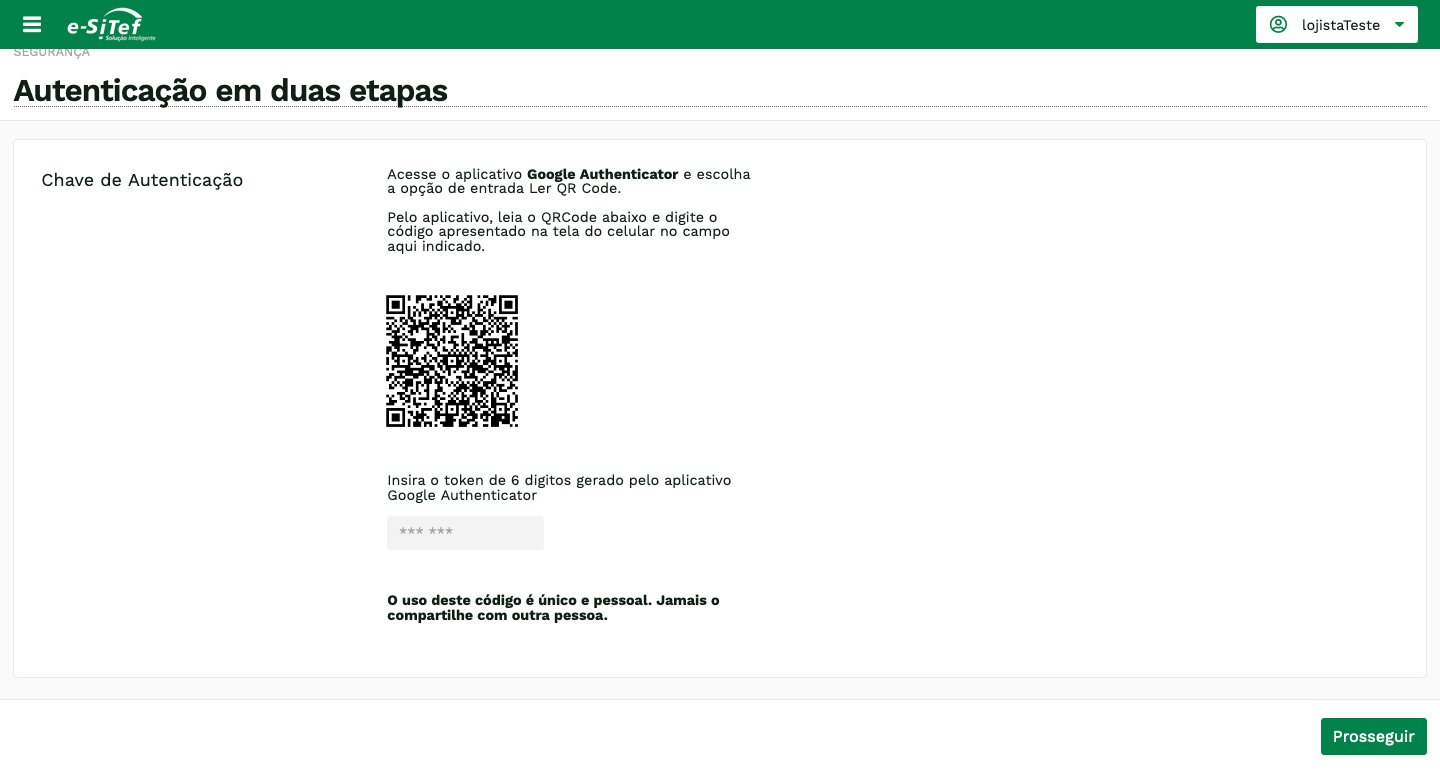
Within the Google Authenticator app, select the Scan QR Code option and point the camera at the QR code displayed on the screen. A 6-digit number will then be displayed on the cell phone, which must be entered in the field indicated on the Store Portal screen and, finally, click on Proceed.
ATTENTION: NEVER share this code with third parties. It is personal and non-transferable. If you have any problems or questions, please contact our support team, who will under no circumstances ask for your password or this authentication code.
If everything went well, a success message or the next screen for the step of the operation you were trying to perform will be displayed, and your user will be enabled for two-step authentication. Whenever required, you must access the Google Authenticator and enter the 6-digit number displayed in the app in the field indicated on the Store Portal screen.
Configure Authorizer Ordering
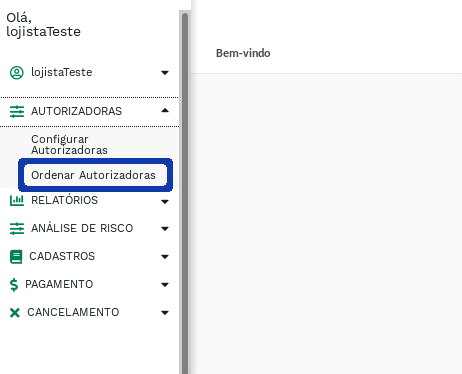
O Portal do Lojista também fornece a funcionalidade de Ordenação de Autorizadoras, que é mostrada ao clicar-se em Configurar Autorizadoras, conforme apresentado a seguir:
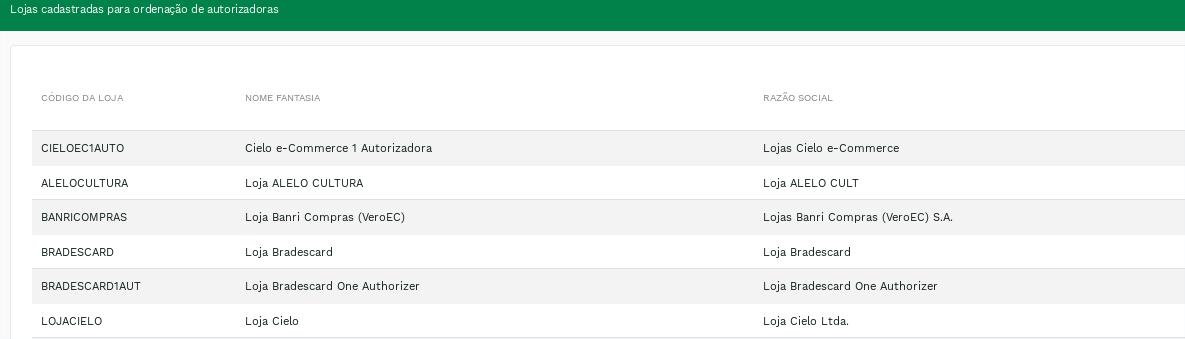
Uma vez que o usuário clique em Ordenar Autorizadoras são listadas as lojas (figura a seguir) que estão habilitadas com essa funcionalidade, caso nenhuma loja esteja habilitada e o usuário deseje utilizar a funcionalidade, entre em contato com suporte informando as lojas em que a ordenação será ativada:
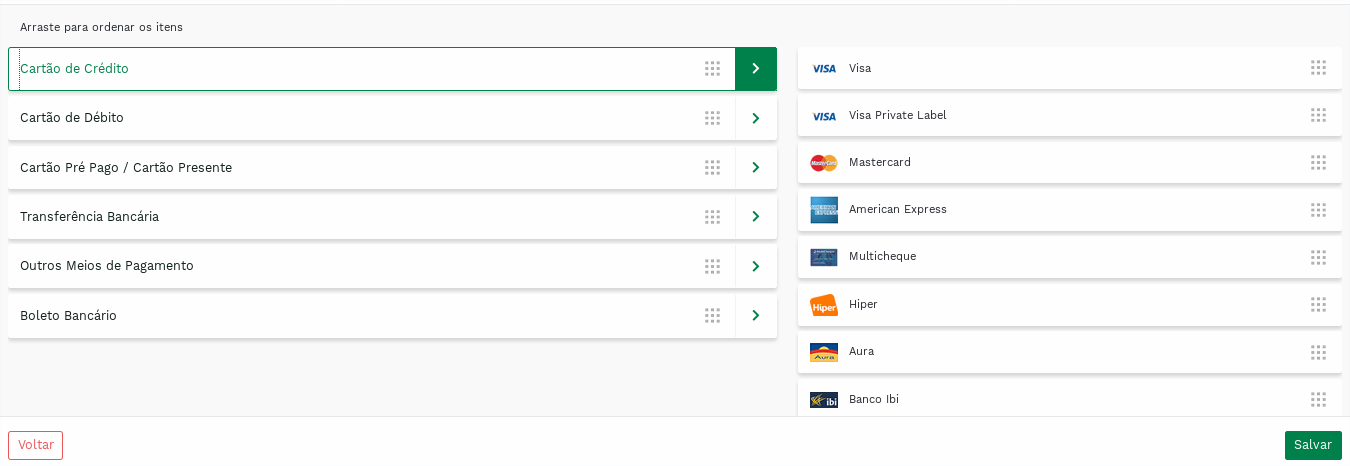
Após selecionar-se uma loja, a tela de ordenação é apresentada, como na figura abaixo. A ordenação é realizada através de movimentos de clicar e arrastar que podem ser realizados nos Tipos de autorizadoras (lado esquerdo da tela) e nas Autorizadoras (lado direito da tela).
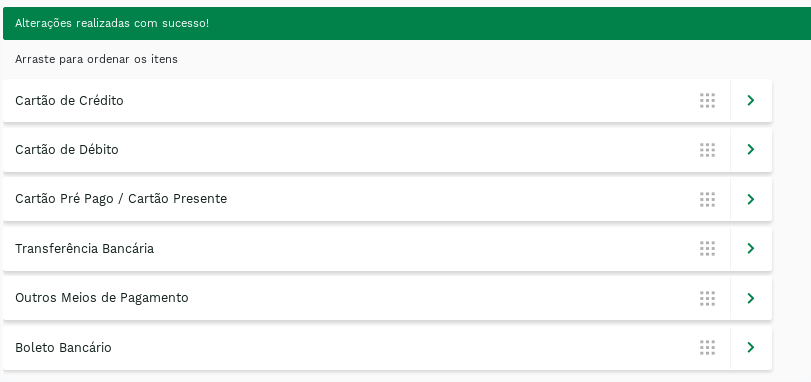
Após escolher e clicar em Salvar. Uma mensagem de aviso de sucesso será exibido.
User Settings
To change the registered password, just click on the username at the top edge of the page, indicated in the figure below:
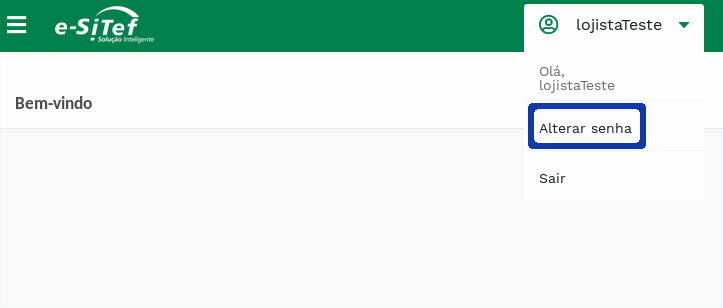
The user will see the screen presented in the item Password Reset on the Web Portal Access. Just follow the same procedures and the password will be changed at the end of the process.
To change the portal language, just click on the flag icon corresponding to the desired language, in the upper right corner of the page, indicated in the figure below
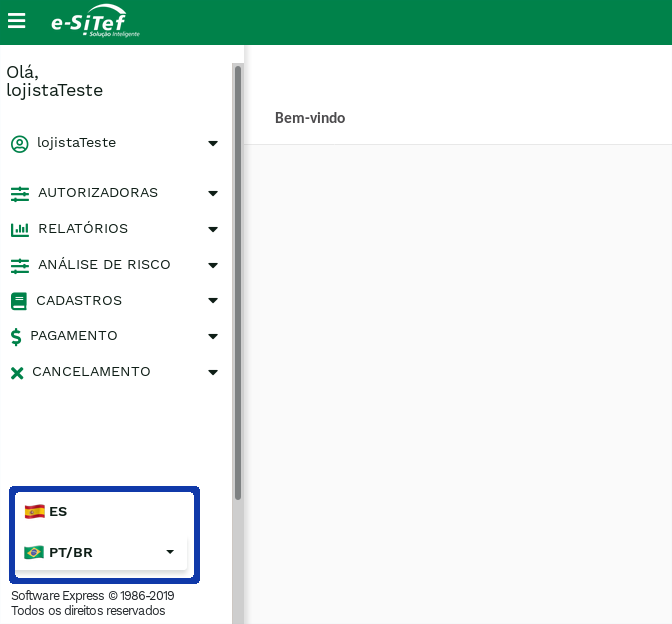
The default language is Brazilian Portuguese PT-BR.
Access to Web Portal
To use the Store's Portal, go to the link: https://esitef.softwareexpress.com.br/e-sitef-loja/.
login by filling in the User and Password fields in the corresponding blanks, as shown in the picture below:
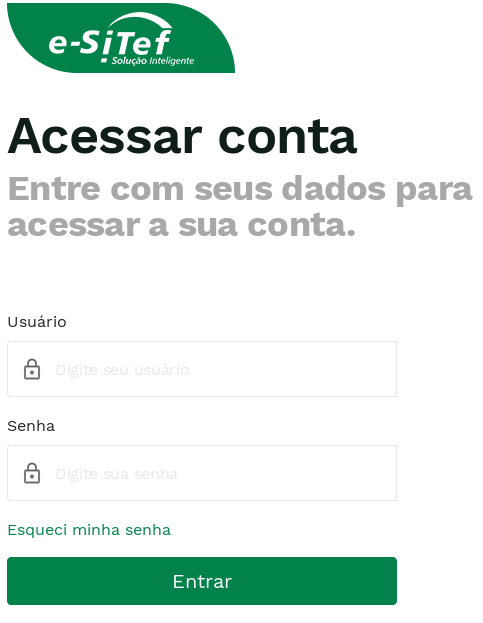
If any of the fields is invalid, an error message will be displayed right above the fields, highlighted in the following figure:
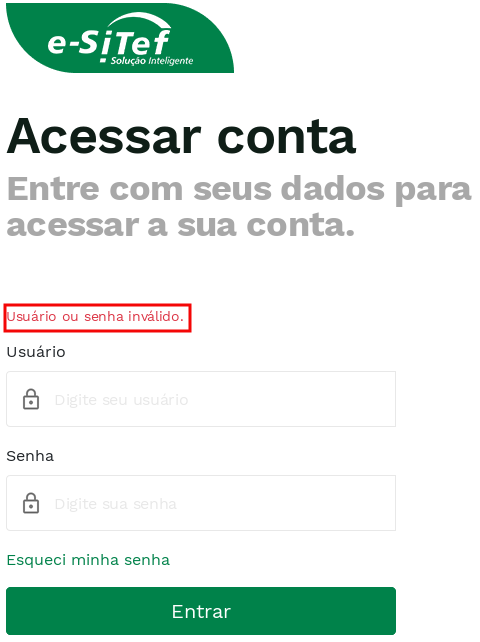
If the data is correct you will be taken to the web portal's homepage:
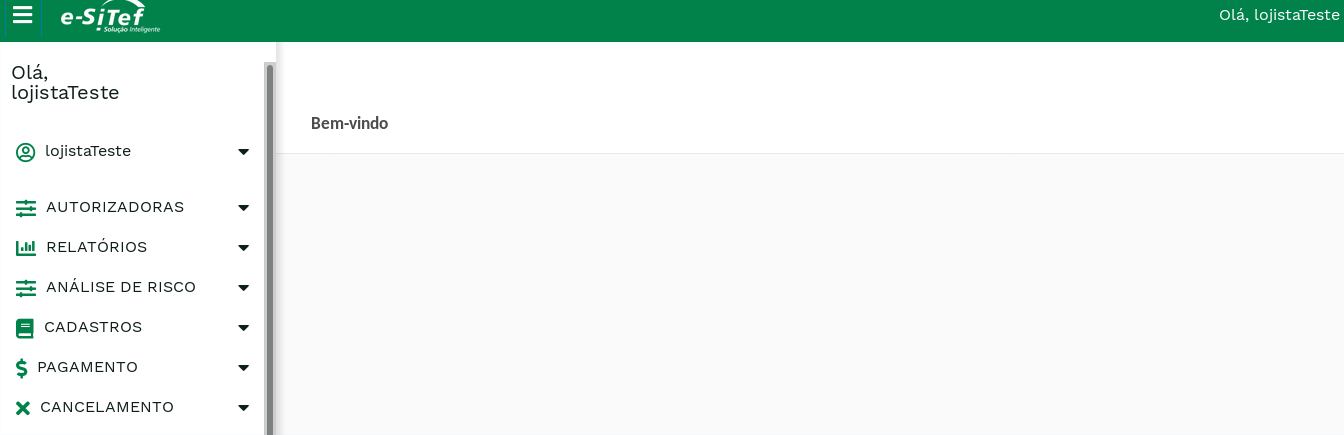
Notice that the links on the main menu depend on the profile configured for the user.**.
The first access can be performed with user data and password provided by the Payment Online production team or by another user who has access to create new accesses.
These data can be temporary or defined through an email containing a link to password definition.
A link to define the access password is sent to the email provided in the registration. If you can't find the email in your inbox, check the spam box.
Below is the content of the password setting email:
| Subject: Password Definition | Carat Portal |
|---|
| Store, Your Carat Portal user was created with the name: store Please click on the link below to set your password: https://esitef.softwareexpress.com.br/e-sitef-loja/acesso/primeiraSenha.se?token=abcd12345_exemplodetoken== Thank you for your preference, Carat Portal Team |
When accessing the link provided in the e-mail, you will be directed to a password definition screen, where you will be asked for the password that will be used in your access to the web portal.
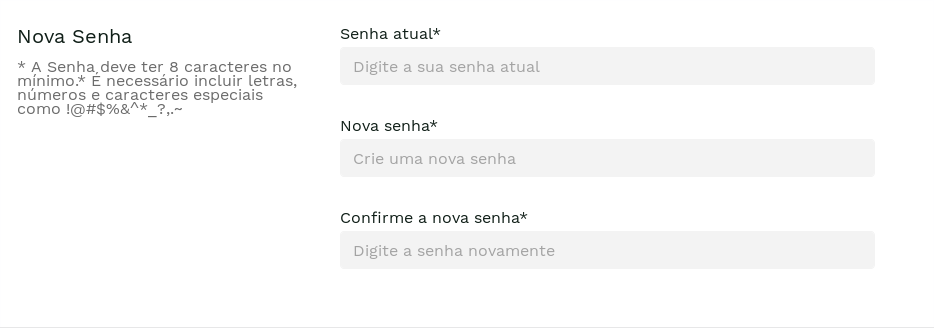
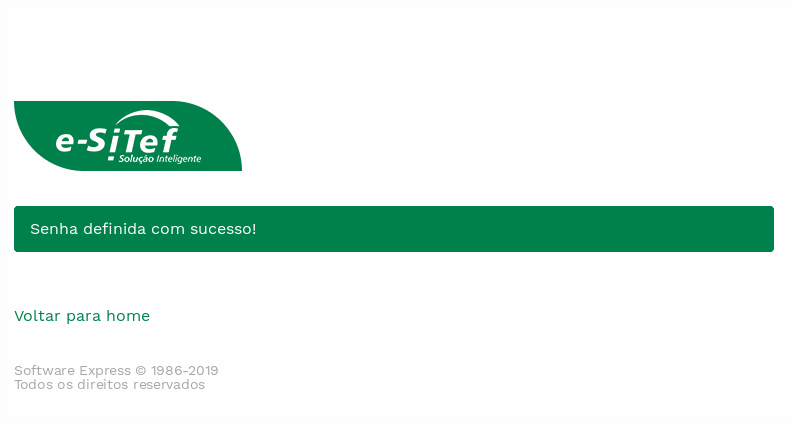
Após a definição da senha, você será encaminhado para outra página confirmando o sucesso do procedimento.
Clique em “Ir para página inicial†e inicie o processo de login com o usuário informado no e-mail e a senha que definiu:
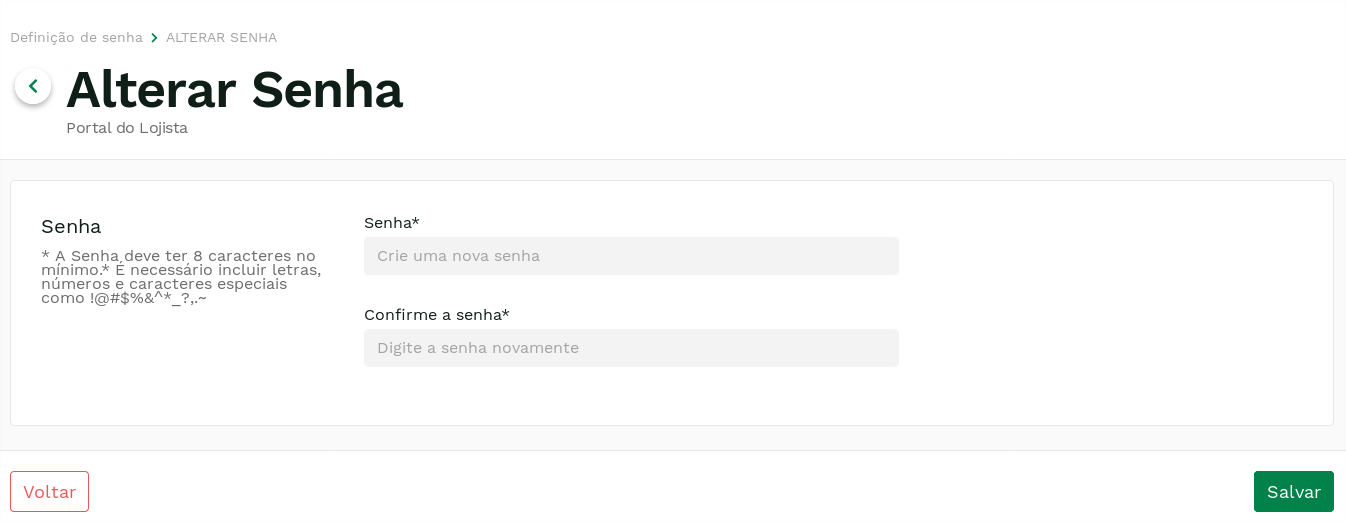
As soon as the first access with the temporary data is made, the user will be prompted to change the password. A screen similar to the one in the following picture will be displayed:
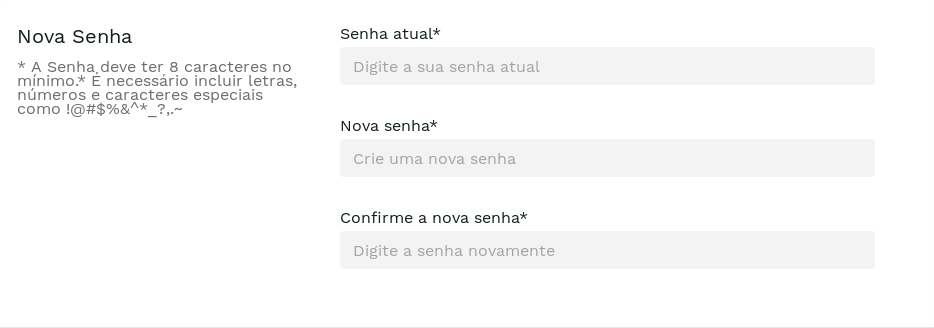
The fields New password and Confirm new password must be filled in identically.
Only passwords of minimum eight characters and strength at least Medium will be accepted.
The levels are calculated according to the length of the password and the types of characters used in the password.
The following picture below shows the different password levels that can be obtained.
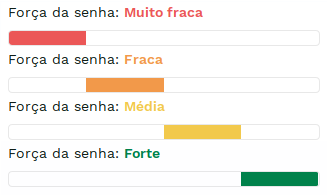
After changing the password, the user will be directed to the web portal's home page.
To start the password reset process, click on “Forgot my password†on the portal login home screen:
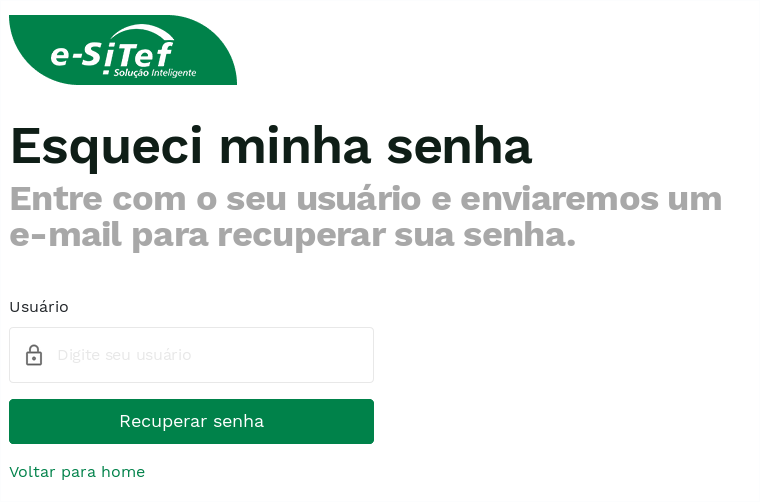
You will be asked to fill in your login:
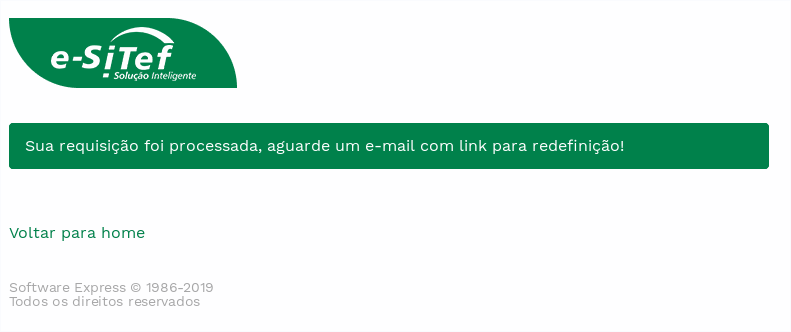
After confirming, the following screen will be displayed:
An email will be sent to the registered email address with the following content:
| Subject: Password Reset | Carat Portal |
|---|
| Store, We have received a request to reset your user's password on the Payment Online Web Portal, click on the link below to proceed: https://esitef.softwareexpress.com.br/e-sitef-loja/acesso/entradaReset.se?token=abcd12345_exemplodetoken== If you didn't make the request, you can ignore this email. Thank you for your preference, Carat Portal Team |
Upon accessing the link provided in the email you will be taken to a password setting screen. Define the new password that will be used when accessing the portal.
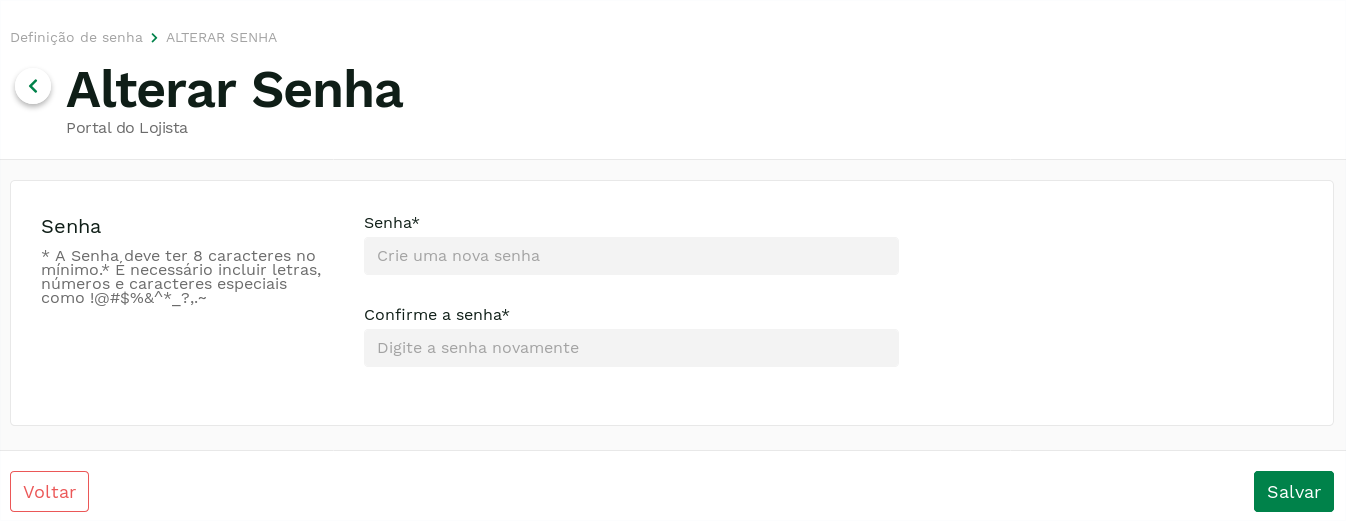
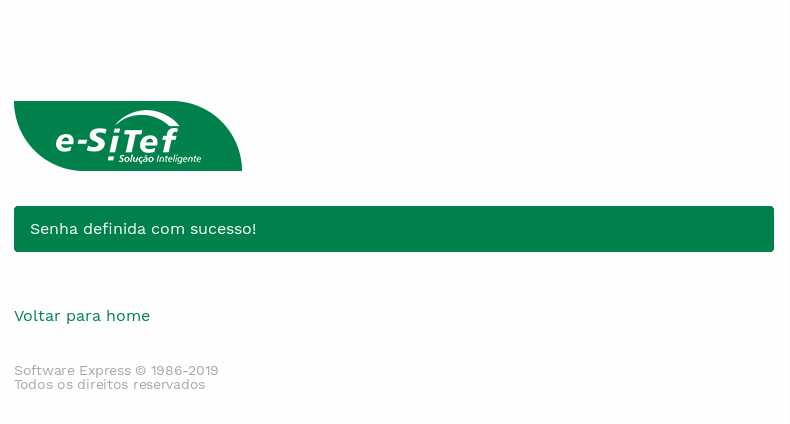
After setting the password, you will be taken to another page confirming the success of the procedure.
Click on "Go to homepage" and start the login process with the user entered in the email and the password you defined:
Risk Analysis Configuration
The Risk Analysis Configuration option is a tool that allows the merchant to define the decision parameters on a risk analysis transaction.
Attention:
To view the Risk Analysis Configuration option, the operating team must release the necessary permission.
There is already a documentation about this tool. Please request the document Integration with Anti-Fraud Solutions.
Configure Authorizers
The option Configure Authorizers allows the alteration of the parameters referring to the authorized companies registered for a specific store. Through it, it is possible to modify the status of the authorizer, type of routing, and properties related to installment payments.
IMPORTANT: To perform configurations in authorization agencies that have extra parameters through the Store Portal, the authentication code will be required in two steps to complete the configuration. CIf this authentication method is not enabled, instructions on the procedure that must be taken to continue will be displayed on the screen. For further information about this authentication and how to enable it, click here.
To proceed with the authorizers configuration, follow the procedures below.
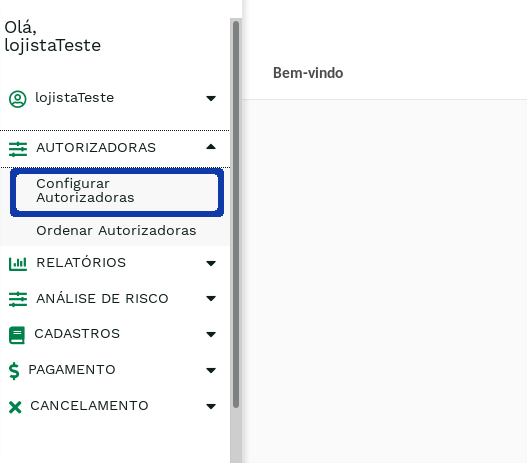
- Click on Configure Authorizers from the main menu:
- Select the store where you want to configure::
Remark:
If the user only has one registered store, the screen below will not be shown, so skip to the next step.
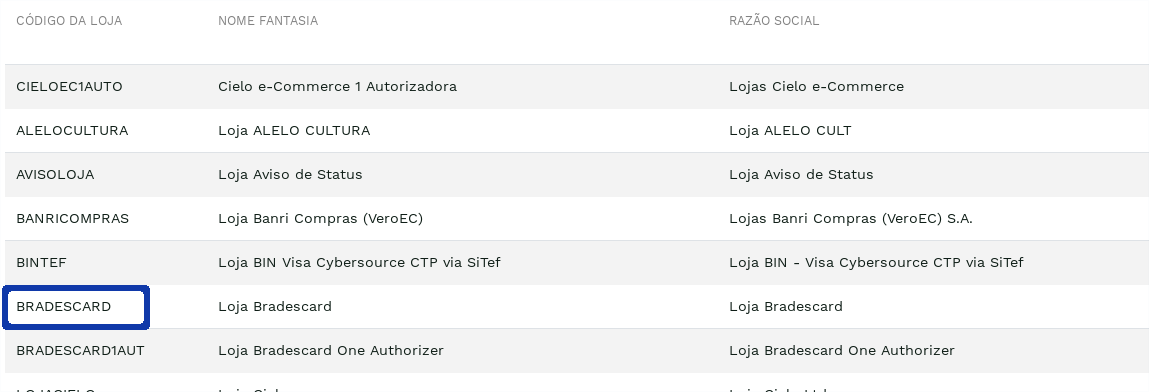
To select a store, just click on one of the respective data: store code, trade name, or corporate name. All redirect to the page shown in the next step.
The BACK button returns you to the portal home page.
- Select the authorizer you want to configure:
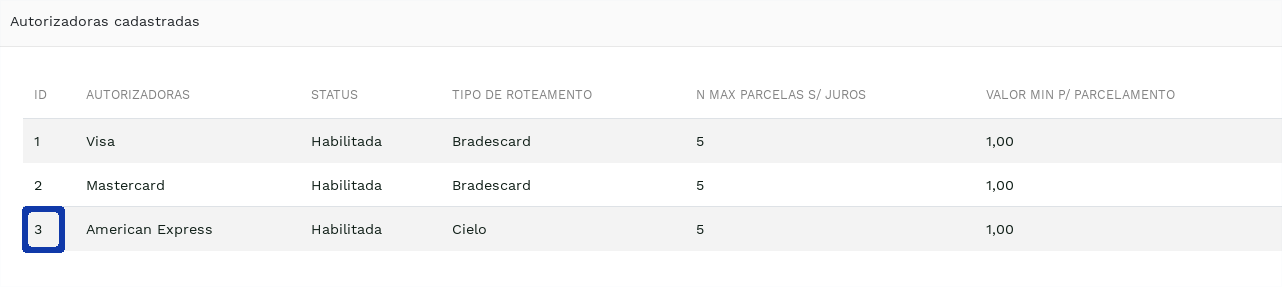
To select an authorizer, just click on one of the respective data: authorizer id, authorizer, authorizer status, or routing type. All redirect to the page shown in the next step.
The BACK button returns to the registered stores screen for authorizing configuration.
ATTENTION: If the selected authorizer has extra parameters and the two-step authentication method is not enabled, an instructions screen will be displayed to configure the two-step authentication.
"Authorizers two-factor configuration instructions.." -no-filter
For more information about this authentication and how to enable it, click here.
- Fill in the fields as desired:
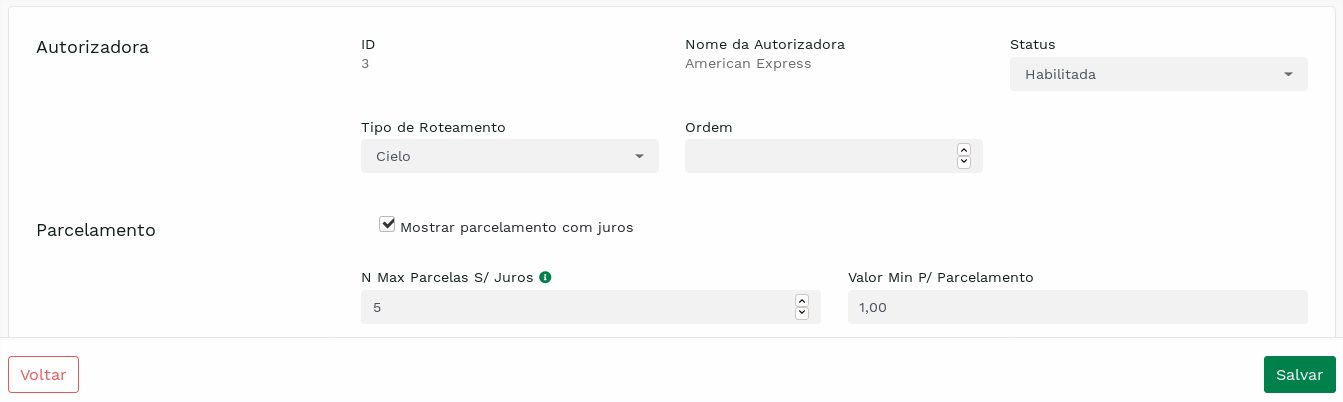
Click on the Save button to consolidate the configuration performed. The success confirmation message is highlighted in the figure below.
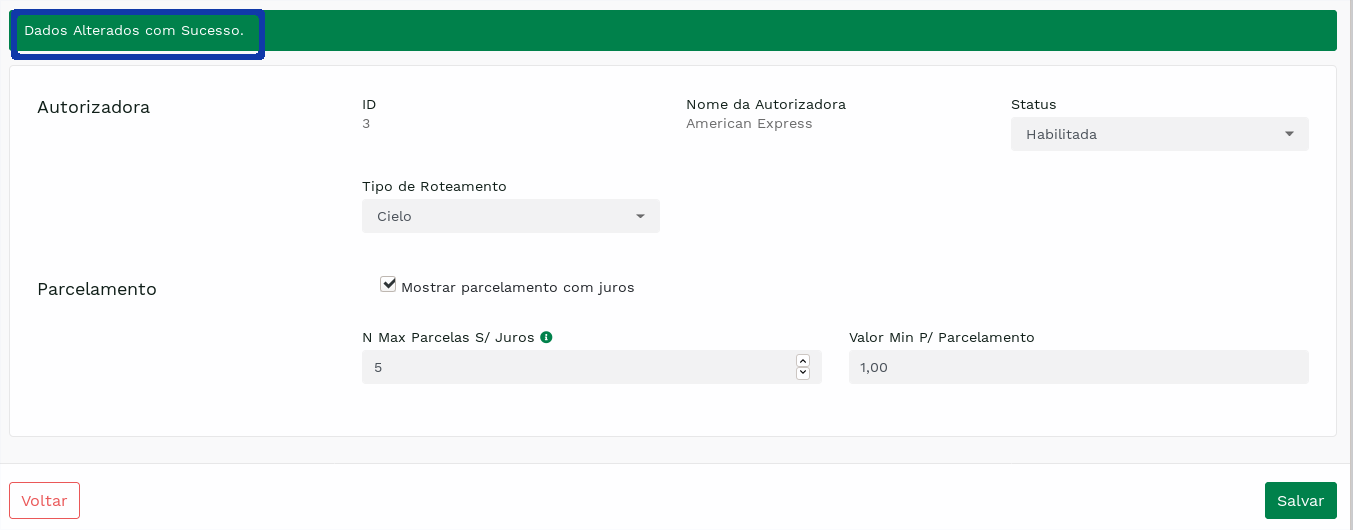
The BACK button returns to the screen of authorizers registered for the store.
n some cases, the authorizer has additional configuration parameters that need to be input for correct operation with it, as in the example below:
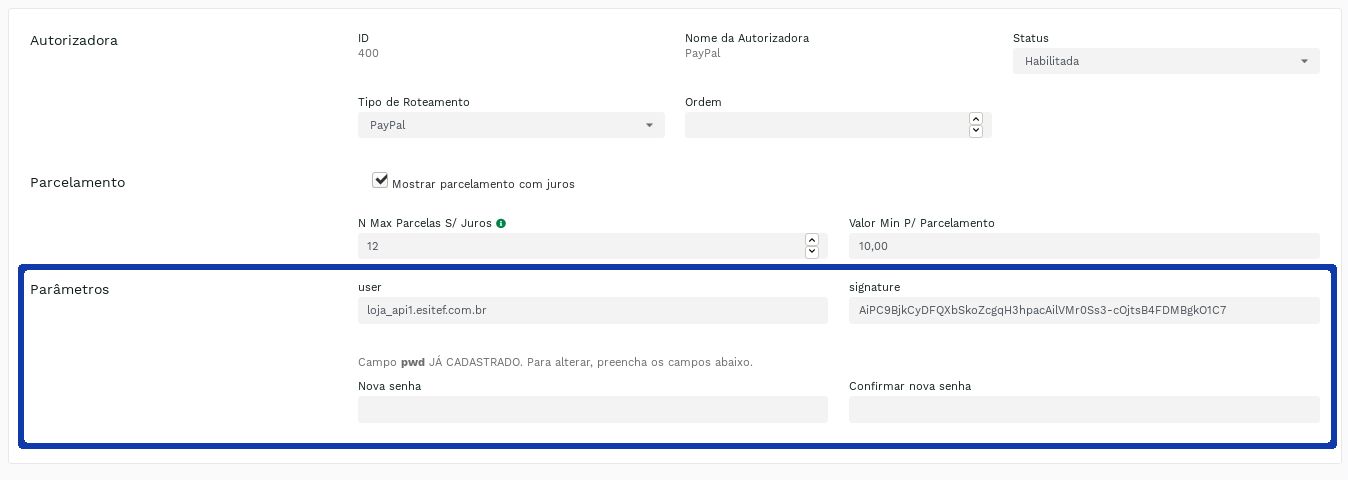
Attention:
According to the needs of each authorizer, a group of different parameters will be requested.
In such cases, clicking on save will require the Two-Factor Authentication token.
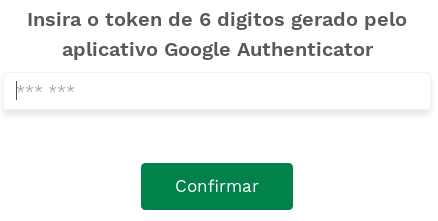
For further information click here.
In some cases, a password type parameter is registered:

In this case, a password already registered with the authorizing/routing network must be registered. To enter a password or to update it with a new one, filling it in again in the New and Confirm New field is required. If the password entered is not the same in both fields, an error message is displayed, as shown in the following figure:

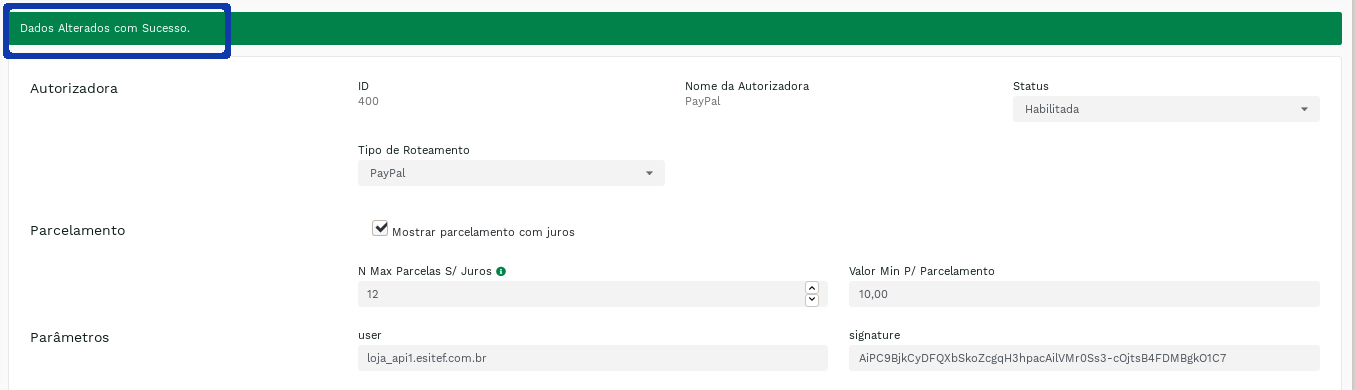
If the password is successfully entered or changed, a success message will be displayed on the screen:
Report: Analytic
Analytical Report allows you to export payment link transactions by store group in a certain period of time.
To access this report, place your mouse cursor over the link Reports from the main menu, and a sub-menu will be displayed. Then click on Analytical as shown below:
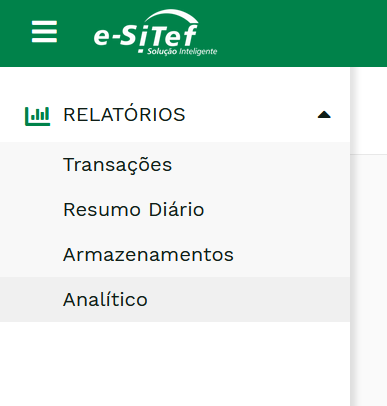
With that, a screen similar to the one below will be displayed:

In this screen, the merchant has the option to define filters that he/she wants to apply before exporting the file with the transactions of the determined period of time. There is also the option to send the file (compressed) to the user's email. The following table describes the possible filters for this report:
| Filter | Description |
|---|---|
| Start date <span style={{ color: 'red' }}>* | Reference start date for export |
| End Date <span style={{ color: 'red' }}>* | Reference end date for export |
| Search by store group | This option must be checked if the user wants to export transactions by store group. If unchecked, the export will be done by store. |
| Send report by email | If this option is enabled, the Carat Portal will send the report to the user's email. |
| Group of Stores | Group associated with the user with a collection of stores. |
| Store Code | Store associated with the user. Leave it blank if you want to export transactions from all stores. |
Attention:
Note that the Date fields, with marking <span style={{ color: 'red' }}>*, are mandatory and must not exceed a difference of 3 (three) months.
In the option of sending an email, the Carat Portal is not responsible for not receiving the file if the user's email is invalid or out of date, or if the email server is down.
Finally, after defining the desired filters, just click on Export. You will receive a CSV file with all transactions that meet the specified criteria.
O Relatório de Transações permite visualizar todas as transações registradas em suas lojas num determinado perÃodo de tempo. Vários filtros são aplicáveis na listagem das transações, e funcionalidades como gráficos também estão disponÃveis para o lojista.
Para acessar esse relatório, coloque o cursor do mouse sobre o link Relatórios do menu principal, e um sub-menu aparecerá. Depois, clique em Relatório de Transações conforme figura abaixo:
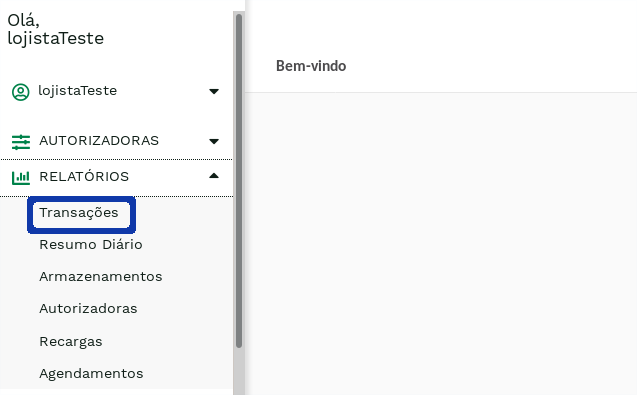
Assim uma tela semelhante a abaixo será apresentada:
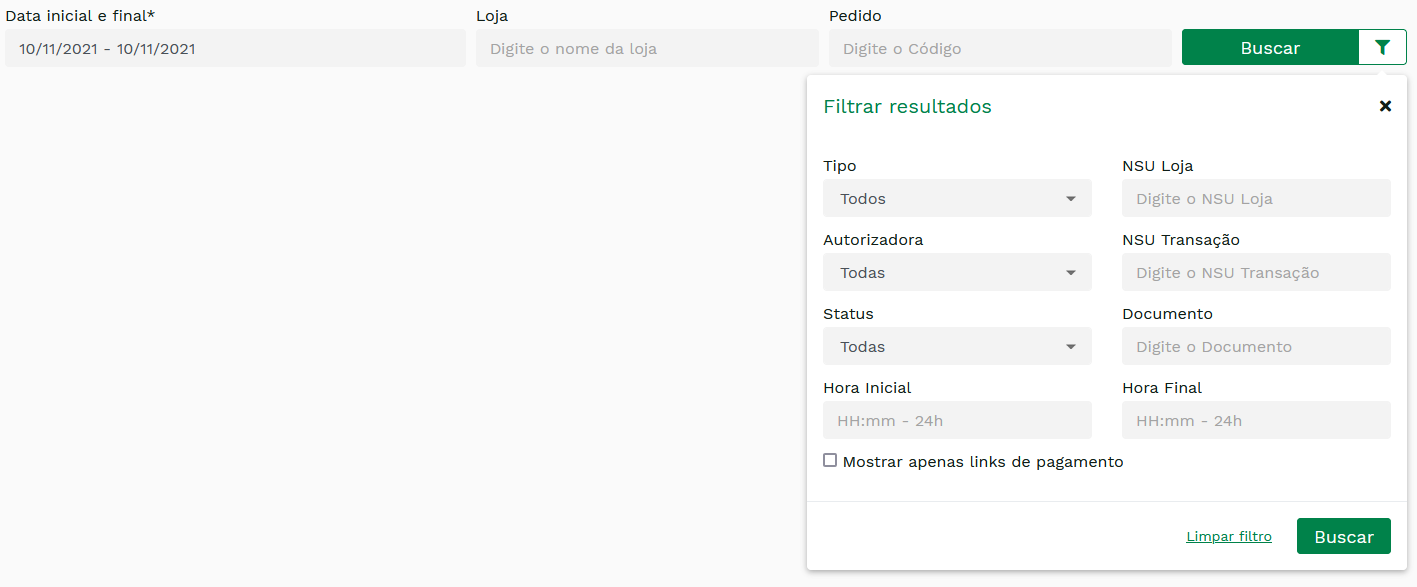
Nesta tela, o lojista tem a opção de definir filtros que deseja aplicar antes de gerar a listagem das transações do perÃodo de tempo determinado. A tabela a seguir descreve os filtros possÃveis para este relatório:
Tabela 1: Filtros do Relatório de Transações.
| Filtro | Descrição |
|---|---|
| Data Inicial <span style={{ color: 'red' }}>* | Data inicial de referência para listagem das transações |
| Data Final <span style={{ color: 'red' }}>* | Data final de referência para listagem das transações |
| NSU Transação | Número único correspondente à transação |
| NSU Loja | Número sequencial da loja |
| Hora Inicial | Hora inicial de referência para listagem das transações |
| Hora Final | Hora final de referência para listagem das transações |
| Código Pedido | Identificação do pedido realizado à loja |
| Documento | Identificação do cliente |
| Tipo | Tipo da transação (Pagamento, Estorno, Recarga, Consulta AVS, Pré-autorização ou Captura de pré-autorização). |
| Código Loja | Loja cadastrada para o lojista |
| Autorizadora | Autorizadora cadastrada na loja |
| Status | Status da transação (Nova, Aguardando usuário, Aguardando pagamento, Pagamento pendente de confirmação, Pagamento desfeito, Confirmada, Expirada, Cancelada, Negada, Inválida, Estornada, Bloqueada, Abandonada, Removida, Erro de comunicação). |
| Mostrar apenas links de pagamento | Quando selecionado, exibe somente as transações criadas a partir de link de pagamento. |
Atenção:
Note que os campos de Data, com marcação <span style={{ color: 'red' }}>*, são de preenchimento obrigatório e não deverão ultrapassar uma diferença de 3 (três) meses.
Vale ressaltar que os campos Hora Inicial e Hora Final só são aplicados caso o filtro de Data corresponda a um único dia (ou seja, apresente o mesmo dia tanto na Data Inicial quanto na Data Final). Caso o perÃodo de tempo seja maior que um dia, os campos de hora serão ignorados na listagem de transações.
Por fim, depois de definir os filtros desejados, basta clicar em Buscar. Você receberá uma lista com todas as transações que satisfazem os critérios determinados. A tela é semelhante à da figura a seguir:
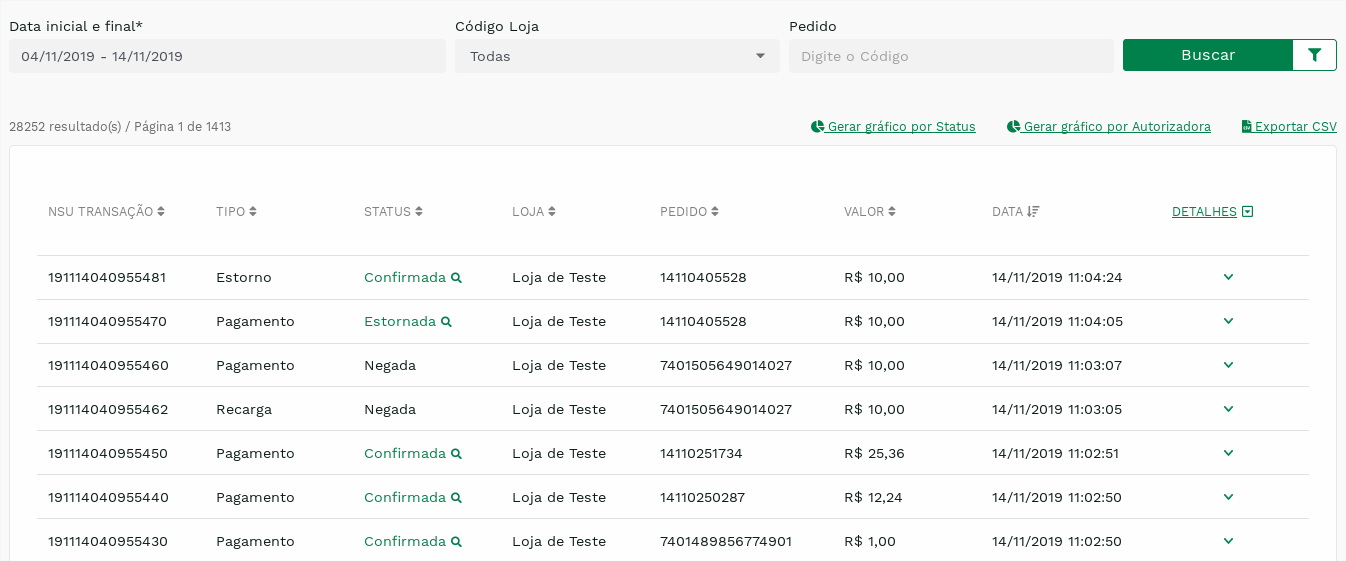
Nesta lista, estão presentes várias funcionalidades úteis ao lojista. Por exemplo, é possÃvel ordenar as transações por ordem numérica ou alfabética de algum dos parâmetros principais. Para isso, basta clicar em algum dos tÃtulos de parâmetro – NSU TRANSAÇÃO, TIPO, STATUS, LOJA, PEDIDO, VALOR, DATA.
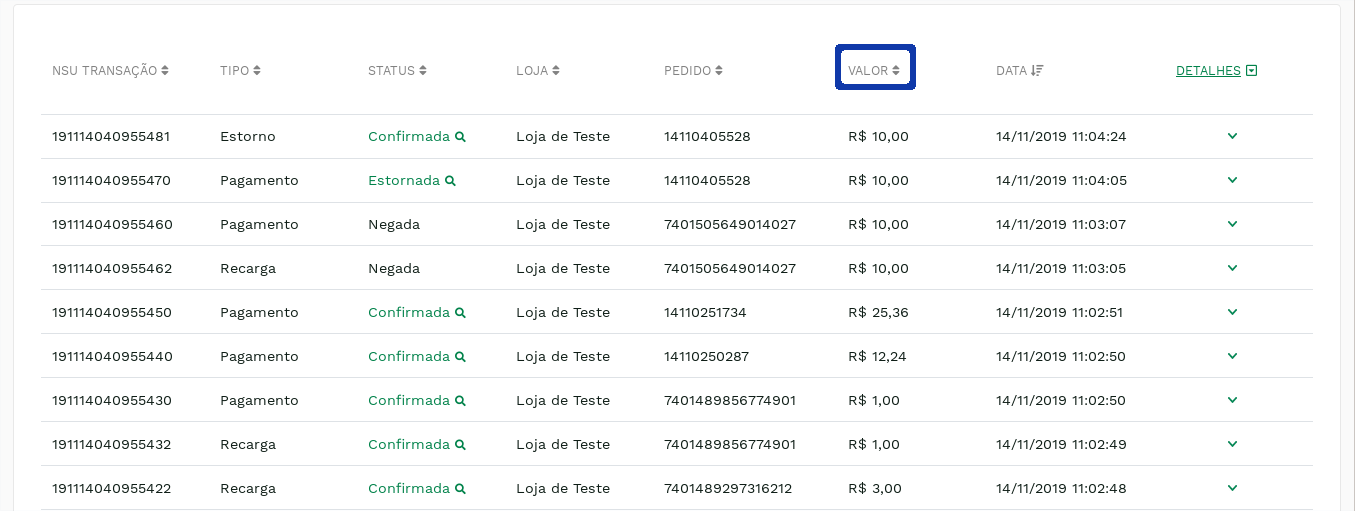
Clicar uma vez ordena as transações em ordem ascendente. Clicar outra vez as ordena em ordem descendente. O padrão da listagem é organizar as transações em ordem da mais recente para a menos recente.
Também é possÃvel ver mais detalhes sobre a transação. Para isso, basta clicar no Ãcone  , ao final da linha correspondente à transação:

Isto abrirá um espaço com mais detalhes sobre a transação:
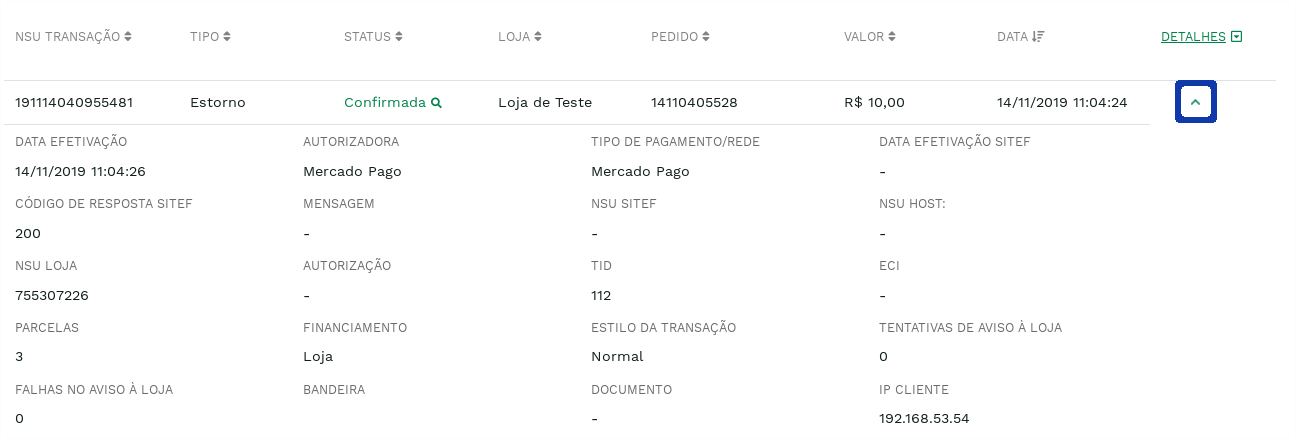
É possÃvel ocultar estes detalhes clicando no Ãcone  , ao final da linha correspondente à transação (no mesmo lugar onde foi clicado em no Ãcone ).
Também é possÃvel exibir os detalhes de todas as transações da lista. Para isso, basta clicar no tÃtulo de parâmetro DETALHES. Clicar uma vez exibe os detalhes de todas as transações da lista. Clicar de novo oculta todos os detalhes.
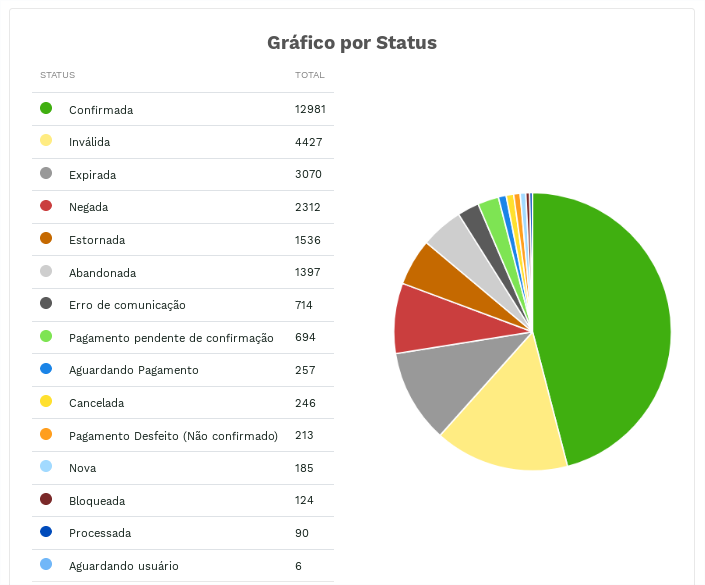
Outra funcionalidade existente ao lojista é a possibilidade de visualizar gráficos correspondentes à listagem de transações exibida. Podem ser gerados gráficos por status da transação, ou por autorizadora. Para visualizar estes gráficos, basta clicar em GERAR GRÃFICO POR STATUS, ou GERAR GRÃFICO POR AUTORIZADORA, destacados na figura a seguir:
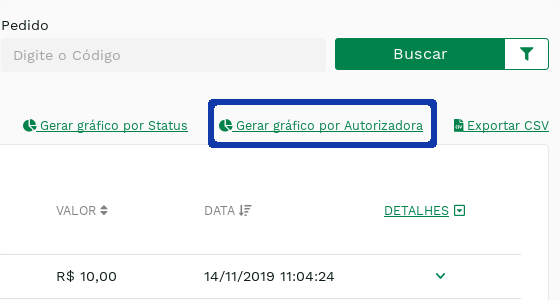
Após clicar em um desses links, seu navegador abrirá uma janela pop-up para exibir este gráfico. A figura abaixo é um exemplo do visual do gráfico gerado:
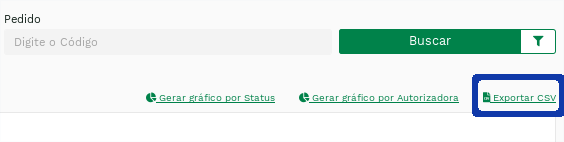
Mais uma funcionalidade presente neste relatório é a possibilidade de exportar a lista de transações em um arquivo CSV (lista de dados separados por ponto-e-vÃrgula), que pode ser trabalhado no Microsoft Excel ou um programa similar.
Para isso, basta clicar em EXPORTAR ARQUIVO CSV, destacado na figura a seguir:
Em seguida seu navegador efetuará o download do arquivo CSV.
A tabela seguinte apresenta os campos que compõe o arquivo:
Tabela 2: Campos exportados em CSV.
| Campo | Descrição |
|---|---|
| NSU | NSU (número sequencial único) no Carat |
| TIPO | Tipo da transação |
| STATUS | Status da transação no Carat |
| CODIGOLOJA | Código da loja (merchant id) |
| NOMELOJA | Nome fantasia da loja |
| PEDIDO | Código do pedido |
| VALOR | Valor da transação (centavos) |
| DATACRIACAO | Data de criação da transação no Carat |
| DATAEFETIVACAO | Data de efetivação da transação no Carat |
| DATAEFETIVACAOOSITEF | Data de efetivação no SiTef ou adquirente direto |
| IDAUTORIZADORA | Código da autorizadora (authorizer id) no Carat |
| NOMEAUTORIZADORA | Nome da autorizadora no Carat |
| TIPOPAGAMENTO | Roteamento da transação |
| RESPOSTASITEF | Código de Resposta do SiTef ou adquirente direto |
| MENSAGEMSITEF | Mensagem de Resposta do SiTef ou adquirente direto |
| NSUSITEF | NSU no SiTef |
| NSUHOST | NSU no Host |
| NSULOJA | NSU da Loja |
| AUTORIZACAO | Código de Autorização |
| PARCELAS | Parcelas da transação |
| FINANCIAMENTO | Tipo de financiamento:
|
| TID | TID (Transaction ID) - identifica a transação na adquirente em integrações diretas |
| ECI | ECI (Electronic Commerce Indicator) - indica o nÃvel de segurança da transação eletrônica em relação a autenticação de portador do cartão. |
| ESTILO | Estilo da Transação:
|
| AVISOS | Tentativas de Aviso a Loja sobre status de transações HTML |
| FALHAS | Tentativas com Falha de Aviso a Loja sobre status de transações HTML |
| IPCLIENTE | IP do Usuário Final |
| DOCUMENTO | Documento / customerID |
| USUARIO | Login do usuário que efetuou a transação no POS Virtual |
| MOEDA | Moeda registrada na transação, seguindo a ISO 4217. Em muitos casos, tem apenas valor de apresentação em relatórios, dependendo da rede adquirente. Ex: Para o SiTef esta informação não é repassada. |
Atenção:
Novos campos podem ser adicionados a estes sem aviso prévio. Caso este arquivo seja processado por algum sistema, este deve estar SEMPRE preparado para a inclusão de novos campos.
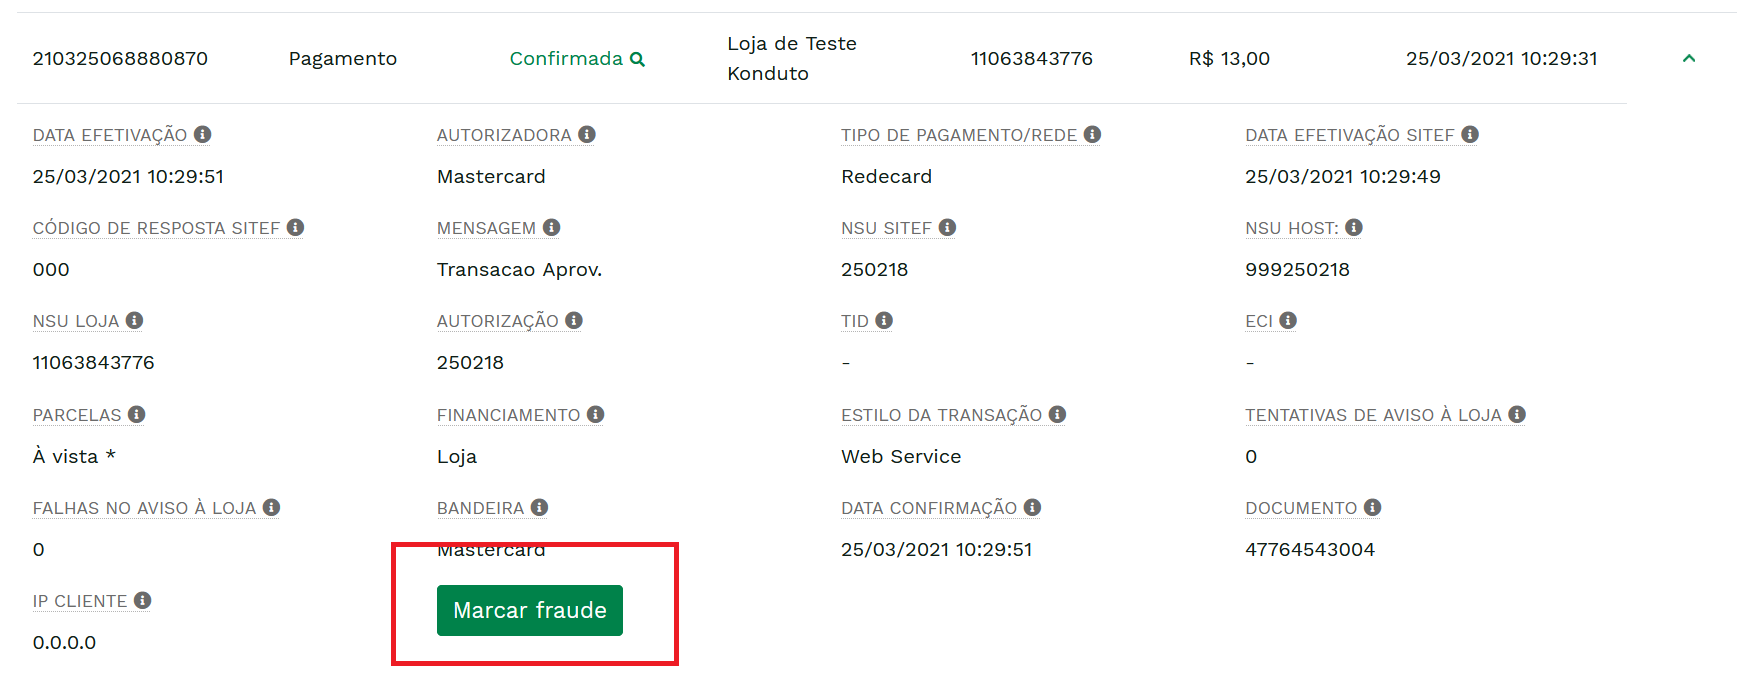
Após uma transação com antifraude bem sucedida, a loja pode vir a identificar que, na realidade, se tratou de uma fraude. Nesse caso, caso o usuário tenha a permissão adequada (entre em contato com nossa equipe de suporte), ele pode localizar essa transação no relatório e clicar no botão "Marcar fraude" para avisar a instituição de análise de risco sobre essa ocorrência, conforme a figura abaixo:
Isso irá refinar o processo de análise dessa instituição, tornando-o mais preciso e evitando mais fraudes futuramente.
Atualmente, esta funcionalidade suporta as seguintes instituições de antifraude:
- Konduto
- Antifraude Fiserv
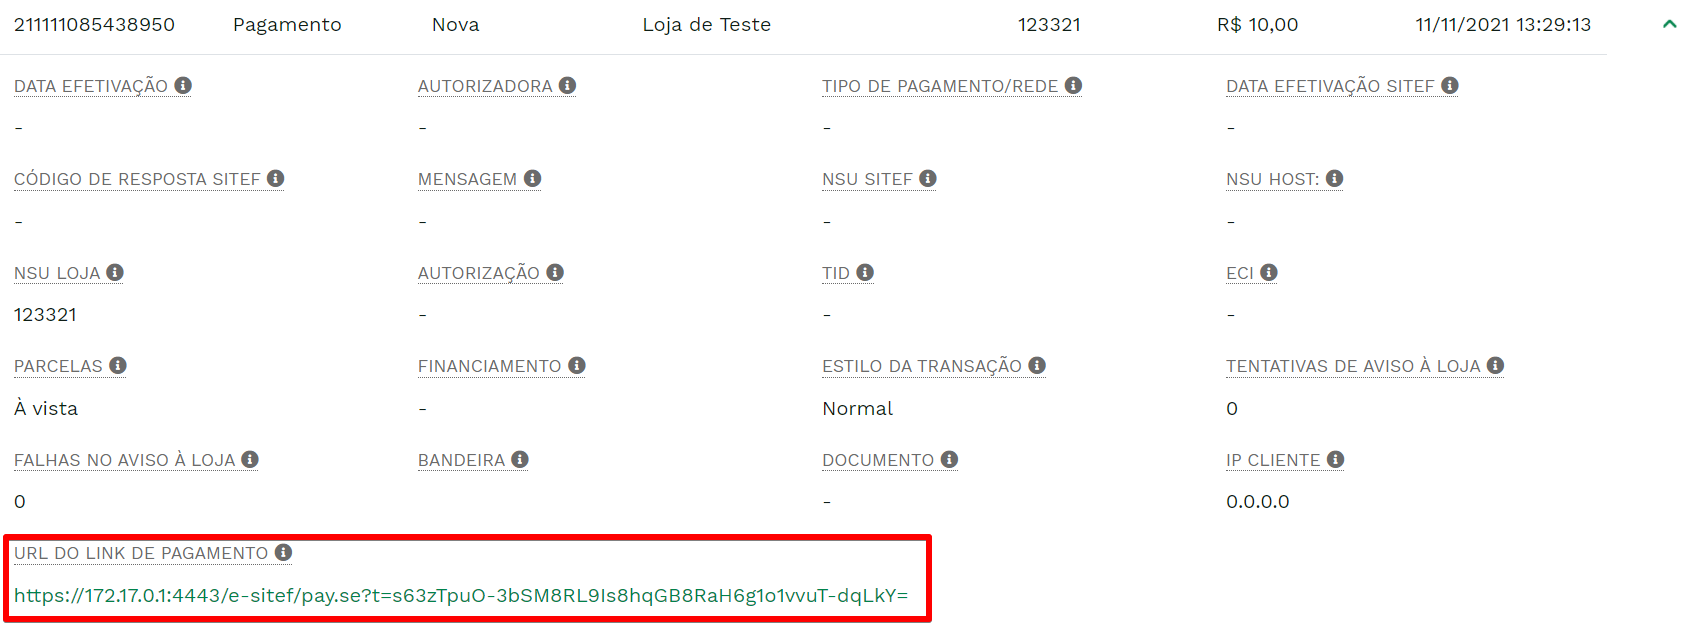
Quando a transação é criada a partir da geração de link de pagamento, é possÃvel recuperar a URL da mesma no detalhe da transação:
Report: Daily Summary
The Daily Summary Report consists of a quick and practical view of the Status and Authorizer graphs of the transactions carried out up to that moment in the day.
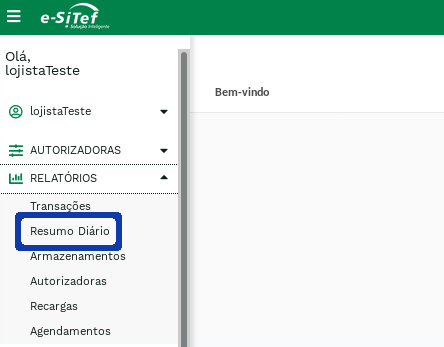
To access this report, place your mouse cursor over the link Reports from the main menu, and a submenu will appear. Then click on Daily Summary:
The displayed screen will be similar to the one below:
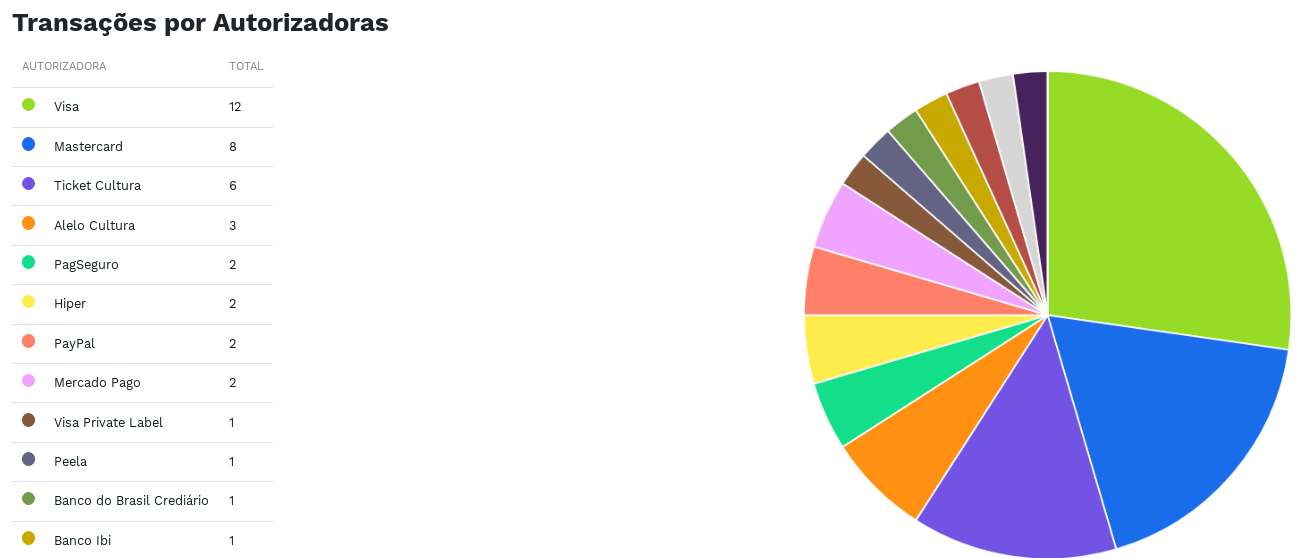
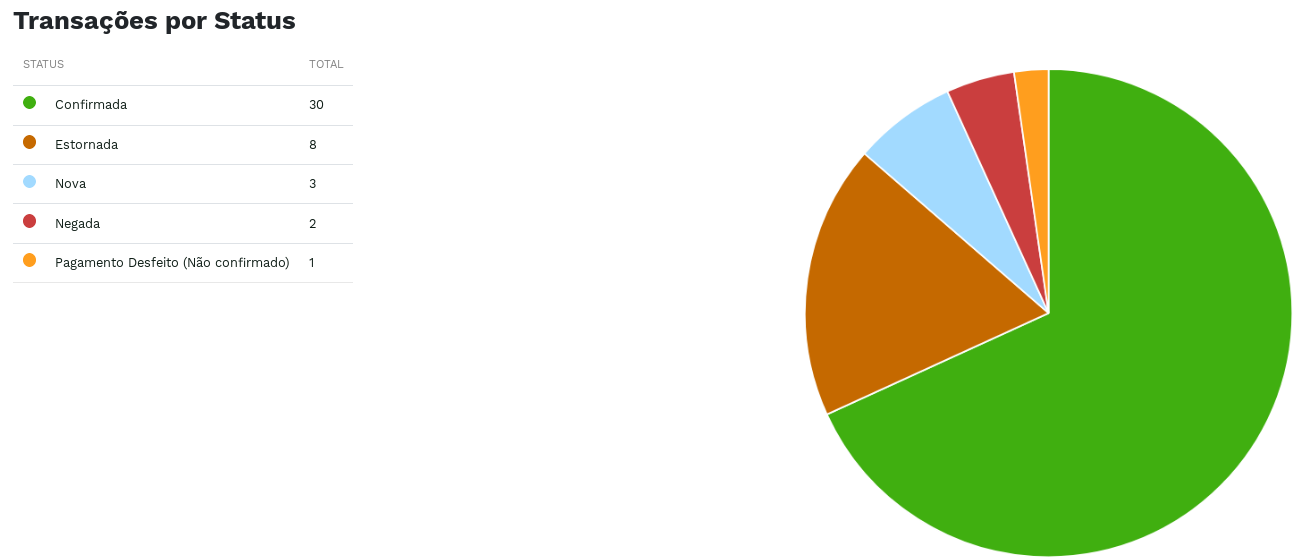
The BACK button returns you to the portal home page.
Report: Storage
The Storage Report allows you to view all card stores registered in your stores in a certain period of time. Various filters are applicable in the listing of storages, and features such as graphics are also available to the merchant.
To access this report, place your mouse cursor over the link Reports from the main menu, and a sub-menu will appear. Then click on Storage Report:
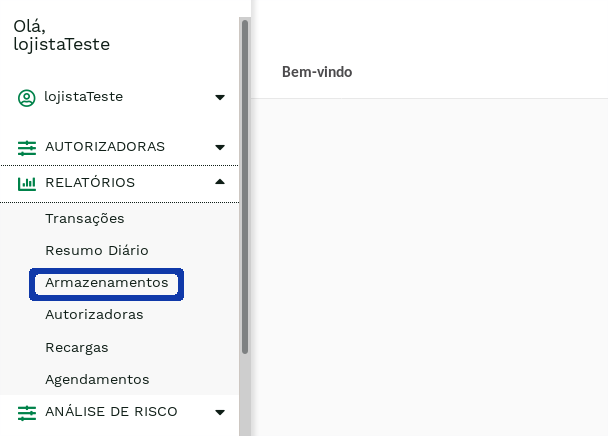
The displayed screen will be similar to the one below.:

On this screen, the merchant has the option of defining filters that he/she wants to apply before generating the list of stores for the specified period of time. To select additional filters click on the icon next to the Search button:
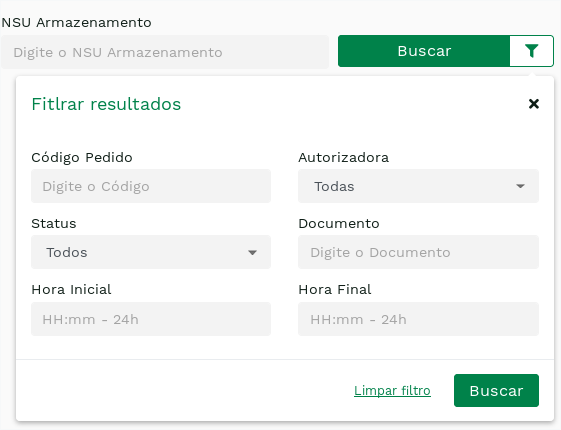
The following table describes the possible filters for this report:
Table 1: Storage Report Filters.
| Filter | Description |
|---|---|
| Start Date <span style={{ color: 'red' }}>* | Initial reference date for listing transactions |
| End Date <span style={{ color: 'red' }}>* | Final reference date for listing transactions |
| Storage's NSU | Unique number corresponding to card storage |
| Order | Identification of the order placed at the store |
| Start Time | Reference start time for listing transactions |
| Final Time | Reference end time for listing transactions |
| Document | Customer Personal Documents |
| Store Code | Registered store for the merchant |
| Authorizer | Credit Card Authorizer Company |
| Status | Storage Status (New, Awaiting user, Confirmed, Duplicate, Canceled, Denied, Invalid, Blocked, Abandoned, Expired). |
Attention
Note that the Date fields with <span style={{ color: 'red' }}>* marking are mandatory and must not exceed a difference of 3 (three) months.
It is noteworthy that the Start Time and End Time fields are only applied if the Date filter corresponds to a single day (that is, it presents the same day in both the Start Date and the End Date). If the time period is longer than one day, the time fields will be ignored in the storage listing.
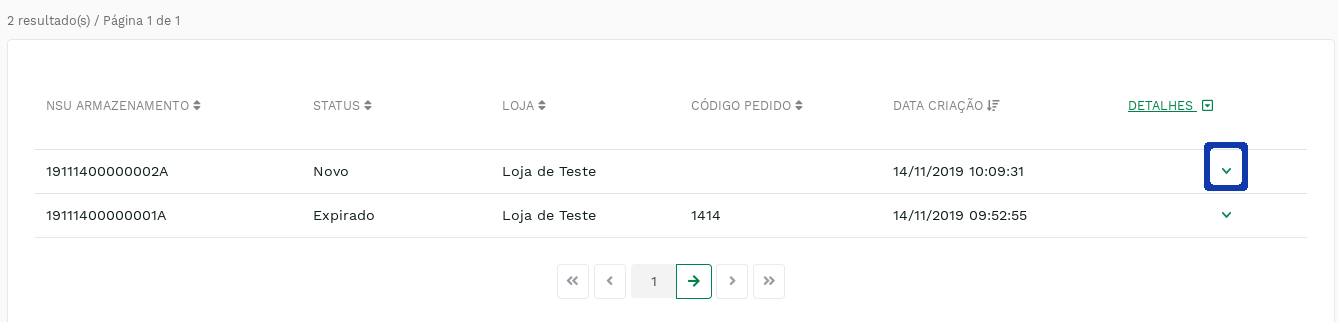
Finally, after defining the desired filters, just click on Search. You will receive a list of all storages that meet the specified criteria. The screen looks like the following:
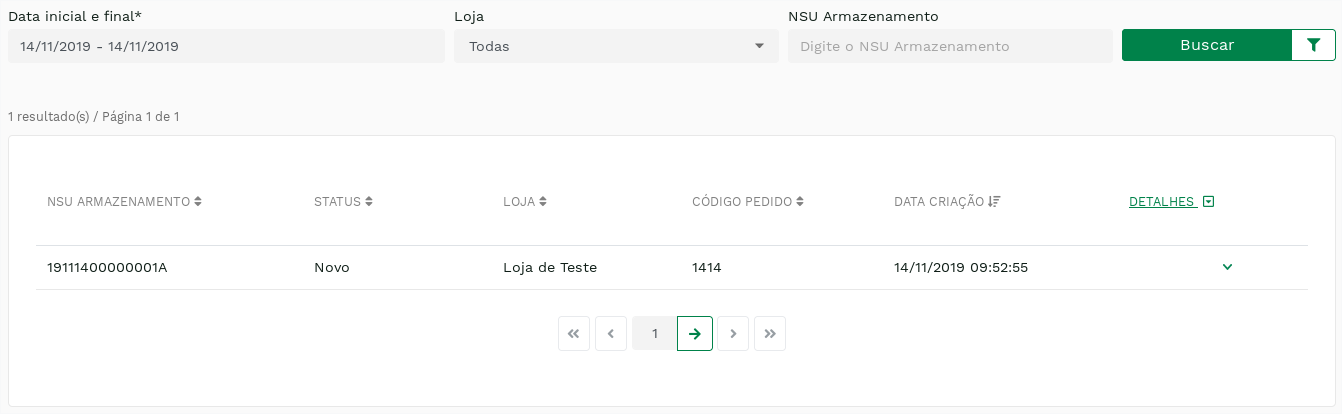
In this list, there are several useful features for the merchant. For example, it is possible to sort the storages in numerical or alphabetical order of some of the main parameters. To do this, just click on any of the parameter titles – NSU STORAGE, STATUS, STORE, ORDER, CREATED DATE.
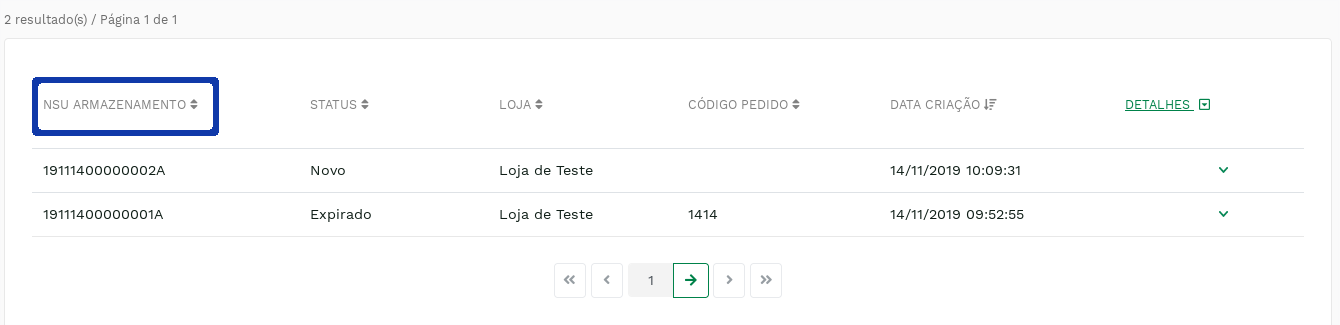
Clicking once sorts the storages in ascending order. Clicking again sorts them in descending order. The listing default is to arrange the storages in order from most recent to least recent.
You can also see more details about storage. To do this, just click on the icon , at the end of the line corresponding to storage:
The displayed screen will be similar to the one below:
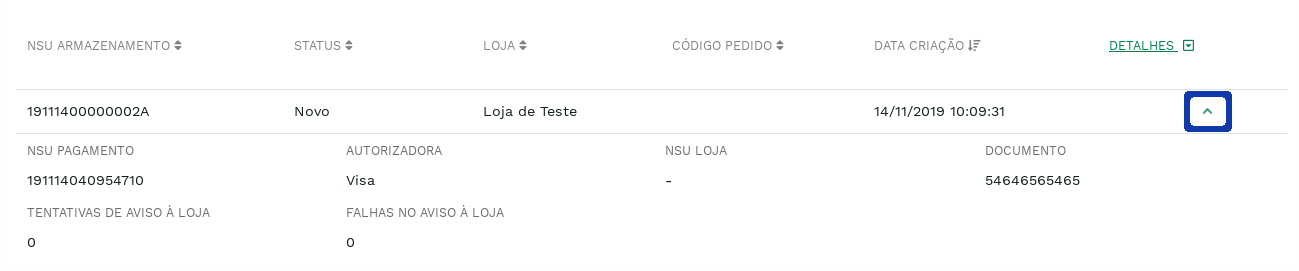
You can hide these details by clicking on the icon , at the end of the line corresponding to the storage (in the same place where the icon was clicked ).
You can also view details of all storages in the list. To do this, just click on the DETAILS parameter title. Clicking once displays details of all storages in the list. Clicking again hides all details.
Report: Recharge
The Recharges Report allows you to view all the recharges registered in your stores in a certain period of time. Various filters are applicable in the list of refills.
Attention:
To view the Recharges Report, the operating team must release the necessary permission.
To access this report, place your mouse cursor over the link Reports from the main menu, and a sub-menu will appear. Then click on Recharges Report:
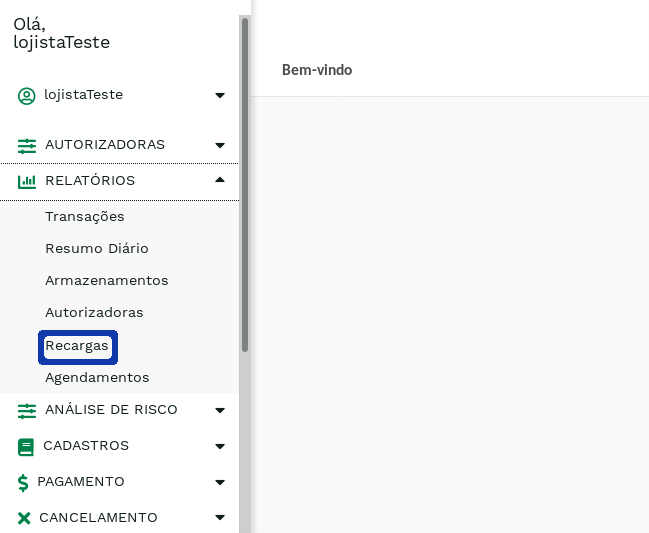
The displayed screen will be similar to the one below:

On this screen, the merchant has the option of defining the filters he/she wants to apply before generating the list of recharges for the specified period of time. The following table describes the possible filters for this report:
Table 1: Recharges Report Filters.
| Filter | Description |
|---|---|
| Start Date <div style={{ whiteSpace: 'nowrap' }}>Data Inicial <span style={{ color: 'red' }}>* | Initial reference date for listing transactions |
| End Date <span style={{ color: 'red' }}>* | Final reference date for listing transactions |
| Store Code | Registered store for the merchant |
| Cell phone Company | Cell phone Company on which the recharge was performed (Vivo, Claro, Oi, Tim) |
| Store Code | Registered store for the merchant |
Attention:
Note that the Data fields, with tag <span style={{ color: 'red' }}>*, are mandatory and must not exceed a difference of 3 (three) months.
Finally, after defining the desired filters, just click on Search. You will receive a list of all recharges that meet the specified criteria. The screen looks like this:
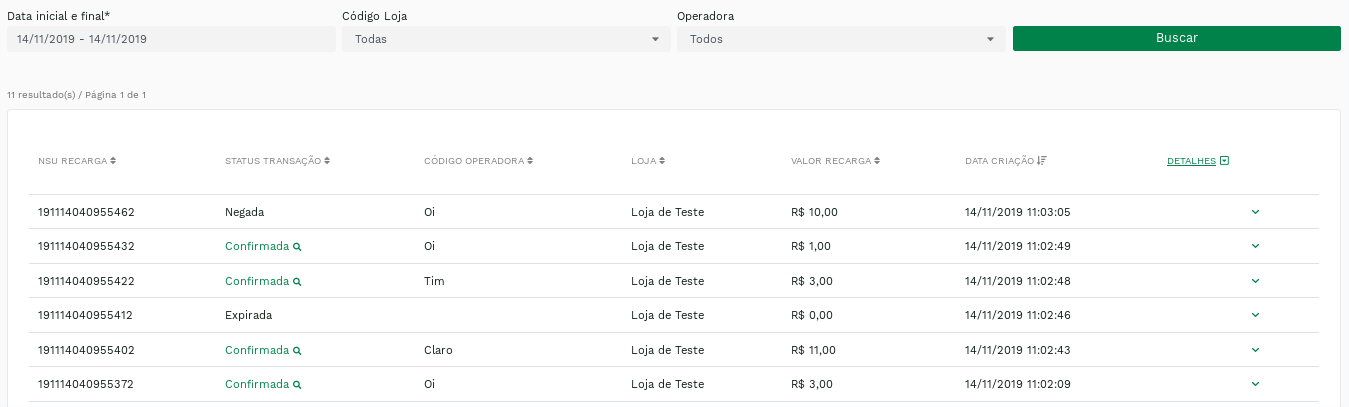
In this list, there are several useful features for the merchant. For example, it is possible to sort the recharges in numerical or alphabetical order of some of the main parameters.
To do this, just click on any of the parameter titles – NSU RECHARGE, TRANSACTION STATUS, CELL PHONE COMPANY, STORE, DATA CREATION.
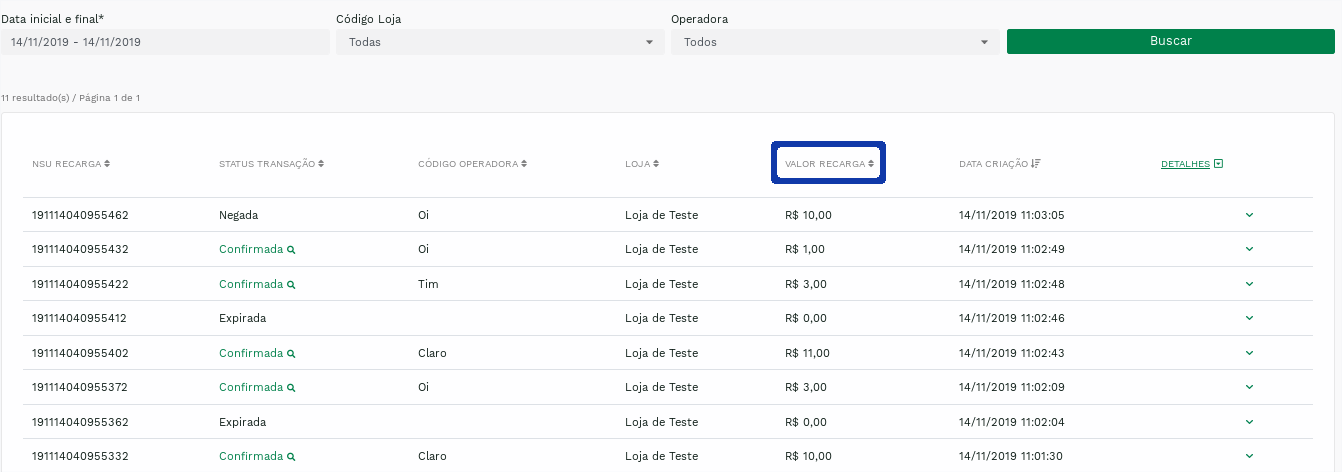
Clicking once sorts the recharges in ascending order. Clicking again sorts them in descending order. The default listing is to arrange the recharges in order from most recent to least recent.
It is also possible to see more details about the recharge. To do this, just click on the icon , ao final da linha correspondente à recarga:

The displayed screen will be similar to the one below:
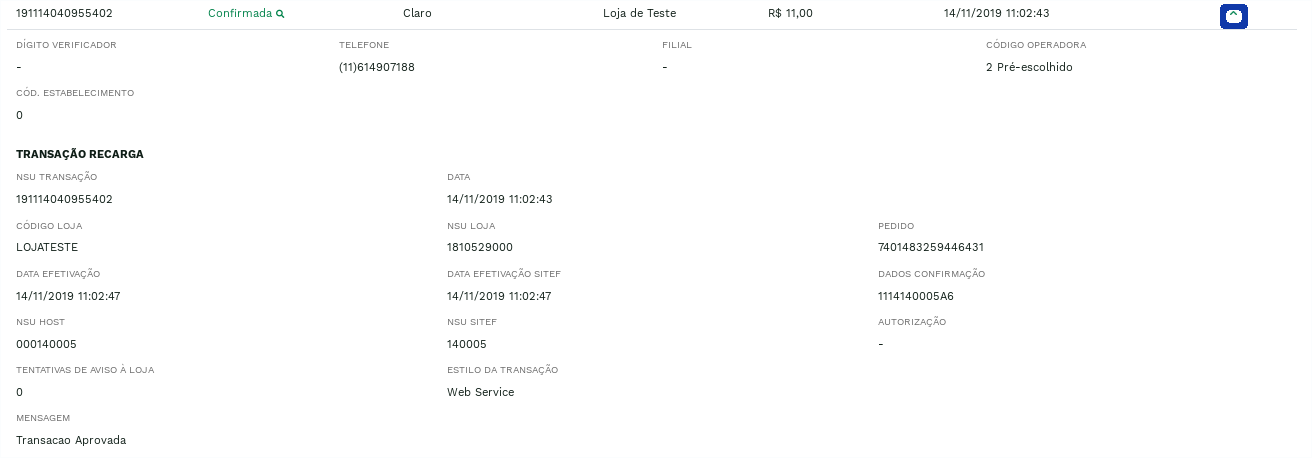
It is possible to hide these details by clicking the icon , at the end of the storage's corresponding line (in the same place where the icon was clicked ).
It is also possible to view the details of all recharges in the list. To do this, just click on the DETAILS parameter title. Clicking once displays details of all stores in the list. Clicking again hides all details.
Attention:
Note that the recharge transaction also carries(within the details) information about the related payment transaction. This payment transaction appears in the Transaction Report as well.
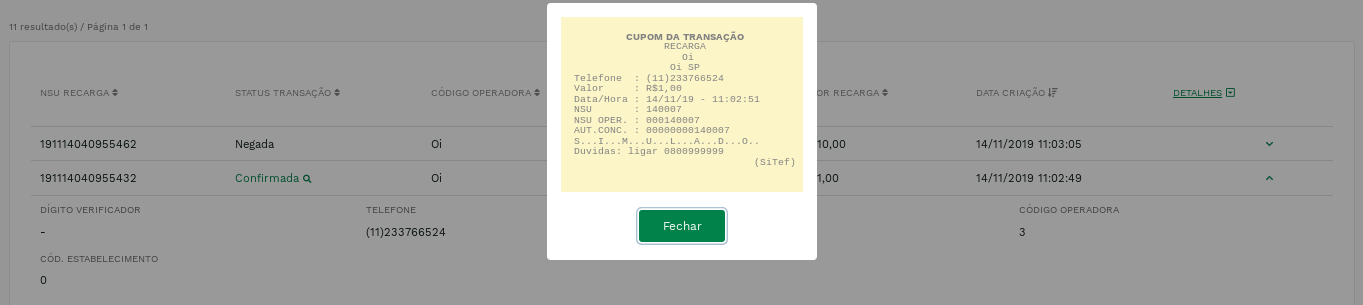
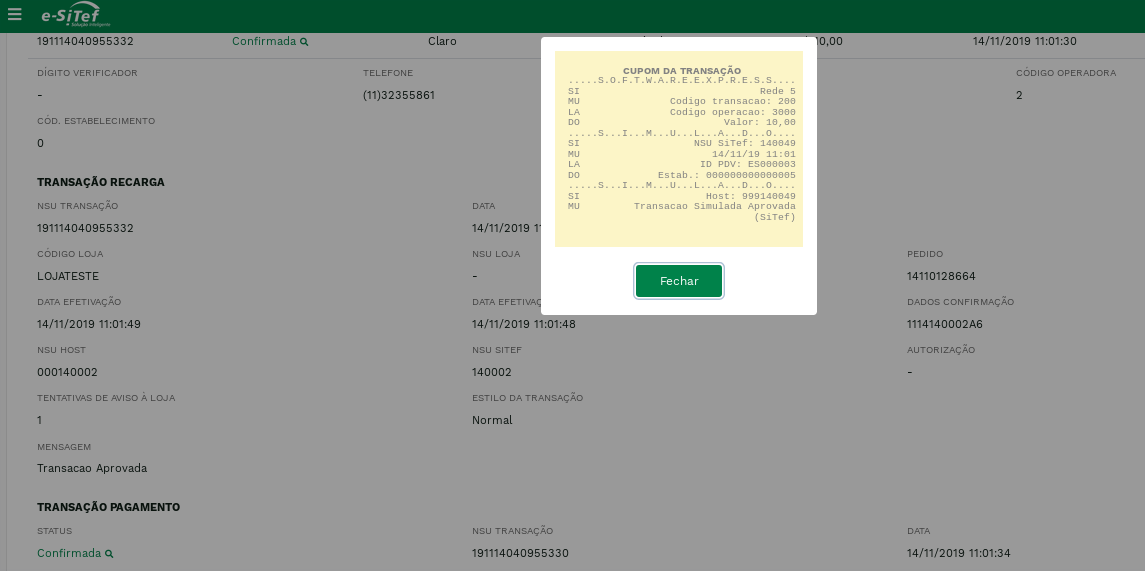
One more feature, present in the Recharges Report, is the display of receipts, both for the recharge and the payment made.
To view the recharge receipt, just click on status Confirmed, which is in bold, in the recharge line:

There is only recharge receipt in case of status confirmed. The receipt will come into focus on the screen, as you can see in the figure below:
You can also view the payment receipt. To do this, just click on the status Confirmed of the payment transaction:
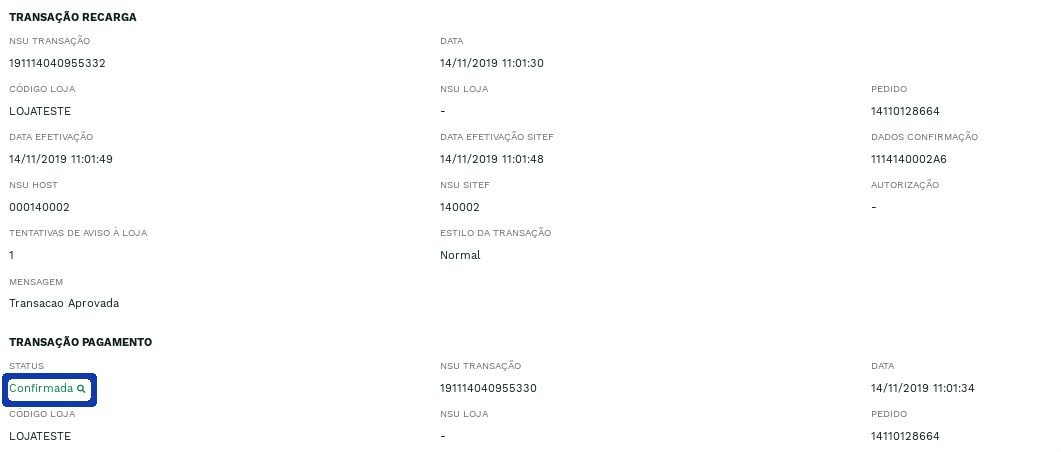
There is only payment receipt in case of status confirmed. The receipt will come into focus on the screen, as you can see below:
Web Page POS
Payment Via Virtual POS
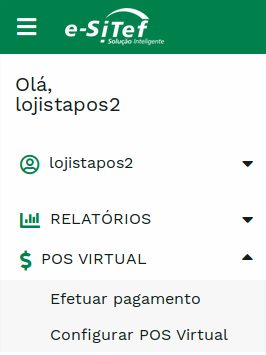
To access payment functionality via Virtual POS, click on the VIRTUAL POS menu and then on the Make payment submenu as shown in the following figure:
Attention:
The user must have the Virtual POS profile to access the functionality. For further information, see how tomanage users.
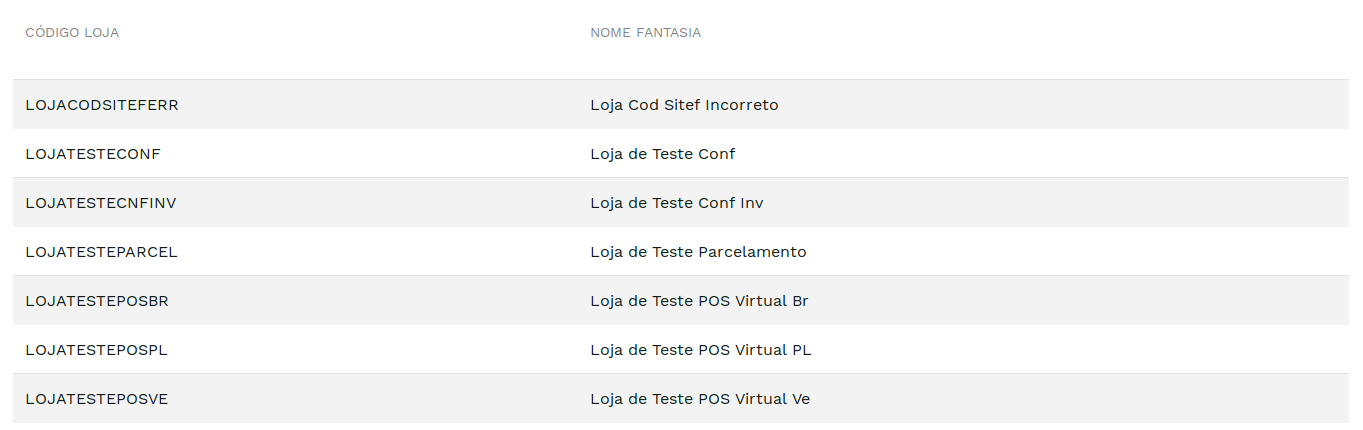
If the store has more than one registered store, the first screen will ask it to select one of them:
Attention:
If the store has only one registered store, the screen above will not be displayed.
Below is the home page for payment via Virtual POS:
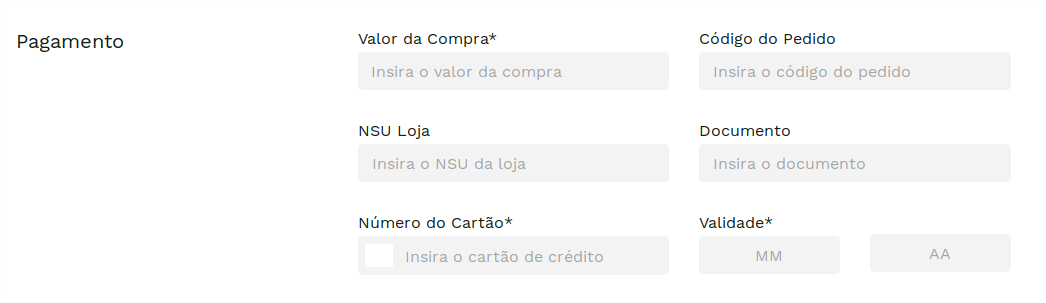
Description of fields:
| Field | Description | Format |
|---|---|---|
| Purchase Value | Purchase Value. The maximum value will be limited according to the setting. | < 10 N |
| Order Code | Purchase Order Code. It will be mandatory or not according to the configuration performed. | - |
| Store NSU | NSU (Unique Sequential Number) of the store. It will be collected or not according to the configuration performed. | |
| Personal Document | Customer's Personal Document. It will be collected or not according to the configuration performed. | < 20 N |
| Credit Card Number | Customer's Credit Card Number. Mandatory. | > 13 N e < 19 N |
| expiration date | Credit Card expiration date. Mandatory. | MM/AA |
With all fields filled in correctly, click on the Proceed button. The card lookup will be carried out.
At that time, a bin query will be carried out to identify the authorizer referring to the card number sent. If there is more than one identified authorizer, the Authorizer Selection option will be displayed, as shown in the following figure:
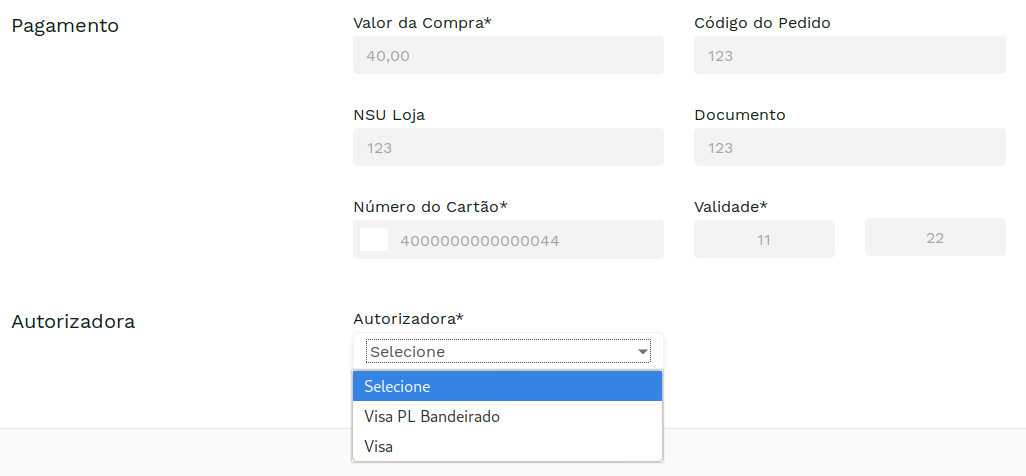
If only one authorizer is identified by querying the card number, the previous screen is not
displayed, moving to the Extra Data Entry screen.
After selecting the desired authorizer (if necessary), click the Proceed button.
As needed, some of the following data will be requested: Security Code, Document and Date
of Card Issuance. In the example below, only the security code was requested:
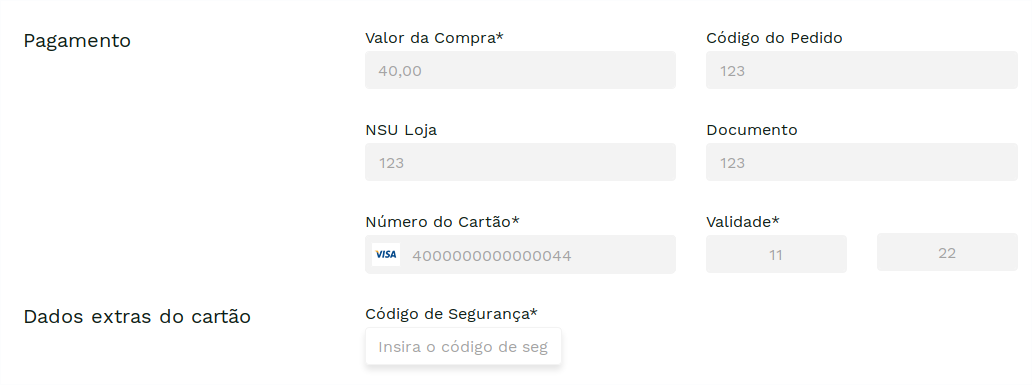
It is possible that no extra information will be requested. In this case, it will be asked directly to choose the payment installments.
The user must choose the form of installment payment and click on Proceed. After choosing, a message will be displayed to confirm the data entered.
Below, the screen for choosing installments:
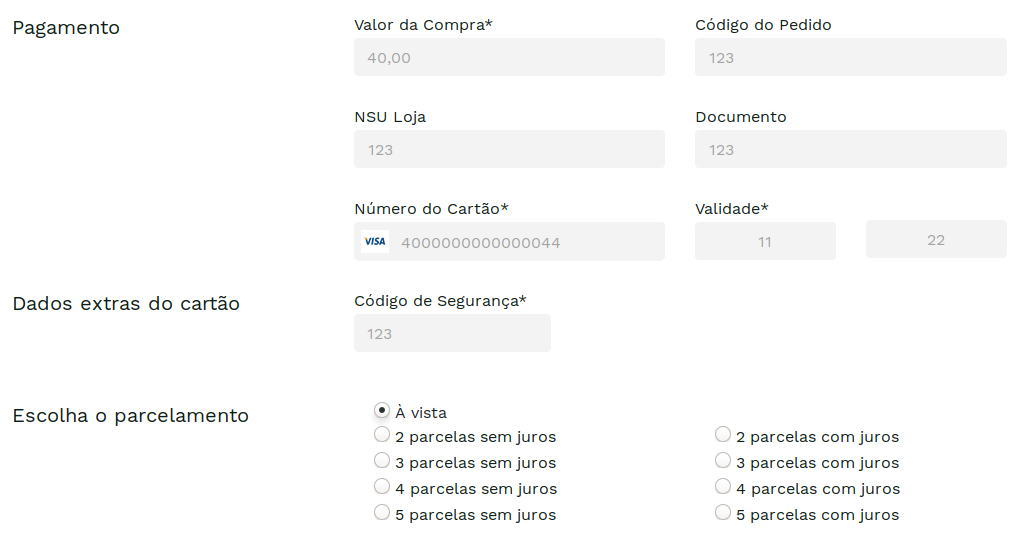
Attention:
This step will not be displayed if the store's Virtual POS is configured para bloquear parcelamentos.
After filling in all the data from the previous steps, a message for data verification will be displayed. If everything is correct, click on the Make Payment button.
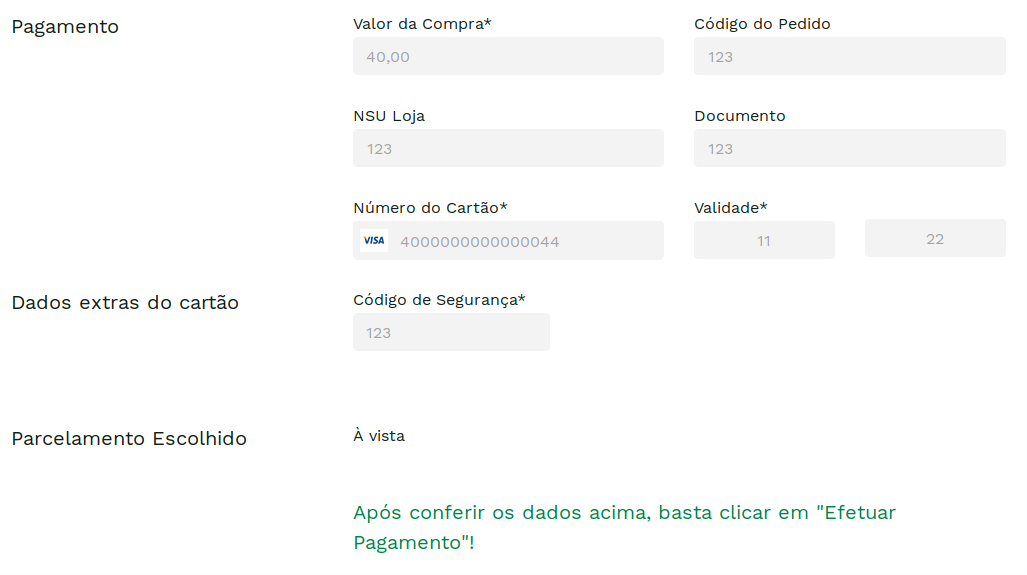
If payment is successful, the following screen will be displayed:
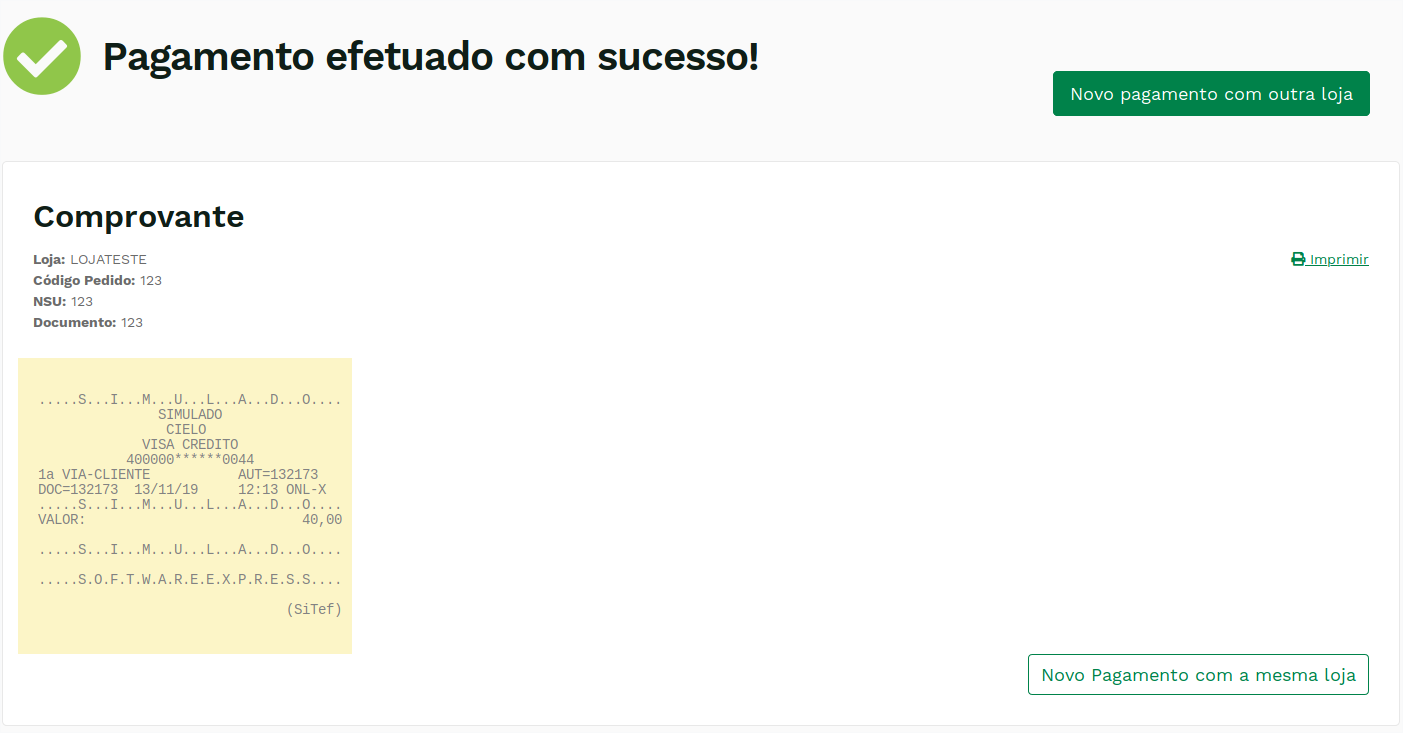
On the final screen you will be able to:
- Make a new payment with the same store.
- Make a new payment with another store.
- Print the Receipt.
To view the transaction report, visit the page about POS Transaction Report.
For more information on canceling transactions via Virtual POS, visit the page on Transaction Cancellation.
POS Transaction Report
To access POS transaction reporting functionality, click on the REPORTS menu and then on the POS Transactions submenu as shown in the following figure:
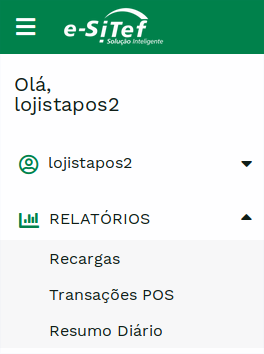
Attention:
The user must have the Virtual POS or Virtual POS Manager profile to access the functionality.
Below, the initial screen of the POS Transactions report:

Fill in the desired search filters and click on the Search button. If other filters are needed, click on the icon  beside the Search button:
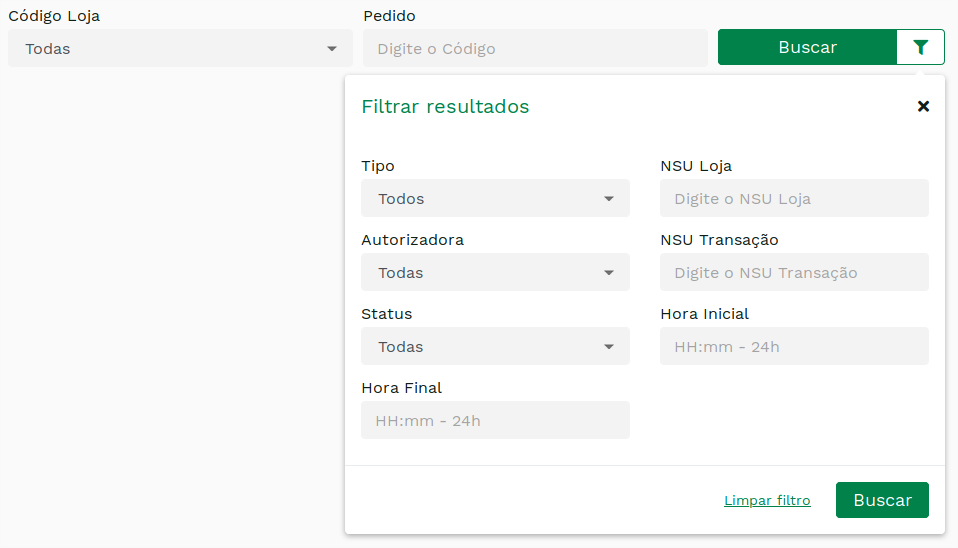
After clicking on Search, the results will be presented as in the figure below:
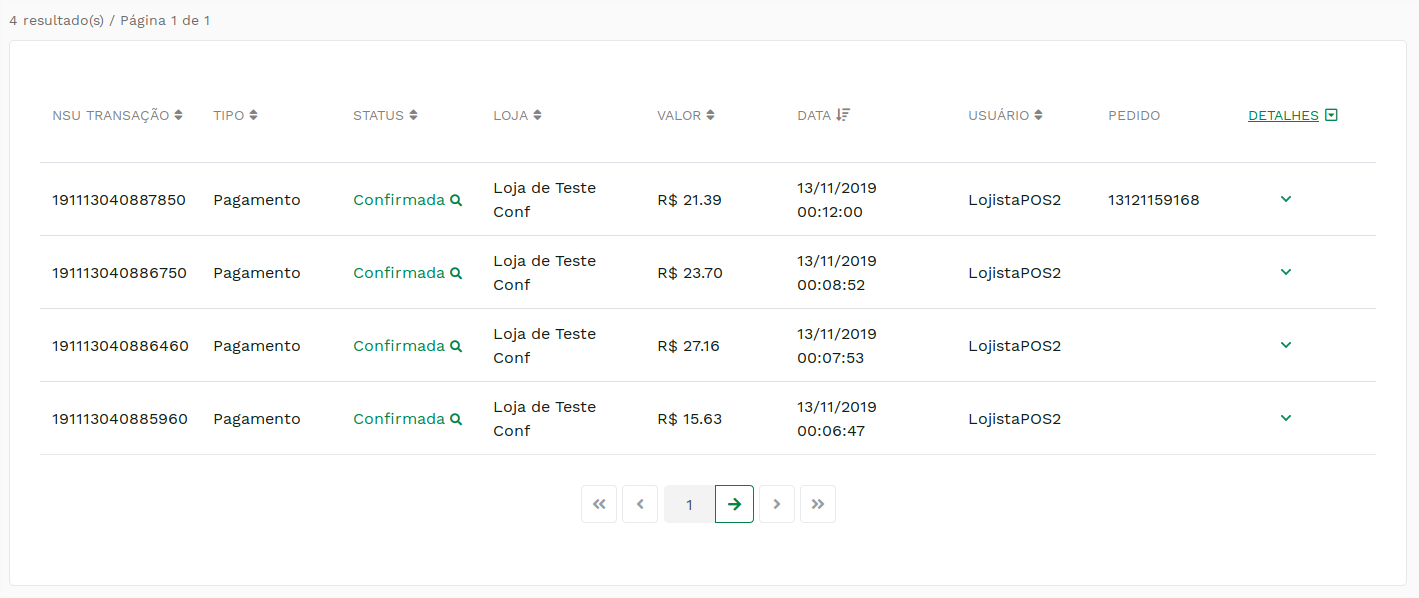
To view more details about a transaction, click the icon ao lado direito da transação:
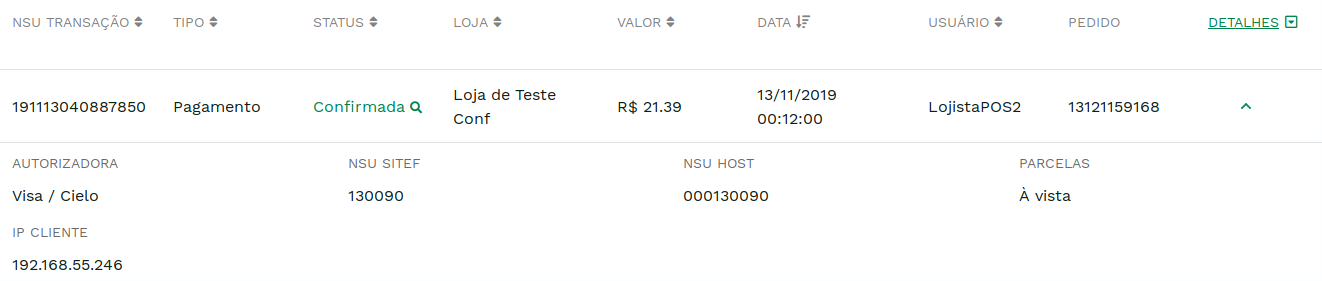
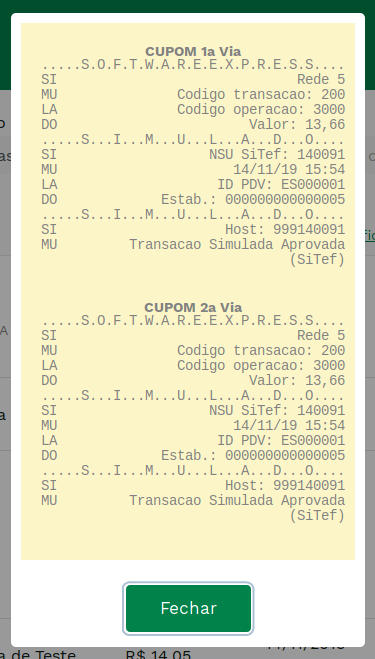
It is possible to view the receipt for a confirmed transaction by clicking on the transaction link  .A popup with the receipt will be displayed as in the figure below:
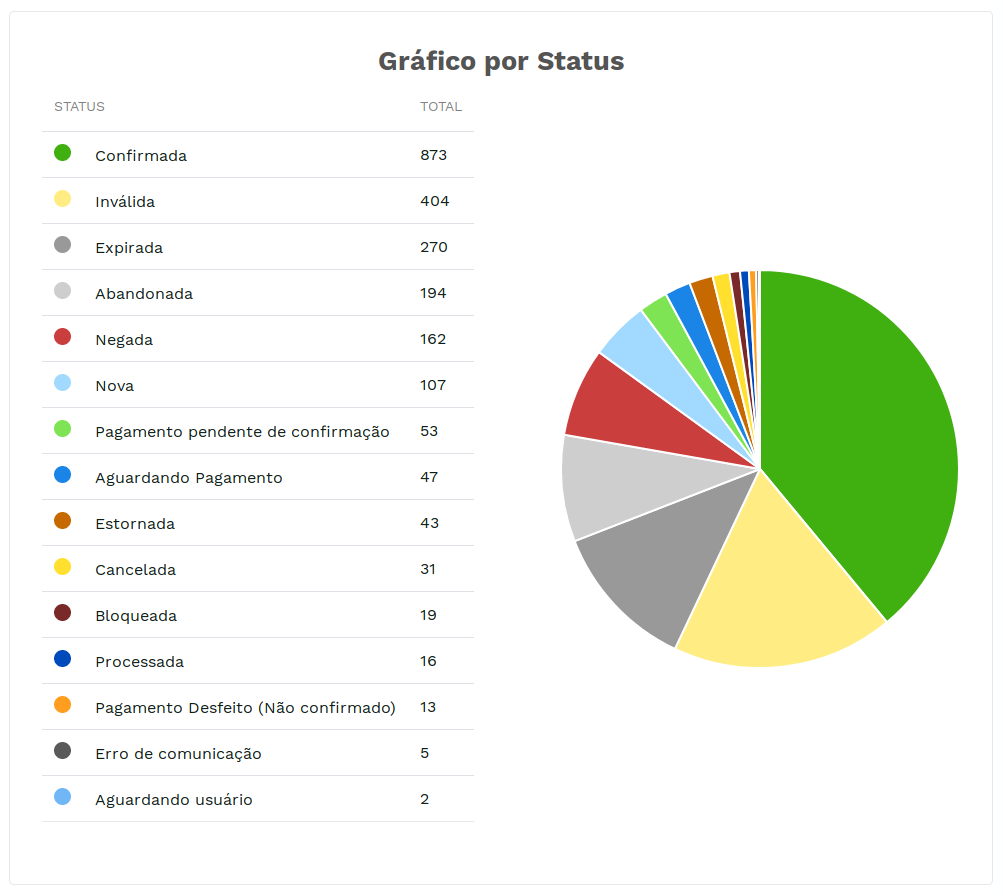
This functionality allows the presentation of charts with the distribution of transactions according to their status.
Attention:
The user must have the Virtual POS Manager profile to access the functionality.
To access the functionality, click on the link Generate Chart by Status which will be displayed after a search:
This functionality allows the presentation of graphs with the distribution of transactions according to the Authorizer (Credit Card Company + Routing) chosen.
Attention:
The user must have the Virtual POS Manager profile to access the functionality.
To access the functionality, click on the link Generate chart by Authorizer which will be displayed after a search:
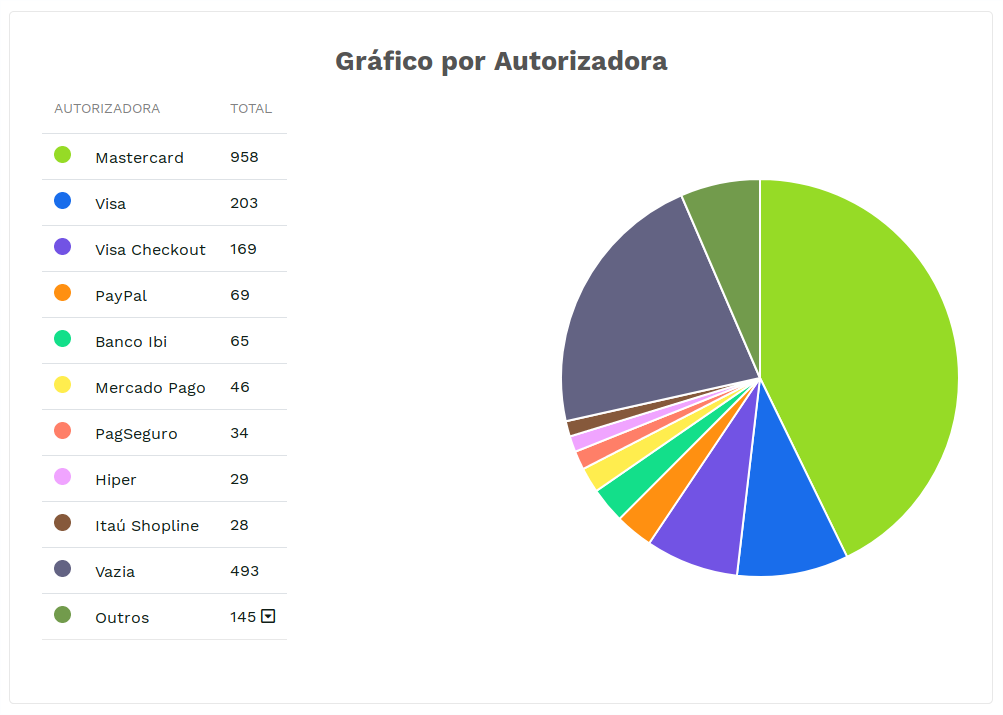
This functionality allows the user to download the report in csv (comma separated value) format.
Attention:
The user must have the Virtual POS Manager profile to access the functionality.
The file will contain the following transaction information:
| Field | Description |
|---|---|
| NSU | NSU (unique sequential number) in Carat Portal. |
| TIPO | Transaction type. |
| STATUS | Transaction Status in Carat Portal. |
| CODIGOLOJA | Store Code (merchant id). |
| NOMELOJA | Store's Trade Name. |
| PEDIDO | Order Code. |
| VALOR | Transaction value(cents). |
| DATACRIACAO | Transaction creation date in Carat Portal. |
| DATAEFETIVACAO | Transaction effectuation date in Carat Portal. |
| DATAEFETIVACAOOSITEF | Effectuation date on SiTef or direct acquirer. |
| IDAUTORIZADORA | Authorizer Code (authorizer id) in Carat Portal. |
| NOMEAUTORIZADORA | Authorizer name in Carat Portal. |
| TIPOPAGAMENTO | Transaction routing. |
| RESPOSTASITEF | SiTef Response Code or direct acquirer. |
| MENSAGEMSITEF | Response Message from SiTef or direct acquirer. |
| NSUSITEF | NSU in SiTef. |
| NSUHOST | NSU in Host. |
| NSULOJA | NSU in Store. |
| AUTORIZACAO | Authorization Code. |
| PARCELAS | Transaction installments. |
| FINANCIAMENTO | Type of financing. 3 – installments with interest 4 – installments without interest |
| TID | TID (Transaction ID) – identifies the transaction in the acquirer in direct integrations. |
| ECI | ECI (Electronic Commerce Indicator) – indicates the security level of the electronic transaction in relation to cardholder authentication. |
| ESTILO | Transaction Style. V - Virtual POS |
| AVISOS | Attempts to Alert the Store on HTML Transaction Status. |
| FALHAS | Failed Attempts to Alert the Store on HTML Transaction Status. |
| IPCLIENTE | End User IP. |
| DOCUMENTO | Personal Document / customerID. |
| USUARIO | Login of the user who performed the transaction in the Virtual POS. |
| MOEDA | Currency registered in the transaction, following ISO 4217. In many cases, it has only reporting value, depending on the acquiring network. Ex: For SiTef this information is not passed on. |
Attention:
New fields may be added to these without notice. If this file is processed by any system, it must always be prepared for the inclusion of new fields.
Virtual POS Configuration
Before starting operations in the Virtual POS, the store must, through the Carat Portal Store Portal, configure the Authorizers and their routes to be used in the Virtual POS.
The Virtual POS configuration screen allows the merchant to modify the parameters to be displayed and validated when paying via POS Virtual.
To access this functionality, click on the VIRTUAL POS menu and then on the Configure Virtual POS submenu as shown in the following figure:
Attention:
The user must have the Virtual POS Administrator profile to access the functionality. For more information, see how tomanage users.
If the store has more than one registered store, the first screen will ask to select one of them:
Attention:
If the store has only one registered store, the screen above will not be displayed.
Below, the Virtual POS configuration screen:
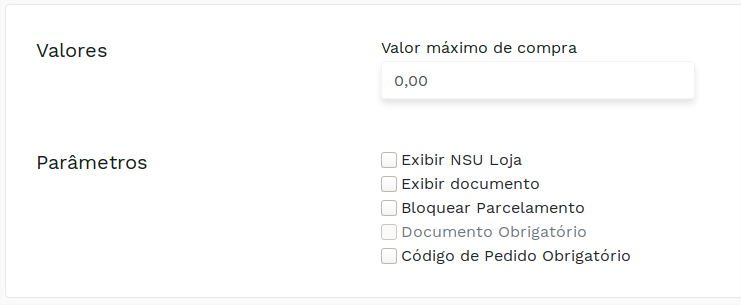
Below is the table with the description of the available configurations:
| Field | Description | |
|---|---|---|
| Maximum purchase value | Maximum purchase value that will be allowed in a payment via Virtual POS. | < 12 N |
| View Store NSU | If selected, displays the NSU Store collection field in the first payment step, via POS Virtual. | - |
| Show Personal Document | If selected, displays the buyer's document collection field in the first step of payment via POS | - |
| Block Installment | If selected, it will not allow the user to select installments and will automatically pay in cash. | - |
| Mandatory Personal Document | If selected, it makes filling out the document mandatory in the first step of Payment via Virtual POS. It will only be editable if the option Display document is enabled. | - |
| Mandatory Order Code | If selected, it makes the filling of the Order Code mandatory in the first step of Payment via Virtual POS. | - |
To make a POS Virtual POS payment, see the page on Virtual POS Payment.
Web Page POS Recharge
Recharge Via Virtual POS
To access the recharge functionality via Virtual POS, click on the RECHARGE POS menu and then on the Recharge Cell Phone submenu as shown in the following figure:
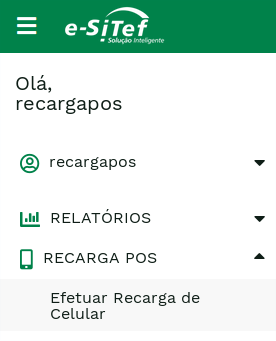
Attention:
The user must have the Recharge via Virtual POS profile to access the functionality. For more information, see how users management.
If the merchant has more than one registered store, the first screen will ask you to select one of them:
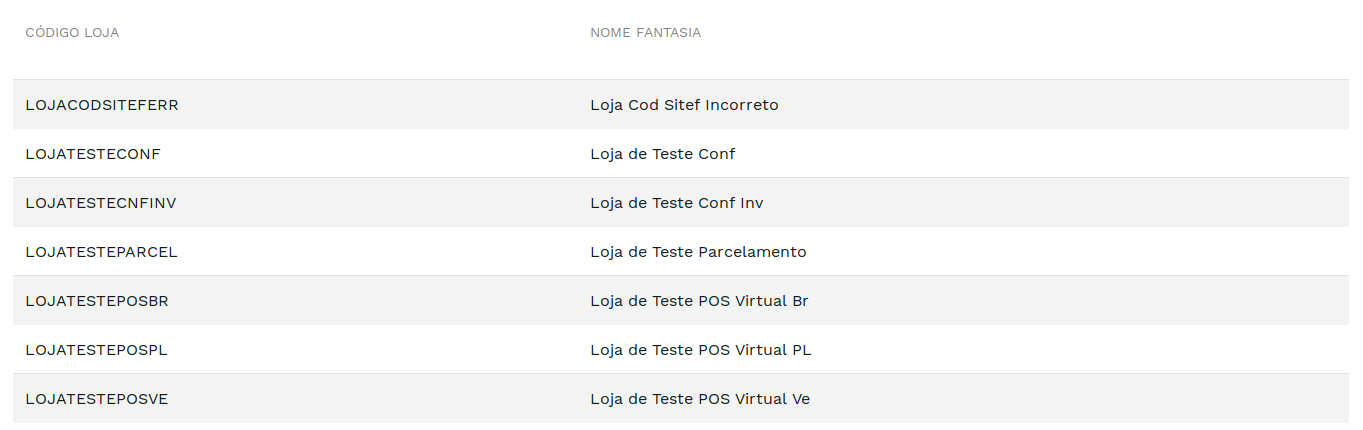
Attention:
Se o lojista possui apenas uma loja cadastrada, a tela acima não será apresentada.
To perform top-ups through the Merchant's Portal, a second authentication step is required to ensure security during transactions.
IMPORTANT: This authentication is essential to perform recharge operations via Virtual POS. For more information about this authentication and how to enable it, click here.
On the initial POS recharge screen, enter the customer's cell phone information:
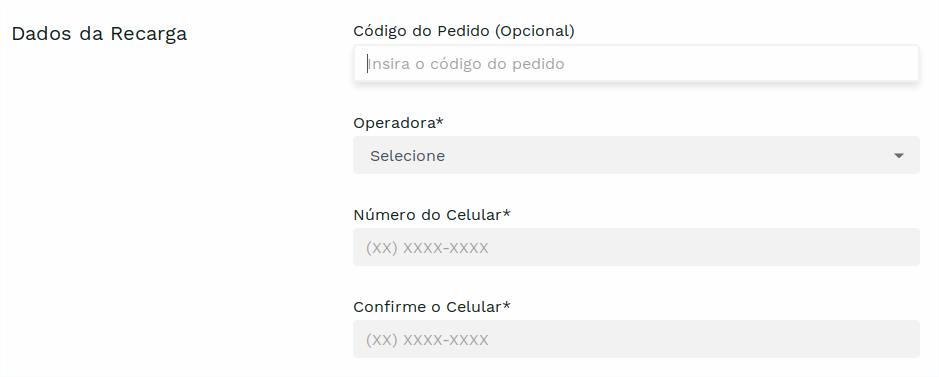
| Field | Description | Format |
|---|---|---|
| Order Code | Recharge order code. Optional. | < 12 N |
| Phone Company | Phone Company of the mobile phone to be recharged. | - |
| Cell phone number | Mobile phone number to be recharged. | < 11 N |
| Cell Phone confirmation | Confirmation of mobile number to be recharged . | < 11 N |
After filling in all the data correctly, click on Confirm Number. A consultation of the number will be carried out and the recharge values ​​will be presented.
Recharge details will be displayed at the bottom of the screen.
In case of fixed values, select the desired value and click on Proceed to Authentication:
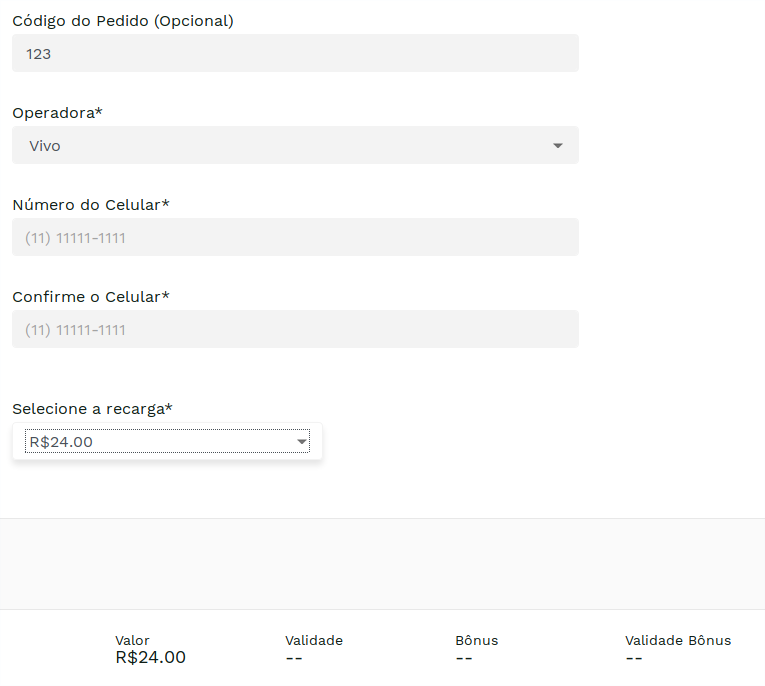
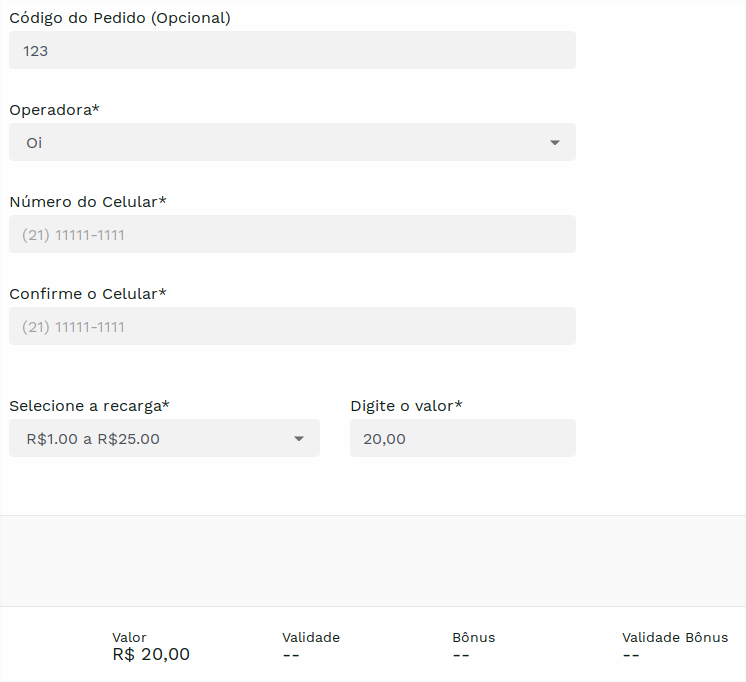
In case of variable values, select a range of values, type the desired value on the side (the value must be within the limits of the selected option) and click on Proceed to Authentication:
When confirming the recharge data, you will need to use the Google Authenticator to validate the recharge.
Open the app and enter the 6-digit token on the screen below:
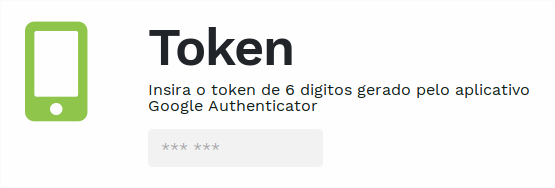
After entering the token, click on Confirm Recharge.
Attention:
If the token is typed 3 times incorrectly, the recharge will be invalidated and the process must be restarted.
If the recharge is successfully done, the following screen will be displayed:
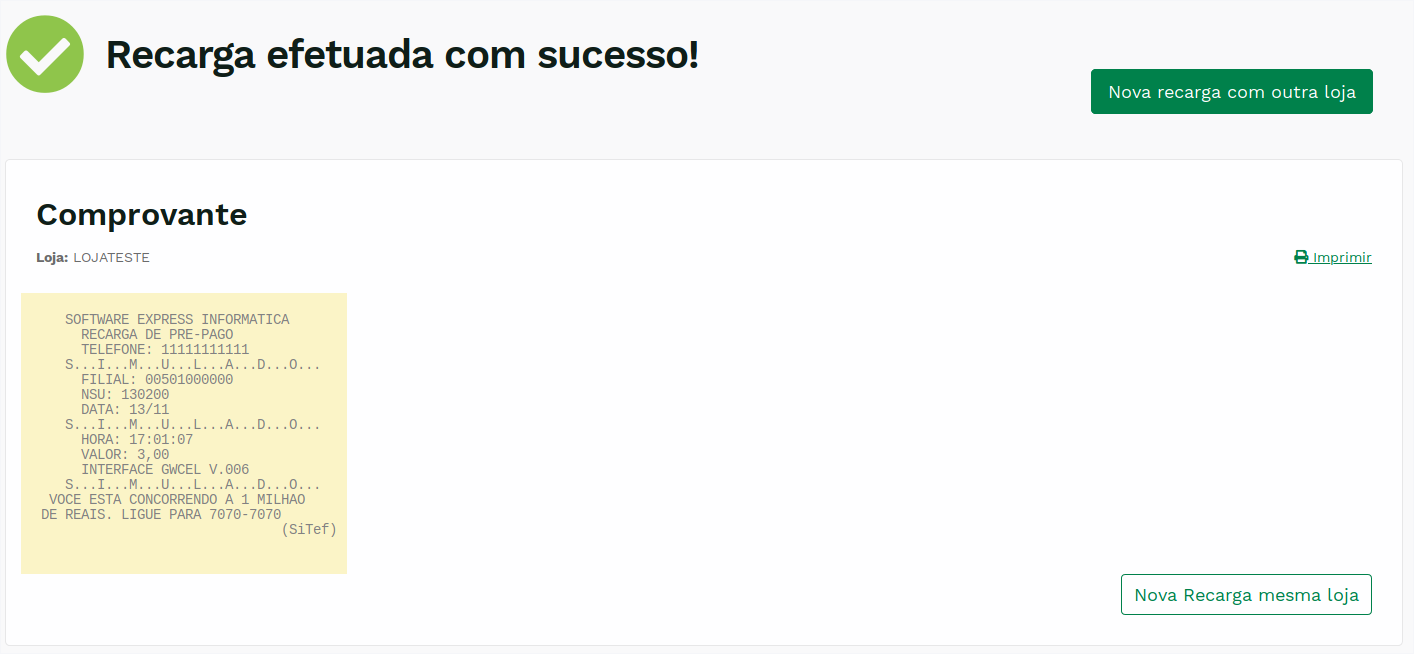
On the final screen you will be able to:
-
perform a new recharge with the same store.
-
perform a new recharge with another store.
-
Print the receipt.
To view the recharges done report, visit the page Recharge Report via POS.
There is no possibility of canceling mobile phone recharges. If you have any questions, please contact support.
Updated about 2 months ago